Page 43 of 191
Re: On my Workbench - North Eastern.
Posted: Tue Jan 17, 2012 9:30 am
by ceejaydee
Thanks J; the mouldings will certainly save much repetitive cutting of plastic and represent good value compared with the time it would take to make from scratch.
Re: On my Workbench - North Eastern.
Posted: Tue Jan 17, 2012 10:15 am
by jwealleans
I started using them when I started scratchbuilding interiors, partly to save time and partly because they strengthen the structure when glued rear and base. The new owner of the business is a little bit erratic when it comes to supply but everything turns up eventually.
Re: On my Workbench - North Eastern.
Posted: Fri Jan 20, 2012 11:10 pm
by Blink Bonny
jwealleans wrote:Morning chaps,
Graeme's almost right - they are Coopercraft but not on a strip; they come cut to length for either corridor or non-corridor coaches. Items STSCOR or STSFWT
here. They're my default seating option and have been for some time.
I think Southern Pride do the cut to length strips.
I thought Southern Pride did resin or plastic moulded "to size" seats.
The cut to length ones I know of are Ratio.
Re: On my Workbench - North Eastern.
Posted: Sat Jan 21, 2012 1:47 pm
by jwealleans
You may be right, BB. I can't say I've used either.
Coaches now have roofs affixed and filler is drying. That doesn't make for very interesting photography, so here are a few other things I've been messing about with:
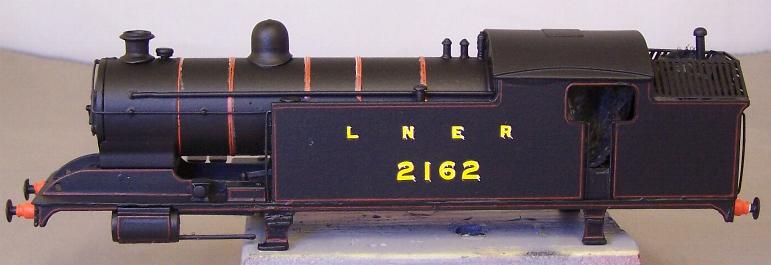
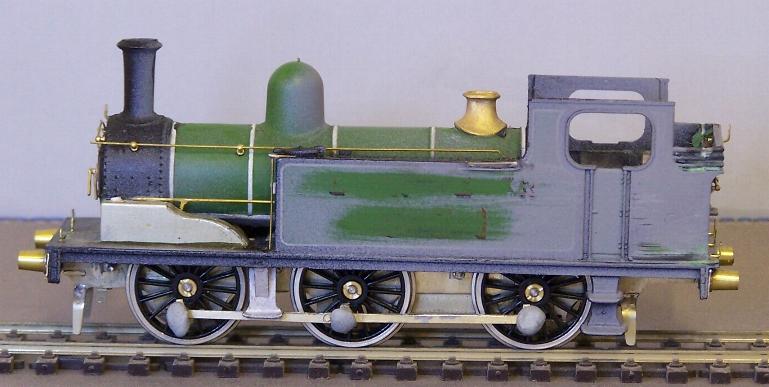
I volunteered to repaint and line the A8 for Ormesby over the winter. The boiler bands are done with what I think must have been Modelmaster lining, given the way the lines kept detaching from the carrier film. The rest is Bob Moore.
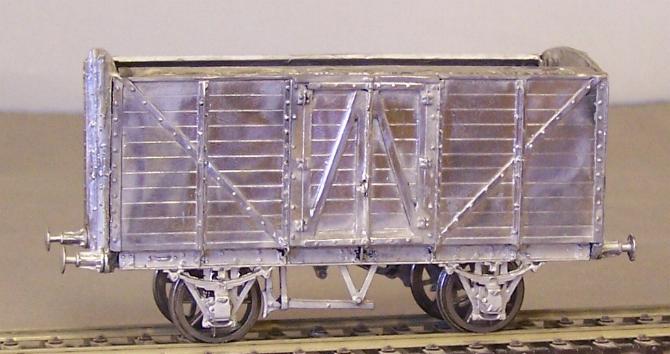
This was in a lot of cast kits on Ebay which someone pointed out on here. It was in bits (although described as 'well built') and so didn't seem to attract much attention. I know a GE 10 ton van when I see one, though. It came yesterday morning, went straight into the Nitromors and half an hour last night saw it put back together. I'll probably have to replace the brakes as I want to put it into BR livery and I believe they may all have had 4 brake blocks by then.
Finally another parcels van. I've had these for years and done nothing with them, but the simple expedient of using the box for something else so they're on the test rack and in my eyeline has got me working on them. I though this one would be as simple as a few lamp irons and a repaint, but closer examination showed that the builder had failed to fit any handrails (and had blocked up the holes for some, so I assume it was a deliberate decision). Anyway, a bit of bent wire later it's about ready for primer again.
Re: On my Workbench - North Eastern.
Posted: Sat Jan 21, 2012 4:54 pm
by ArthurK
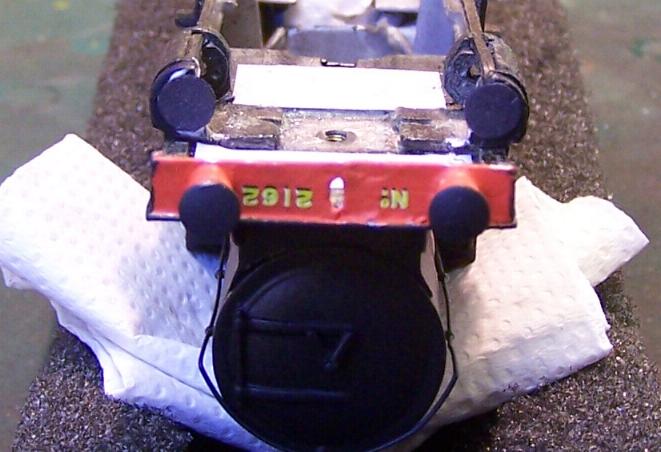
I cammot let the photo of the A8 2162 pass without comment as it holds a place in my memory. Apart from being the first rebuild from the NER 'D' 4-4-4T two of us were 'doing' the shed at West Hartlepool and there was 2162 on the roundhouse turntable. Unfortunately (?) the driver spotted us and fearing the worst he came across to us. His comment - "you shouldn't be here so push that around". So that was our penance. I will never forget!
ArthurK
Re: On my Workbench - North Eastern.
Posted: Sat Jan 21, 2012 6:03 pm
by jwealleans
I hope he'd got it well balanced, Arthur, or you would have felt that in your legs for a few days!
Re: On my Workbench - North Eastern.
Posted: Sat Jan 21, 2012 8:16 pm
by ArthurK
Ar least there were two of us. We were about sixteen at the time. We had cycled down from Tyneside and later took in Stockton and nosed around Darlington works later. Quite a day that was. 1621 was in the old paint shop(?) at that time. I seem to recall a surviving electric was aqround too and a Sentinal railcar, can't remember which.
ArthurK
Re: On my Workbench - North Eastern.
Posted: Wed Jan 25, 2012 9:54 pm
by jwealleans
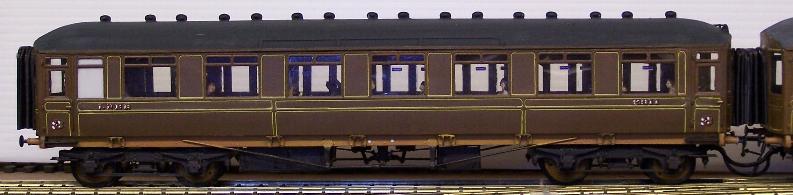
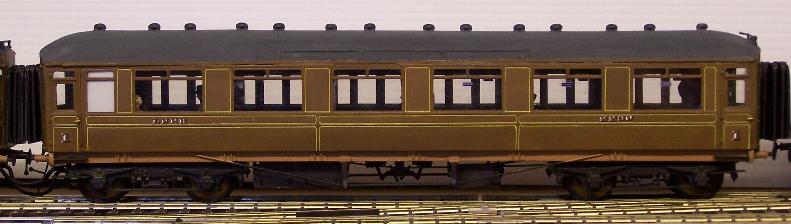
Some updates worth posting after a few days fiddling about. First of all the coaches are about finished. There are one or two bits of paintwork to touch up but I'll leave them for a couple of weeks now and come back to them with fresher eyes. I will probably give them a run round Pilmoor on Monday as a test, so there may be more photographs then.
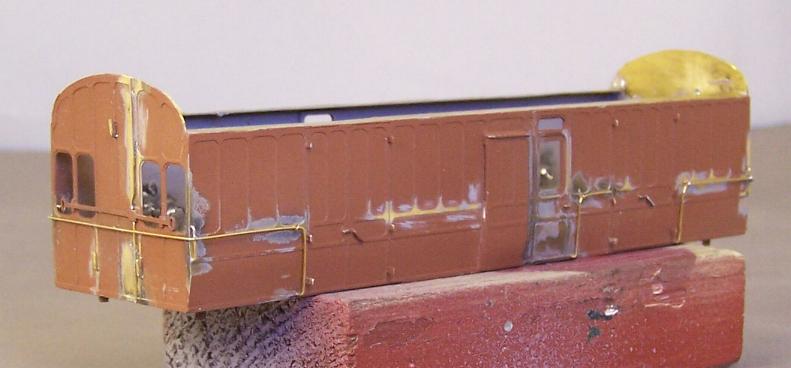
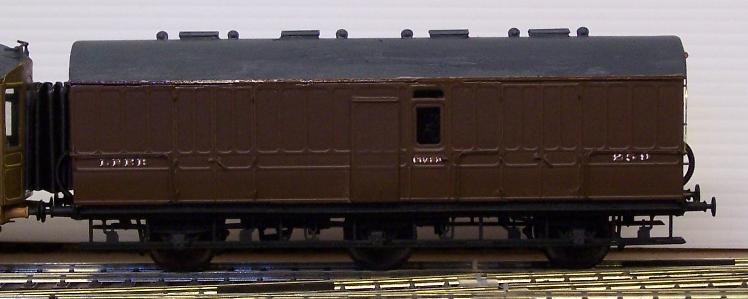
I've just about done the passenger brake as well. The shiny bits are where I painted up the cornice to match the body after gluing the roof in place. The roof needs another coat and then it'll get a blow over with satin varnish again. I also realised that I'd forgotten a handrail, which you can just about make out unpainted at the right hand end.
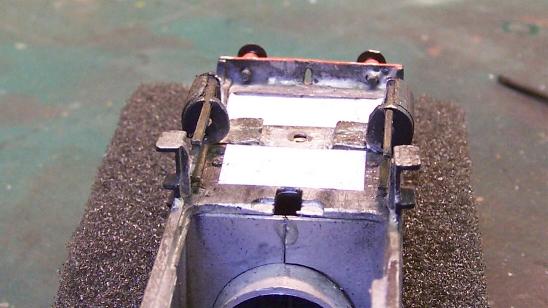
Now a couple of different jobs. When I took the A8 apart to paint it, I removed the insulating arrangement from the front cylinders. This consisted of a piece of electrician's tape over the cylinders and across the underside of the front of the body. Now it's painted I needed to put something equivalent back. These locos are notorious for shorting on curves, as are the B16s - in fact our B16 on Pilmoor can only be used 'down' because it won't go round the 'up' curves.
The cunning plan we came up with on Monday night was as follows:
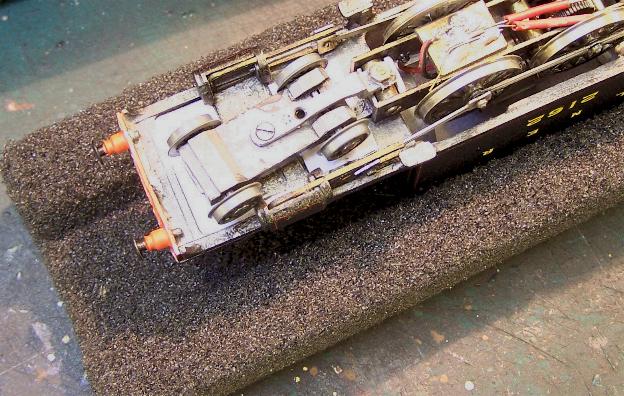
This is the problem - the front bogie wheels touch the front edge of the cylinder very readily.
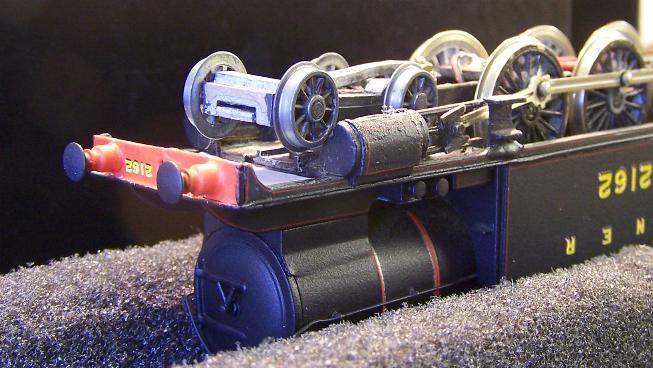
The cylinder had already been cut away in the past, possibly when the loco was built, to try to counteract this. I cut it further back, almost across the half way point.
To complete the cosmetic subterfuge, a couple of circles were punched out of black paper and stuck over the cylinder ends.
I'd like to say it worked perfectly, but I painted the wheels today so I haven't been able to test it yet. Full report to follow in due course.
Next a job Ian (Pennine) knows I've been going to do for months and kept forgetting. I have a GW open which I acquired and built last year, don't recall where from. I wanted to sheet it, but make the sheet removable so I can run it 'loaded' or 'unloaded'. The problem was how to make the sheet a realistic looking fit - and the wagon has a tarpaulin rail as well - but still be able to get it off. I had an idea but hadn't tried it. I'm pleased to say it seems to have worked.
First, wrapped the wagon in clingfilm.
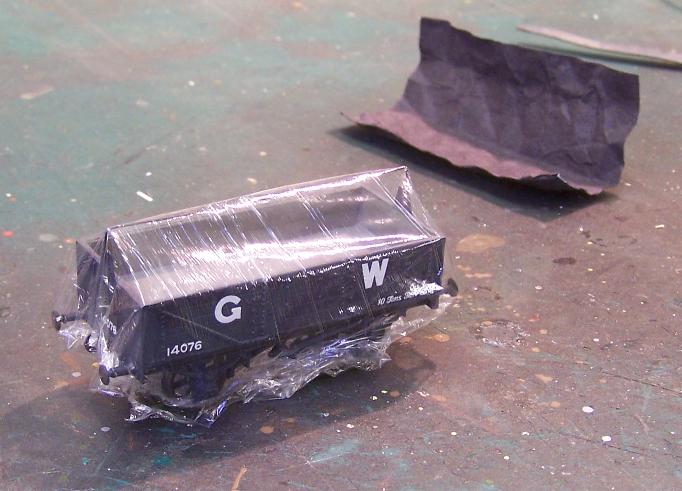
Then coated the back of the sheet (Roger Smith) liberally with PVA and stuck it on, folding and moulding it to the shape of the wagon and over the tarp rail. A rubber band holds it nicely in place while drying.
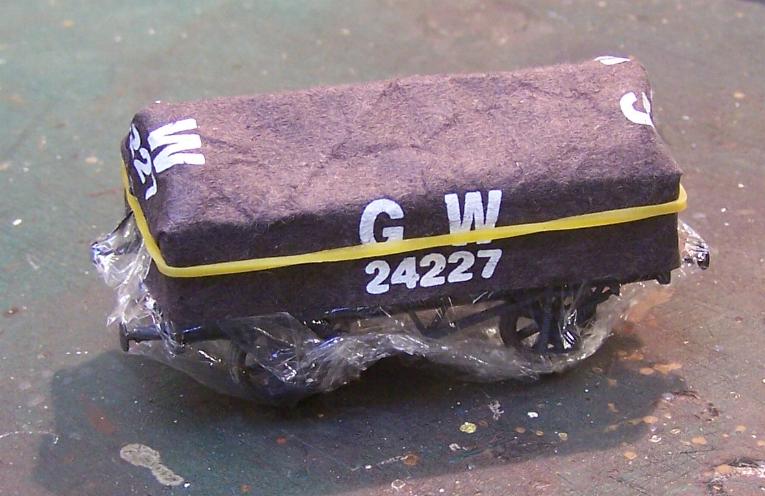
Once dry, only the absence of ropes is the giveaway - but that's an unavoidable compromise if you're going to be able to take it off.
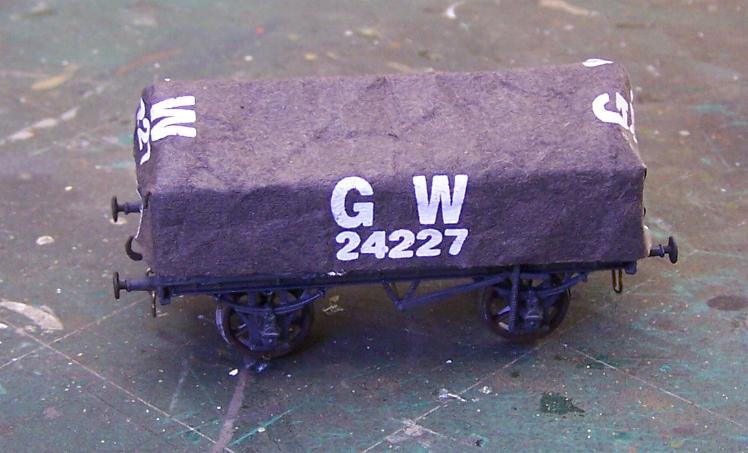
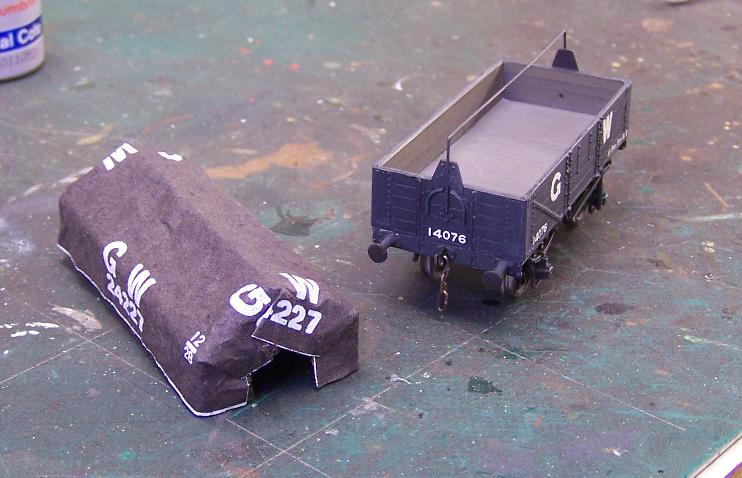
Judicious trimming to remove all visible evidence of the clingfilm and the sheet slides off easily. The PVA makes it quite rigid, but this may well get a bit of weathering and some matt varnish which ought to stiffen it up a bit more. I'll make a rolled sheet from plain black paper to put into the 'empty' wagon.
Re: On my Workbench - North Eastern.
Posted: Thu Jan 26, 2012 12:38 am
by mick b
Nice tarp good idea.
Re the bogie how about using the Comet etch bogie mounting version which uses a sliding slot design as the latest Hornbys or use a plastic bush where the swing lever is screwed to the chassis to insulate all of the bogie ?
Re: On my Workbench - North Eastern.
Posted: Thu Jan 26, 2012 9:32 am
by Atlantic 3279
I'd go for the Comet-style of curved bogie carrying slot too, but presumably, if the coupled wheels on one side of the loco are un-insulated, or if the motor has only one insulated brush, then isolating the bogie frame from the rest of the chassis won't stop all shorts. These will still occur when a bogie wheel rim on the "wrong" side of the chassis touches the metal of the "live to opposite pole" cylinders.
Re: On my Workbench - North Eastern.
Posted: Thu Jan 26, 2012 10:24 am
by jwealleans
You've got it spot on, Graeme. That's also the reason for the paper underneath the body where there were traces of the wheels hitting the underside. I'll certainly bear that Comet item in mind for my own when I complete it.
Re: On my Workbench - North Eastern.
Posted: Thu Jan 26, 2012 12:11 pm
by Blink Bonny
Ay up!
Never thought of the Comet item for that reason. I've used 'em on a couple of 0-4-4Ts which helped 'em run properly.
May sort out a persistant, intermittant short on the Hush-Hush.
Re: On my Workbench - a bit of wagon therapy.
Posted: Fri Jun 08, 2012 4:12 pm
by jwealleans
After a prolonged absence due to a major home improvement project, I have managed to find the time to do a bit more modelling. Not as much as I'd like, or the projects I really want to crack on with, but bits and bobs of finishing off. In the main this has been completing wagon kits which I take with me on my travels and build in hotel rooms. I dug out one or two older kits this year. Hopefully it will be self explanatory: I've tried to use the bits as supplied, but there are one or two substitutions where components were so awful as to be unuseable or much better things are available.

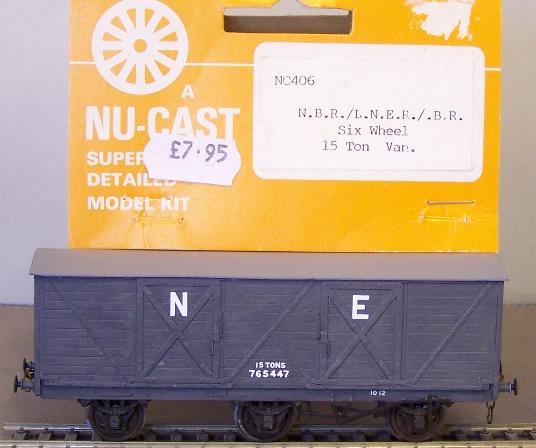
The detail on this is a bit flat, but it's turned out better than I might have expected. The centre axle floats on a floppy bit of wire. I wasn't able to find decent replacement buffers; the supplied ones are nowhere near those in the photos I looked at, but no-one seemed to do any which resembled the bottle shape of the real ones, so these will have to do until better ones turn up. Both these kits showed their age in the amount of time it took to get flash free W irons and square, parallel axles.

This is awaiting etched stanchions from 51L which arrived today. I also replaced the buffers with (the wrong) cast ones - Dave Franks does the correct pattern, but by the time I realised they were glued so firmly that I started to pull the buffer beam off. It is built as the earlier, 1929, diagram.
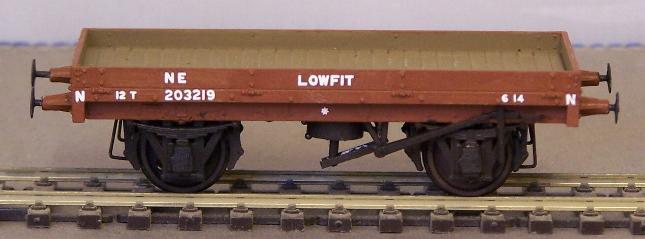
I have a few Bachmann bodies which I've been using Parkside chassis under to make up Lowfits, but this is Parkside with a few scratchbuilt brake bits to fill in gaps.
Finally, I fettled the coupling rods on the J71 so the chassis rolls smoothly. I'm now awaiting the mechanicals from High Level.
Re: On my Workbench - a bit of wagon therapy.
Posted: Fri Jun 08, 2012 5:41 pm
by Atlantic 3279
Good to be back? Ta for those drawings and the document earlier this week - I'll digest them when my schedule quietens down a bit.
Re: On my Workbench - a bit of wagon therapy.
Posted: Sat Jun 09, 2012 1:28 am
by Manxman1831
Those models look very robust, not to mention nice to boot. Is the J72 an old Mainline body on the Comet replacement chassis? Sorry not read entire thread, think I will though.