I think I'm right in saying that Dave Scott of Stainsby fame (scottiedog of this parish) used to have 51L kits? What their path has been since then I don't know.
Too cold here for modelling in the attic so I've retreated to the lounge, lit the fire and started contemplating a few projects. One of them I've already had a discussion with Graeme about. I need a brake van for the Continental freight we run on Thurston and fancied backdating the Dapol kit to an LNER build. As far as I can see I need to do the following:
Shorten footboards
Different handrails (small grab handles at the base of each verandah opening, three horizontal side handrails)
Different lamp irons
Roof layout different (almost reversed)
Solid verandah door (two panes in later builds)
No visible end weights
RCH type W irons instead of the plate ones.
Upright vac pipes.
Can anyone come up with anything I've missed? I thought I'd seen a thread here or on RMWeb where someone did this but I can't find it this morning.
As a longer term thing for a future layout, I was contemplating an F3. There is no kit (the Coopercraft one is the only one I'm aware of and after their B12 I'd be wary of it). Two routes came to mind; an E4 or an F4. The E4 I could get from the new Alan Gibson, but there's a wait, it's expensive and I'd be left with the tender and other bits. The F4 I can get as a body only from Falcon Brass for half the price. Given that I was expecting to have to make/commission the frames anyway that isn't a problem. I have the GER drawings CD with the F4 and I've just ordered the Isinglass drawing for the F3 to compare the two. Anyone else have a twopennorth to throw in?
West End Workbench
Moderators: 52D, Tom F, Rlangham, Atlantic 3279, Blink Bonny, Saint Johnstoun, richard
-
jwealleans
- LNER A4 4-6-2 'Streak'
- Posts: 4226
- Joined: Wed Oct 25, 2006 8:46 am
-
jwealleans
- LNER A4 4-6-2 'Streak'
- Posts: 4226
- Joined: Wed Oct 25, 2006 8:46 am
Re: On my Workbench - scratchbuilt LNER Fish van.
Well, someone on RMWeb threw in the following:
Single instead of double brake shoes.
Different cabin height (but not by much!)
No angle trussing (might have been added to the final vans built - I think that it corresponds with concrete weights)
Vac. cylinder and V-hangers (does the Dapol kit have these?)
Any advance?
Single instead of double brake shoes.
Different cabin height (but not by much!)
No angle trussing (might have been added to the final vans built - I think that it corresponds with concrete weights)
Vac. cylinder and V-hangers (does the Dapol kit have these?)
Any advance?
-
65447
- LNER A4 4-6-2 'Streak'
- Posts: 1748
- Joined: Fri Oct 19, 2007 2:44 pm
- Location: Overlooking the GEML
Re: On my Workbench - scratchbuilt LNER Fish van.
A good source is Slater's instructions for the 7mm kit, designed to produce both LNER and BR types (although not all permutations are possible with the parts supplied). You need to be careful with the combinations as not all those you list apply to a given vehicle at a given period. As ever, choose your prototype.
For your period you can ignore the sanding gear (removed by 1936) but in summary (usual caveats) all were fully fitted (except some of those built for the CLC), the 2-pane window door came in with the concrete ballast and angle trussing, the slight increase in body height was a consequence of the switch to concrete ballast weights, wheels could be spoked or 3-hole and axleboxes RCH or the later LNE pressed steel type, screw couplings, 2 part vertical and 1 piece horizontal handrails. Tatlow's earlier LNER Wagons is useful, Geoff Kent's mods to the Airfix/Dapol kit described in The 4mm Wagon Part 3 cover most of what you need, just about all the other articles published, and Ian Flemings notes on the previous RMWeb, refer to the BR standard version. The tricksiest variation is the positioning of the lamp irons which kept being changed, explained in the Slater's instructions - I'll scan and e-mail...
For your period you can ignore the sanding gear (removed by 1936) but in summary (usual caveats) all were fully fitted (except some of those built for the CLC), the 2-pane window door came in with the concrete ballast and angle trussing, the slight increase in body height was a consequence of the switch to concrete ballast weights, wheels could be spoked or 3-hole and axleboxes RCH or the later LNE pressed steel type, screw couplings, 2 part vertical and 1 piece horizontal handrails. Tatlow's earlier LNER Wagons is useful, Geoff Kent's mods to the Airfix/Dapol kit described in The 4mm Wagon Part 3 cover most of what you need, just about all the other articles published, and Ian Flemings notes on the previous RMWeb, refer to the BR standard version. The tricksiest variation is the positioning of the lamp irons which kept being changed, explained in the Slater's instructions - I'll scan and e-mail...
-
jwealleans
- LNER A4 4-6-2 'Streak'
- Posts: 4226
- Joined: Wed Oct 25, 2006 8:46 am
Re: On my Workbench - scratchbuilt LNER Fish van.
65447 was very generous with his time and information as outlined above and sent through a great deal of documentation for me to peruse. Before I could get onto that I had to rescue the Sentinel which I managed to drop from some height and dent quite badly. I was slightly pleased that it didn't fall apart, but I'd much rather not have found out that way how strong my soldering was. It still has a few dents and ripples but nothing like what it had suffered.... It's back to painted and lettered stage again now and I'll post up a pic when I've got it finished. No shots of the damage... I was too cross with myself.
Anyway, to matters Toad. I had a Dapol kit bought at Warley so it just remained to find the time to get to grips with it. Through the week I spent some time in front of the TV paring off handrails and roof detail in preparation for a proper start.
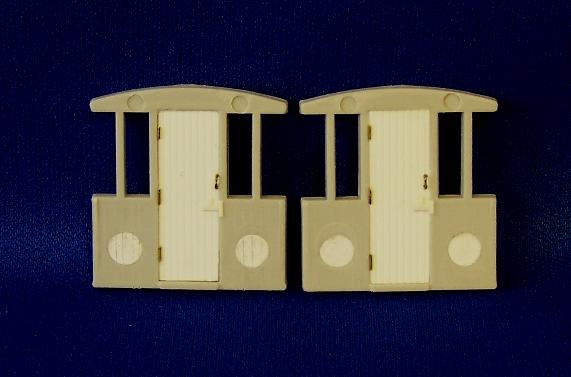
This is what you get in the kit:
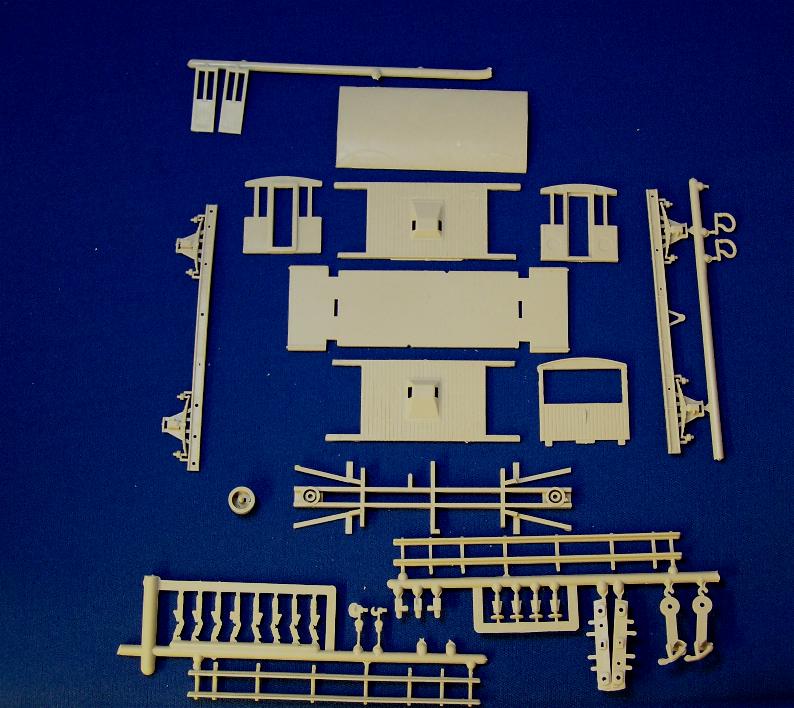
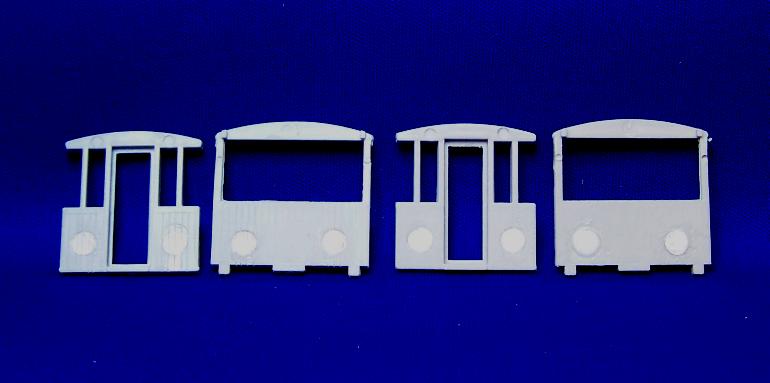
Not shown are the couplings (throw them away) the wheels (throw them away) and the transfers (see under couplings) The sharp eyed will also note the absence of one outer end. The plastic is very soft and I broke it at the top while shaving the lamp irons off. The plastic is also very hard to photograph with any contrast or detail visible so I have had to tweak the following as best I could.
One thing I noticed which Geoff Kent also pointed out are the marks left by the mould ejector pins in the ends. These are on the inside of the verandah but still visible so I thought I'd make at least a token effort to do something about them.
These are paper (from the instructions sheet, in fact, punched out with an ordinary hole punch and glued in place with plastic weld. They're just about spot on for size and thickness (is 80 gsm paper about 7 thou?); I'll know better how they look when primed but it's better than it was before. Once they've thoroughly dried you can scribe the plank lines back into them.
While they were drying I took the time to get the roof ready; details shaved off and then new vents and chimney applied as per several photos and diagrams I now have to hand. I'm going to do a very early build vehicle and they had very high set round roof vents as here (I suspect they're D & S, from the spares box). Rainstrips varied in length but are nearly all straight on the photos I have.
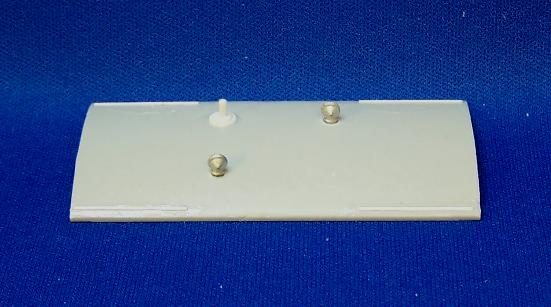
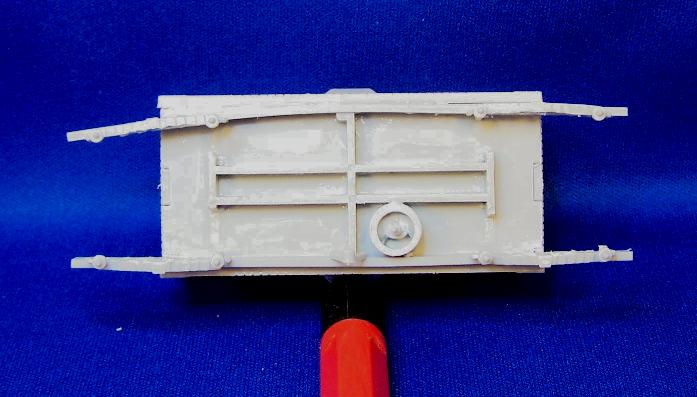
Surgery was then required on the chassis; I wasn't going to build this rigid and so some of the underpinnings have to come off to allow the suspension units to fit. Here I've shortened the chassis component and also removed the concrete weight from the ends of the floor piece. That's one of the major visible differences between these vans.

The van doors were also solid on the LNER vehicles, at least the early series. Helpfully this is a separate piece in the kit, so I just made up a new one out of Evergreen planked sheet with a packing piece of 20 thou behind it. I resisted the temptation to model one open as then I'd have to get into interiors which is not somewhere I want to go in 4mm.
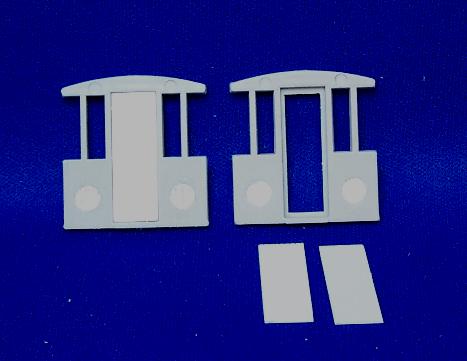
Here I've added hinges and a representative catch. The photo in Tatlow also hows a grab handle on the door which seems to have been abandoned very early on.
By now I was starting to get the shell assembled; here measuring up for the suspension units which are our own Mike Trice's finest. I left the W irons on the solebar I stuck in place t give me something to line the wheelsets up to.
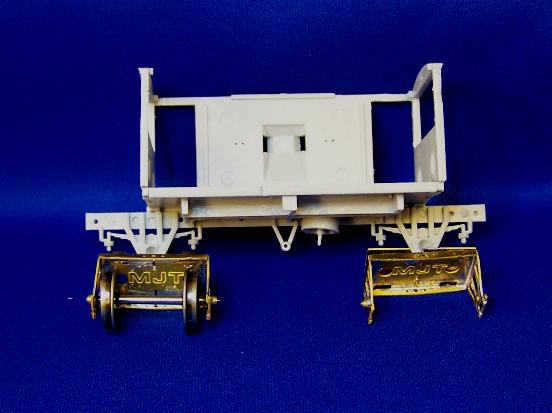
This is one of the downsides of the kit - the plastic is soft, it bends and stays bent. Fortunately it can be bent back, as long as you have some means of keeping it there.
Having left the straight solebar to dry I attached the bent one to the body and used the buffer beams to bring it to the right shape. I did clamp it against a straightedge for a while to encourage it to remain straight.
The double brake shoes are one of the very distinctive features of the BR van. We shan't be having those, so I made up one of the Mainly Trains sets and attached to the brass suspension units.
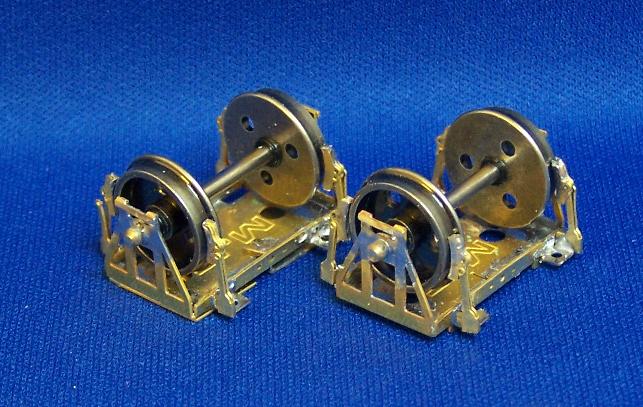
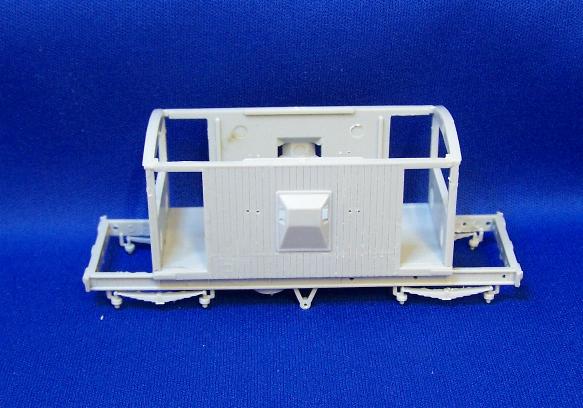
Finally the all important test against the buffer height jig showing that we're about right. I've put a piece of 10 thou plastikard over the ends and chamfered the edges down slightly to make it look more like the prototype steel plate. This is an area where I've weakened the kit and the MJT units are part of the structure here as well. By it's nature, though, it won't be pulling anything, just rattling round at the end of a string of ferry vans so I'm not unduly concerned.

This is where we've reached. I've attached the fixed axle and will allow that to set before using it as the datum point to attach the rocking one. Having very carefully preserved the springs in place while removing the W irons I then found I had to thin the solebars quite a bit to get the MJT units in and so removed them to attach to the new W irons instead. Ideally the rocking ones will rock inside the J hangers although the stepboards will make most of them very hard to see.
I hope to move this on a bit further this week before I start my Christmas hols.
Anyway, to matters Toad. I had a Dapol kit bought at Warley so it just remained to find the time to get to grips with it. Through the week I spent some time in front of the TV paring off handrails and roof detail in preparation for a proper start.
This is what you get in the kit:
Not shown are the couplings (throw them away) the wheels (throw them away) and the transfers (see under couplings) The sharp eyed will also note the absence of one outer end. The plastic is very soft and I broke it at the top while shaving the lamp irons off. The plastic is also very hard to photograph with any contrast or detail visible so I have had to tweak the following as best I could.
One thing I noticed which Geoff Kent also pointed out are the marks left by the mould ejector pins in the ends. These are on the inside of the verandah but still visible so I thought I'd make at least a token effort to do something about them.
These are paper (from the instructions sheet, in fact, punched out with an ordinary hole punch and glued in place with plastic weld. They're just about spot on for size and thickness (is 80 gsm paper about 7 thou?); I'll know better how they look when primed but it's better than it was before. Once they've thoroughly dried you can scribe the plank lines back into them.
While they were drying I took the time to get the roof ready; details shaved off and then new vents and chimney applied as per several photos and diagrams I now have to hand. I'm going to do a very early build vehicle and they had very high set round roof vents as here (I suspect they're D & S, from the spares box). Rainstrips varied in length but are nearly all straight on the photos I have.
Surgery was then required on the chassis; I wasn't going to build this rigid and so some of the underpinnings have to come off to allow the suspension units to fit. Here I've shortened the chassis component and also removed the concrete weight from the ends of the floor piece. That's one of the major visible differences between these vans.
The van doors were also solid on the LNER vehicles, at least the early series. Helpfully this is a separate piece in the kit, so I just made up a new one out of Evergreen planked sheet with a packing piece of 20 thou behind it. I resisted the temptation to model one open as then I'd have to get into interiors which is not somewhere I want to go in 4mm.
Here I've added hinges and a representative catch. The photo in Tatlow also hows a grab handle on the door which seems to have been abandoned very early on.
By now I was starting to get the shell assembled; here measuring up for the suspension units which are our own Mike Trice's finest. I left the W irons on the solebar I stuck in place t give me something to line the wheelsets up to.
This is one of the downsides of the kit - the plastic is soft, it bends and stays bent. Fortunately it can be bent back, as long as you have some means of keeping it there.
Having left the straight solebar to dry I attached the bent one to the body and used the buffer beams to bring it to the right shape. I did clamp it against a straightedge for a while to encourage it to remain straight.
The double brake shoes are one of the very distinctive features of the BR van. We shan't be having those, so I made up one of the Mainly Trains sets and attached to the brass suspension units.
Finally the all important test against the buffer height jig showing that we're about right. I've put a piece of 10 thou plastikard over the ends and chamfered the edges down slightly to make it look more like the prototype steel plate. This is an area where I've weakened the kit and the MJT units are part of the structure here as well. By it's nature, though, it won't be pulling anything, just rattling round at the end of a string of ferry vans so I'm not unduly concerned.
This is where we've reached. I've attached the fixed axle and will allow that to set before using it as the datum point to attach the rocking one. Having very carefully preserved the springs in place while removing the W irons I then found I had to thin the solebars quite a bit to get the MJT units in and so removed them to attach to the new W irons instead. Ideally the rocking ones will rock inside the J hangers although the stepboards will make most of them very hard to see.
I hope to move this on a bit further this week before I start my Christmas hols.
Last edited by jwealleans on Tue Nov 06, 2018 11:46 am, edited 7 times in total.
-
jwealleans
- LNER A4 4-6-2 'Streak'
- Posts: 4226
- Joined: Wed Oct 25, 2006 8:46 am
Re: On my Workbench - Dapol Toad E.
One more thing... anyone have a set of instructions for D & S 187 (NE Dia 77 Clerestory Brake Third)?
-
Atlantic 3279

- LNER A4 4-6-2 'Streak'
- Posts: 6544
- Joined: Fri Jun 26, 2009 9:51 am
- Location: 2850, 245
Re: On my Workbench - Dapol Toad E.
Did those metal three-hole wheels come in the Dapol kit JW? If so, are they to good profile and true running?
When I last built a Dapol kit they had certainly upgraded from the old original "glue-em together and they might rotate if you're lucky" plastic pizza-cutter wheelsets, and included plastic wheels on pin-point metal axles which were okay for profile and running but (as I found in hindsight after ignoring accepted wisdom) were no good for helping to keep track clean. Dapol METAL wagon wheels that I've seen have included some dire examples with desperately badly profiled treads and flanges that wouldn't even stay on straight track. As I think you know I was "warned off" by the censors on that big modelling website for daring to say what I thought about Dapol manufacture and quality control. I'd be keen to know if they are now actually getting it right
BTW my local friend has a copy of that book you mentioned - thanks for the offer of course.
When I last built a Dapol kit they had certainly upgraded from the old original "glue-em together and they might rotate if you're lucky" plastic pizza-cutter wheelsets, and included plastic wheels on pin-point metal axles which were okay for profile and running but (as I found in hindsight after ignoring accepted wisdom) were no good for helping to keep track clean. Dapol METAL wagon wheels that I've seen have included some dire examples with desperately badly profiled treads and flanges that wouldn't even stay on straight track. As I think you know I was "warned off"
BTW my local friend has a copy of that book you mentioned - thanks for the offer of course.
Most subjects, models and techniques covered in this thread are now listed in various categories on page1
Dec. 2018: Almost all images that disappeared from my own thread following loss of free remote hosting are now restored.
Dec. 2018: Almost all images that disappeared from my own thread following loss of free remote hosting are now restored.
-
jwealleans
- LNER A4 4-6-2 'Streak'
- Posts: 4226
- Joined: Wed Oct 25, 2006 8:46 am
Re: On my Workbench - Dapol Toad E.
The wheels are an improvement on what you used to get, Graeme; I'm using them because they're supplied but if they fail the hand-made Corfe track test then they're out and a pair of Hornbys will be substituted. They are all metal and the profile looks ok. Thurston has Code 100 track (thanks to some club member in the dim and distant who insisted on his right to pizza cutter wheels) so I can afford not to be too fussy.
Thanks to the good offices of Gresleybear I now have a set of D & S instructions so you may have something else to look at before the Christmas shutdown.
Thanks to the good offices of Gresleybear I now have a set of D & S instructions so you may have something else to look at before the Christmas shutdown.
-
jwealleans
- LNER A4 4-6-2 'Streak'
- Posts: 4226
- Joined: Wed Oct 25, 2006 8:46 am
Re: On my Workbench - Dapol Toad E.
A small amount of progress last night as I shortened the footboards and added them along with the body retaining brackets along each side. I've also attached the inner ends but the roof is just sitting in place. There are a couple of footboard brackets to replace where the BR ones don't match to the LNER and then those holes in the solebars to fill in.
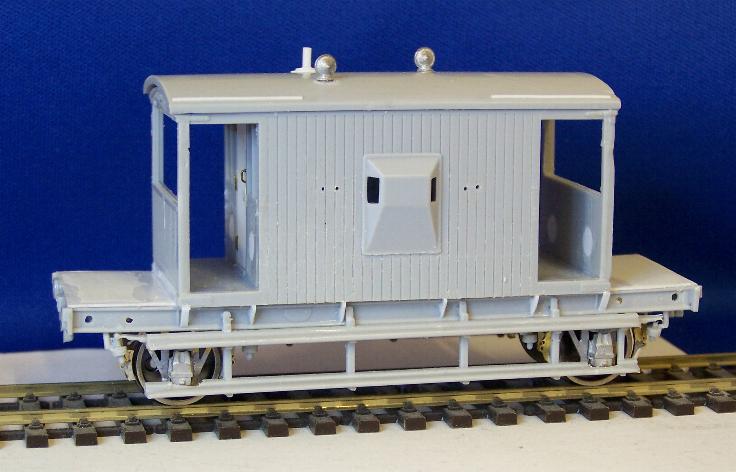
A couple of small niggles are now becoming apparent: one end has pulled up slightly, presumably an effect of the drying mekpak on the plastic. If I were doing another I might look at ditching the solebars and using Evergreen I beams for added rigidity. The camera has made it appear like that at both ends, which is not the case. The footboards also restrict the movement of the rocking W iron. Bill B's sprung ones are a good alternative in that situation.
A couple of small niggles are now becoming apparent: one end has pulled up slightly, presumably an effect of the drying mekpak on the plastic. If I were doing another I might look at ditching the solebars and using Evergreen I beams for added rigidity. The camera has made it appear like that at both ends, which is not the case. The footboards also restrict the movement of the rocking W iron. Bill B's sprung ones are a good alternative in that situation.
Last edited by jwealleans on Tue Nov 06, 2018 11:35 am, edited 3 times in total.
-
Atlantic 3279
- LNER A4 4-6-2 'Streak'
- Posts: 6544
- Joined: Fri Jun 26, 2009 9:51 am
- Location: 2850, 245
Re: On my Workbench - Dapol Toad E.
That warp in the solebars is something I shall have to watch out for myself. I have an Airfix/Dapol Toad D built some years ago, on which I shortened the footboards and altered the lamp irons and handrails to suit LNER practice, but through a combination of laziness and ignorance at the time I failed to change to pre-war thin steel end platforms, solid doors and mirror-image roof details! I shall have to revisit the problem shortly, when I finally get into brake-van-mode. The plan is to build(or modify)/paint/apply transfers to three different (but related) vans "in one go" to economise on time and effort.
Perhaps the fact that every other joint in my old model is now rock hard may save me from trouble if I saw off the "concrete" platforms and substitute thin "steel" ones. The doors however may prove tricky to get at. I may have to build another one the right way instead .
.
Perhaps the fact that every other joint in my old model is now rock hard may save me from trouble if I saw off the "concrete" platforms and substitute thin "steel" ones. The doors however may prove tricky to get at. I may have to build another one the right way instead
Last edited by Atlantic 3279 on Wed Dec 15, 2010 4:45 pm, edited 1 time in total.
Most subjects, models and techniques covered in this thread are now listed in various categories on page1
Dec. 2018: Almost all images that disappeared from my own thread following loss of free remote hosting are now restored.
Dec. 2018: Almost all images that disappeared from my own thread following loss of free remote hosting are now restored.
-
jwealleans
- LNER A4 4-6-2 'Streak'
- Posts: 4226
- Joined: Wed Oct 25, 2006 8:46 am
Re: On my Workbench - Dapol Toad D.
I shall look forward to seeing those, Graeme. Did we ever establish what a Toad A was?
Mikemeg on RMWeb has posted a couple of pics of his conversions. He discarded the roof - which I think has tipped me to going the same way - and also made new stepboards from plastic strip, which I've rejected as they'd be too delicate for transport and exhibitions. What he did query (and he wasn't the first) were the rainstrips. I've made mine straight and parallel to the roof edge based on what I see in the Tatlow picture and others. I know they could be curved/angled, but does anyone else think I'm misreading that photograph?
There's another in Larkin, Pre Nationalisation Freight Wagons on BR: page 82, upper, E246665. Those rainstrips look to me as if they're straight and parallel with the roof edge.
-
Atlantic 3279
- LNER A4 4-6-2 'Streak'
- Posts: 6544
- Joined: Fri Jun 26, 2009 9:51 am
- Location: 2850, 245
Re: On my Workbench - Dapol Toad D.
I'm still not sure. Can anybody else help out on that point?jwealleans wrote:Did we ever establish what a Toad A was?
Most subjects, models and techniques covered in this thread are now listed in various categories on page1
Dec. 2018: Almost all images that disappeared from my own thread following loss of free remote hosting are now restored.
Dec. 2018: Almost all images that disappeared from my own thread following loss of free remote hosting are now restored.
-
65447
- LNER A4 4-6-2 'Streak'
- Posts: 1748
- Joined: Fri Oct 19, 2007 2:44 pm
- Location: Overlooking the GEML
Re: On my Workbench - Dapol Toad D.
See: http://www.rmweb.co.uk/forum/viewtopic.php?f=5&t=46066 for a couple of sloping examples and comments from the like of Ian Flemingjwealleans wrote:What he did query (and he wasn't the first) were the rainstrips. I've made mine straight and parallel to the roof edge based on ...
The first LNER type was the Toad 'B', based on the NER Type V4 van - so probably the NER ones, still in use, were taken as the 'A' model while the first LNER standard type became 'B', but then we jump to 'E' which was basically a 'B' but with metal rather than timber duckets, while the express LWB type was coded 'D', but there again maybe the LWB type was designed and classified before the metal duckets were applied to the SWB type; not sure what happened to 'C' though, ...jwealleans wrote:Did we ever establish what a Toad A was?
I wonder if Mr Tatlow will explain in his latest volume concerning the LNER types of LNER Wagons...
-
Atlantic 3279
- LNER A4 4-6-2 'Streak'
- Posts: 6544
- Joined: Fri Jun 26, 2009 9:51 am
- Location: 2850, 245
Re: On my Workbench - Dapol Toad D.
I had "passively assumed" that the V4s may have been Toad A, but I've also recently seen a picture of a bit of a GN/NE hybrid design - very much GN bodied but with rather NE style duckets, built in 1923ish - so that could instead be the Toad A . Hence the appeal for learned opinions.
Again it's an assumption, but Toad C could conveniently refer to the two experimental Toad B style ferro-concrete bodied vans that proved too cold for guards' comfort. It was a neat idea to do away with separate ballasting to bring up the braked weight.
Whilst the final variant of Toad B, with pressed steel duckets, i.e. Toad E, ought in some ways to precede Toad D if the versions were coded in evolutionary pecking order, I believe that the Toad Es (to a largely tried and tested general design) were built after the first LWB Toad Ds but while the latter were still "on trial". I assume that once the Toad D had proved acceptable on a wide enough range of duties the justification for also building a SWB variant, no good on express goods, fairly logically disappeared.
Last edited by Atlantic 3279 on Wed Dec 15, 2010 10:22 pm, edited 1 time in total.
Most subjects, models and techniques covered in this thread are now listed in various categories on page1
Dec. 2018: Almost all images that disappeared from my own thread following loss of free remote hosting are now restored.
Dec. 2018: Almost all images that disappeared from my own thread following loss of free remote hosting are now restored.
-
65447
- LNER A4 4-6-2 'Streak'
- Posts: 1748
- Joined: Fri Oct 19, 2007 2:44 pm
- Location: Overlooking the GEML
Re: On my Workbench - Dapol Toad D.
That's certainly an alternative possibility for the 'A'. Likewise 'C' for Concrete has a certain credibility, but I've not seen anything to either confirm or deny it. By the way and for historical accuracy, only 1 such experimental brake van was constructed, see here.Atlantic 3279 wrote:I had "passively assumed" that the V4s may have been Toad A, but I've also recently seen a picture of a bit of a GN/NE hybrid design - very much GN bodied but with rather NE style duckets, built in 1923ish - so that could instead be the Toad A
Again it's an assumption, but Toad C could conveniently refer to the two experimental Toad B style ferro-concrete bodied vans that proved too cold for guards' comfort. It was a neat idea to do away with separate ballasting to bring up the braked weight.
-
Atlantic 3279
- LNER A4 4-6-2 'Streak'
- Posts: 6544
- Joined: Fri Jun 26, 2009 9:51 am
- Location: 2850, 245
Re: On my Workbench - Dapol Toad D.
One only, I see, not as RM Oct 75 article then? What about the livery of the concrete van though? The interiors of the verandahs do not appear to be as dark as the applied main body colour. The duckets and end stanchions look darker. Not apparently red-oxide all over, as per the standard scheme........
Most subjects, models and techniques covered in this thread are now listed in various categories on page1
Dec. 2018: Almost all images that disappeared from my own thread following loss of free remote hosting are now restored.
Dec. 2018: Almost all images that disappeared from my own thread following loss of free remote hosting are now restored.