Nathan's rolling stock and loco workbench

This forum is for the discussion of railway modelling of the LNER and its constituent companies.

Moderators: 52D, Tom F, Rlangham, Atlantic 3279, Blink Bonny, Saint Johnstoun, richard

User avatar
73082gibbers
LNER Thompson L1 2-6-4T
Posts: 80
Joined: Sun Oct 05, 2014 6:01 pm
Location: Selhurst T&RSMD
Contact:

Re: Nathan's rolling stock and loco workbench

Post by 73082gibbers »

Evening all!

The cab went terribly - in my opinion - however, I managed to salvage it (just) using a LOT of filler, and plasticard, so hopefully once I've got time, it will be smoothed out, and straightened - some of the plasticard has warped toward the tender end of the roof.

Today, I took a trip to Alton, and popped into the model railway center there. I picked up some Railmatch paint - LNER Greight Grey, and LNER Red Oxide. Along with these, I purchased a Parkside Dundas kit, PC50 LNER Standard Cattle Truck. I decided to start it almost immediately when I got home, and after cutting my thumb open not once, but twice, then cutting into one of the cuts twice more later this evening, the wagon was virtually complete, all the parts from the sprues being used much to my shock (its not something I usually do!!).
961660_10200488096083081_1730216957_n.jpg
11148996_10200488095923077_1438600143_n.jpg
Hopefully, it will be finished tomorrow evening!

Nathan...
Southern by location, Eastern by nature

Visit my workbench at viewtopic.php?f=3&t=10406
User avatar
73082gibbers
LNER Thompson L1 2-6-4T
Posts: 80
Joined: Sun Oct 05, 2014 6:01 pm
Location: Selhurst T&RSMD
Contact:

Re: Nathan's rolling stock and loco workbench

Post by 73082gibbers »

Evening chaps and chappettes!

Progress on the Cattle van continued this morning, with the body being painted Red Oxide. Just waiting for it to fully dry before I tackle the black for the brake gear, etc...

This afternoon I found a pair of wagons that rarely get used by me, in the form of the two open wagons from the Your Model Railway Village range. The grey plasticy one and the red detailed one. They were both given a generous light coat of LNER Freight Grey, and finished as a Cheshire Lines wagon and a M&GN one. I also found a discarded Hornby railroad NE van body that had been abused by paint for testing purposes. This was also repainted into the Freight Grey, and finished as an M&GN fruit van. Do excuse the poor pictures...
CL 8ton 5 plank wagon No.90
M&GN 9ton 5 plank wagon No.8
M&GN 20ton Fruit van No.12
Till next time folks!

Nathan....
Southern by location, Eastern by nature

Visit my workbench at viewtopic.php?f=3&t=10406
User avatar
73082gibbers
LNER Thompson L1 2-6-4T
Posts: 80
Joined: Sun Oct 05, 2014 6:01 pm
Location: Selhurst T&RSMD
Contact:

Re: Nathan's rolling stock and loco workbench

Post by 73082gibbers »

Evening all!

A bit of progress on the Edward Conversion...

After attempting to fabricate a GNResque cab and roof using the original cab sides and front - which failed miserably - I took it upon myself to do a new one from scratch, sacrificing the rear mounting brackets for the chassis - cab in the process. The new front was cut to shape, with the gap to allow the motor to sit correctly - it sticks out into the cab quite a bit... The new sides were then cut to shape, and cemented in place just behind the front plate. Then for the fun part, the roof... Using the same style plasticard that was used on the first trial cab, thicker off cuts of plasticard were used to support the new roof in place, and also to give the cab a more sturdy finish.

The extended splashers, as per the GNR E1, and others (I think) were created using a short piece of plasticard on the side to cover the old dummy splasher (short stumpy black one infront of the cab) and a thin but longer piece cemented to the top of the front splasher and the front of the cab. A lot of filler was used for this, and the left hand side ( as of posting) is still awaiting filing down to the right width.

The new chimney was sought from a box of lego Technic parts, and wedged onto the top of the smokebox with some filler in the middle to help support it. filler has now been applied around the base to form the flanged part of the chimney. A replacement smokebox door was found - off of one of the 3mm scale plinthed models, in this instance, an LBSCR Baltic tank, and a small piece of plasticard glued to the original moulded lamp iron, to form a new one. the old lamp irons were also removed, and thin pieces of plasticard, similar to the first one, were cemented into the holes. Clack valves were added to the boiler, and a steam heat pipe to the buffer beam, which now has sprung buffers added. The dome also has been changed to the more fat and stumpy one from the terrier detail bag. The next stage is to remove the moulded hand rails from the boiler sides, and drill out holes for new ones, most likely the standard Hornby ones...
New cab, splashers, smokebox door, etc fitted
Hopefully by the next update, the new tender will have arrived, and the body shell completed!

Till next time folks!

Nathan...
Southern by location, Eastern by nature

Visit my workbench at viewtopic.php?f=3&t=10406
User avatar
manna
LNER A4 4-6-2 'Streak'
Posts: 3793
Joined: Sun May 24, 2009 12:56 am
Location: All over Australia

Re: Nathan's rolling stock and loco workbench

Post by manna »

G'day Gents

The GN type cab is difficult to make, properly, glue the cab square, then fit small pieces of plastic card inside the cab, then you can start filing the outside of the cab to shape, after that you will have to file out the inside, car body filler will have to be used to get a smooth finish.

manna
Attachments
DSCF0254.JPG
EDGWARE GN, Steam in the Suburbs.
User avatar
73082gibbers
LNER Thompson L1 2-6-4T
Posts: 80
Joined: Sun Oct 05, 2014 6:01 pm
Location: Selhurst T&RSMD
Contact:

Re: Nathan's rolling stock and loco workbench

Post by 73082gibbers »

manna wrote:G'day Gents

The GN type cab is difficult to make, properly, glue the cab square, then fit small pieces of plastic card inside the cab, then you can start filing the outside of the cab to shape, after that you will have to file out the inside, car body filler will have to be used to get a smooth finish.

manna
A very nice example you've got there! Much better than my attempt!

Today I managed to sort out the filler on the splashers, and also, refit the steps. Whilst clearing my cupboard up, I found the GBLC T9 that I purchased, and sort of just dumped, seeing that it had a stove pipe that was a lot shorter than the original that I fitted at first, and also being just a few mm taller than the scratch one I fitted, I decided to fit this one! And it certainly looks the part now! The holes have also been drilled out for the new handrails and knobs. Once they arrive, I can focus on priming the body, and then acquiring the paint. I'm not sure if I should use Railmatch LNER Doncaster Apple green, or Phoenix Precisions doncaster apple green...
New stovepipe chimney fitted, and holes drilled out in boiler sides
Till next time chaps!!

Nathan....
Southern by location, Eastern by nature

Visit my workbench at viewtopic.php?f=3&t=10406
User avatar
73082gibbers
LNER Thompson L1 2-6-4T
Posts: 80
Joined: Sun Oct 05, 2014 6:01 pm
Location: Selhurst T&RSMD
Contact:

Re: Nathan's rolling stock and loco workbench

Post by 73082gibbers »

Well, having matched the emily tender against the engine - which arrived finally yesterday, it turns out that it's too wide, tall and long, so the original has been slightly cut and shut. The whole engine and tender are now complete, bar the handrails on the engine which are due in the post tomorrow! Little bit of touching up to do on the firebox area and bufferbeam, but apart from that, it's finished! Been a fun little project!
3852 complete bar handrails
Here's to the next project, whatever it might be!!!

Nathan....
Southern by location, Eastern by nature

Visit my workbench at viewtopic.php?f=3&t=10406
User avatar
73082gibbers
LNER Thompson L1 2-6-4T
Posts: 80
Joined: Sun Oct 05, 2014 6:01 pm
Location: Selhurst T&RSMD
Contact:

Re: Nathan's rolling stock and loco workbench

Post by 73082gibbers »

Good evening chaps and chappettes!

3852 was finished off this afternoon, with the arrival of the handrails, and was put on test with my suburban set. It's a pretty decent runner if I'm honest! And now onto the next exciting project, whatever it will be ;)
11164112_10200529849806898_1218885941_n.jpg
Payday was today, so I couldn't help but purchase something to pass the time over the course of the next month or so! Popped into the Croydon model village section of what was Alders, and managed to pick up two Parkside dundas wagon kits, for under a tenner! Also popped into WHSmiths' next door and picked up a railroad gresley CK, and some paint... This is to try and work on my teak effect, using the advice that some of you chaps gave me a while back! I'm uncertain as to what to do with the wagon kits livery wise, but they'll probably end up in red oxide and lner freight grey accordingly, the kits in question being an RCH 5plank wagon, and an LNER 12T van w/ courrugated ends

Updates will be shown of the van and wagon in due course!

Nathan...
Southern by location, Eastern by nature

Visit my workbench at viewtopic.php?f=3&t=10406
James Harrison
GCR O4 2-8-0 'ROD'
Posts: 581
Joined: Tue Apr 30, 2013 7:15 pm

Re: Nathan's rolling stock and loco workbench

Post by James Harrison »

That's a very credible and inventive model you've made there (I wouldn't have seen the basis of a GN 4-4-0 in a TTTE toy). Well done!
User avatar
73082gibbers
LNER Thompson L1 2-6-4T
Posts: 80
Joined: Sun Oct 05, 2014 6:01 pm
Location: Selhurst T&RSMD
Contact:

Re: Nathan's rolling stock and loco workbench

Post by 73082gibbers »

James Harrison wrote:That's a very credible and inventive model you've made there (I wouldn't have seen the basis of a GN 4-4-0 in a TTTE toy). Well done!
Many thanks James! It's amazing how little needs to be done to a toylike model to make it look much more realistic!

I've decided to give the Bachmann Henrietta repaint (the first one I did two years ago now) from Red Oxide to Grey, to make it look a bit more presentable (the red oxide was applied due to the poor paintwork applied a while back)
11216289_10200586995035493_391003244_n.jpg
Not much has really happened other than this modelling wise, mainly due to the fact that I've now started in the loco department at the Spa Valley, and that, along with work, is taking up most of my time now, however, having cleared up a fair bit of space at the back of my room, come the Summer, I may have the start of a layout up and running! Possibly N gauge, possibly a small OO museum type setup. Who knows, but watch this space!!!

Nathan....
Southern by location, Eastern by nature

Visit my workbench at viewtopic.php?f=3&t=10406
User avatar
73082gibbers
LNER Thompson L1 2-6-4T
Posts: 80
Joined: Sun Oct 05, 2014 6:01 pm
Location: Selhurst T&RSMD
Contact:

Re: Nathan's rolling stock and loco workbench

Post by 73082gibbers »

Inspired by Simierski's railroad gresley conversion into a set of Twinarts, I thought I'd give it a shot too! Here's the start of my pair, using an old body and chassis that were used as test beds for other projects, and one of the bogies from it (middle one) fitted with bachmann wheels. the mid sections on the coachset will be plasticarded over, and a gangway section fitted inbetween. The end that features the used bodyshell will have a new interior fitted as I butchered the original one, and new glazing, the original too has suffered damage.
11304389_10200589593780460_639664901_n.jpg
11289811_10200589593820461_995255829_n.jpg
11120530_10200589593860462_1415354658_n.jpg
11245400_10200589593900463_1611382509_n.jpg
As you can see, a fair bit of work will need to be done to get the "Arts" running and looking presentable (teaking will be done after all mods needed have been completed) but they should make a nice addition to my Gresley coach collection that's continually growing!

Till next time!

Nathan..
Southern by location, Eastern by nature

Visit my workbench at viewtopic.php?f=3&t=10406
User avatar
73082gibbers
LNER Thompson L1 2-6-4T
Posts: 80
Joined: Sun Oct 05, 2014 6:01 pm
Location: Selhurst T&RSMD
Contact:

Re: Nathan's rolling stock and loco workbench

Post by 73082gibbers »

Afternoon all!

A small bit of progress on the arts, along with their accompanying brake third. The three bodies have been primed, and the interiors painted. The underframes have been done up too.

Also, in addition to these, is a new project I started at the start of the week. This is a hybrid ex M&GNJR 0-6-0 Tender engine. The body parts are from the GBL Midland Compound (Don't fret, I'm not foolish enough to butcher an RTR one!!!) the running plates, cab floor and front have been made using Plasticard, and the frame sides from Brass. The tender drawbar is made from the same Plasticard, with two holes in to accept a screw on the loco end, and the pin from the Emily tender. The kitbash will be finished in unlined black, as No.22. (apologies for the deep link)

Image

More updates soon!!

Nathan...
Southern by location, Eastern by nature

Visit my workbench at viewtopic.php?f=3&t=10406
James Harrison
GCR O4 2-8-0 'ROD'
Posts: 581
Joined: Tue Apr 30, 2013 7:15 pm

Re: Nathan's rolling stock and loco workbench

Post by James Harrison »

Looking good. What are you going to do for the splashers?- the one from the compound is far too large really. You can get etched splashers -eg (plucked off google, others are available) http://www.brassmasters.co.uk/replacement_splashers.htm
User avatar
73082gibbers
LNER Thompson L1 2-6-4T
Posts: 80
Joined: Sun Oct 05, 2014 6:01 pm
Location: Selhurst T&RSMD
Contact:

Re: Nathan's rolling stock and loco workbench

Post by 73082gibbers »

James Harrison wrote:Looking good. What are you going to do for the splashers?- the one from the compound is far too large really. You can get etched splashers -eg (plucked off google, others are available) http://www.brassmasters.co.uk/replacement_splashers.htm
The plan is, at a later date, to cover up the firebox section between the cab and splasher, and box the front ends of them off as sand boxes, however as I've now finished painting it, it'll have to wait... :P

Here's the finished result, looking quite convincing as a real engine ;)
11303507_10200654051631866_409823580_n.jpg
Nathan..
Southern by location, Eastern by nature

Visit my workbench at viewtopic.php?f=3&t=10406
User avatar
73082gibbers
LNER Thompson L1 2-6-4T
Posts: 80
Joined: Sun Oct 05, 2014 6:01 pm
Location: Selhurst T&RSMD
Contact:

Re: Nathan's rolling stock and loco workbench J70 and WD 75105

Post by 73082gibbers »

Hi all!

Having managed to fall off the real WD75105 Walkden on Saturday, I've had a lot of time to catch up on some projects, most notably, finishing up a J70 conversion, and also fitting the plates to my Austerity, duly modelled after the aforementioned one...

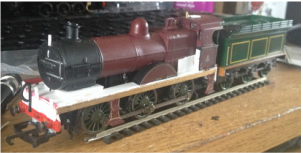
I'll start with Walkden, as it's only one photo. The engine started life as WD 145 Warrington, with a Stoker chimney, and six sets of steps. The chimney was replaced along with the injectors, by a whitemetal one, and pair of brass injectors. the middle steps were cut off as they were not needed, and the smokebox door numberplate rubbed down as far as possible. The engine was then repainted in Olive Green, the nearest I have to what the real one actually carries (I assume Kahki green) and name and cabside works plates ordered from Narrow Planet. A Mechanical Lubricator was also fitted to the model, as per the what the real one has fitted. I hope to possibly fit new steps on the running plate for access to the tank, as per the real one, as well as two dummy lamp irons infront of the left hand side of the cab. A storage space on the right side for fire irons has also been added. The below photo shows how far I've got with it. All that needs doing now is the wheels and rods being painted green and red accordingly, and transfers, then it's ready for use. Quite a speedy model at that too!!
WD75105 3155 Walkden
Fire Irons and holder on RH side of engine
Next up, is the J70, No.8216.

This started life as Toby, and was a simple case of drop the face out, and glue on two 3D printed door pieces on either end of the bodyshell. I opted for 8216 in NE livery (mainly due to me having a lack of full LNER transfers).
11335754_10200684693717899_133567085_n.jpg
After the new pieces were fitted, it was simply a case of paint over the plasticy brown, and turn the grey to black on the skirts and cow catchers. The bufferbeams also recieved a going over as I intended on putting the numbers on there, as per the prototypes. Below is the finished result.
11536820_10200697745324181_526204333_n.jpg


The paintwork is a little iffy in areas, but I can't really help it as the paint I used was dodgy, and I haven't the money to splash on more... :(

Till Next time, Nathan....
Southern by location, Eastern by nature

Visit my workbench at viewtopic.php?f=3&t=10406
User avatar
73082gibbers
LNER Thompson L1 2-6-4T
Posts: 80
Joined: Sun Oct 05, 2014 6:01 pm
Location: Selhurst T&RSMD
Contact:

Re: Nathan's rolling stock and loco workbench WD75105 Walkden

Post by 73082gibbers »

Evening all!

Small bit of progress done on WD75105... The wheels and rods are now painted, and the bufferbeams have had a going over. The next stage will be to acquire the transfers. Anyone know of anywhere that sells War Department ones???
11259016_10200708399950540_324216986_n.jpg
Till next time!

Nathan...
Southern by location, Eastern by nature

Visit my workbench at viewtopic.php?f=3&t=10406
Post Reply