I have a number of kits in the “To do later” pile. (Like quite a few people I guess). A number of these kits I have kept safe until such time as I think my skills are good enough for them. Well, now I’ve decided to take the plunge, and post the results on here.
My ( planned) layout is based on Bilton Junction just north of Harrogate in 1930’s. I want to model the trains as accurately as I can and, to this end, I have gathered together a number of kits. There will, inevitably, be modellers licence but I do hope that the results will be plausible at least.
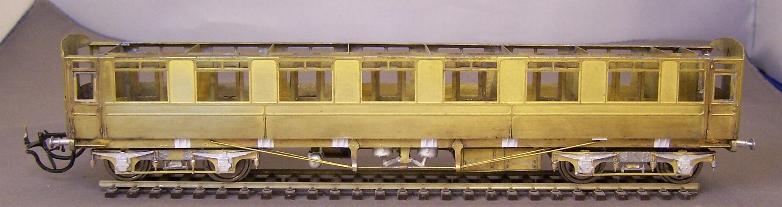
The first train (or portion to be accurate) is the North East Area catering portion for the Newcastle to Liverpool service. There is a photo in Banks and Carter that shows it consisted of ex-NER coaches - a matchboard third, a 12 wheel Restaurant Third and a First Open. Unfortunately I am not aware of kits for these exact coaches. However, I can get the overall look from these kits (I’m not up to scratch building yet - and I did say that there would be modellers licence involved )
705D5C87-2311-4D9C-9351-5AAC9E1D9A2D.jpeg (36.39 KiB) Viewed 6118 times
7AB34570-8FD0-41B8-A1A6-A637A343BBD4.jpeg (32.91 KiB) Viewed 6118 times
Bill Bedford D155 TO
C495CEF7-90C6-448D-A58E-E6E7198F06E1.jpeg (31.81 KiB) Viewed 6118 times
Sorry the photos are a bit blurry....I had to mail them to myself to reduce the size. Need to sort out a photo editor!
Thanks for the information- I’ll look that photo editor up. In the mean time I have sorted out a fix - seems that my phone was taking short videos and not simple photos. So looks like the photo size, at least, is sorted for now.
I started work on the ex-NER third open and fairly quickly got the basic underframe built. I then had to re- build it because I’d built it upside down! I’d bent the supports for the base of the sides (that are attached to the floor pan) down the wrong way. I then soldered on the headstocks and the sole bars .....only to realise the errors of my ways when I looked at the sides of the battery boxes. These bend down from the floor pan and the way I’d built things the etched detail would have been on the inside of the battery box! I wouldn’t mind but this was very clear in the basic instructions that can be downloaded. Anyway it’s all corrected now...and good soldering practice.
I stopped with the underframe at that point. This is partly because I did not want to add delicate details until the body was built up, and also because I’m not sure about the arrangements of the queen posts and trusses. I need to do some more research.
So I then moved onto the ends of the coach. I found it easiest to form the end curvature using finger pressure and a piece of 5mm steel rod.
I then formed up the door and curved it slightly to match the end profile. The door has a neat support for the main side. The side is flush with the door at the top and bottom but curves further out at the waist.
My plan was to build both end units and bolt them to the floor. Then I would attach the main sides to each end unit.
Just as I was about to start work I checked a prototype photo and realised that the door handle positions are incorrect. On the prototype the door handles are to the right on all the doors. On the etch the door handles holes are positioned towards the end of the coach ( so to the right on two doors and to the left on the other two doors).
Drilling out new holes is easy enough but modifying the beading around the redundant hole will be more difficult. Both jobs will be easier with the door flat.
The trussing on these is unusual. i thought I'd taken a close up when I built the two i have, but I can't find it.
There are two rods from each queenpost to the solebar, one passing either side of it. Then there's one heavier gauge rod between the two queenposts. Hopefully the picture will help.
I will watch the restaurant car build with interest I have one of those to build.
The underframe trussing is as Jonathan says, it's very similar to this in principal if you can make it out.
Well, I’ve built everything supplied with the etches and I’m pleased with the results. I’ve learned a fair amount along the way as well. That will be useful as I have a number of the Bill Bedford kits to build. That includes another one of these third opens - which I plan to complete as a buffet car conversion.
So this is where I have got to so far:
I do have a question though, with regards to the bogies. As built they ran on Fox bogies. I think many of them were changed to Gresley bogies - but were they all changed? My layout will be set in 1938 ( give or take a year or two ) and I do fancy having this coach run on Fox bogies.
I’ve been filing and fettling the roof end castings for the last couple of days. Getting there now.......I think.....maybe.....
As distraction therapy i’ve Been considering the livery to be applied to this coach.
As built I think they were painted lake. Then, after grouping, as they were main line coaches and continued to be used in prestigious formations for quite a few years, I’m assuming that they were turned out in teak by the LNER. Is that correct though?
The post war photos that I have seen seem to show them in brown paint - so I’m thinking (or hoping) that the switch from teak to brown happened during the war.
I've never seen a photo of one of these scumbled - I believe they were in brown paint immediately after the Lake. The two I built were finished like that.
Thanks for the reply. Looks like coach brown it is then! From a construction perspective at least it means that I can solder in the door furniture without worry about lining.
I still wonder if the coaches used in something like the Leeds Glasgow service were scumbled . The photos seem to show the coaches with a lustre. I suspect that, even if they were scumbled initially, then by the mid 1930s they were demoted and in coach brown.
I wish I had concrete evidence....anyway I’ve mailed you with scans of the photos that make me wonder.
From your last sentence do I understand that you lined them in coach brown? If so, I guess that could be what I have seen in the photos. Anyway i’ve Held off fixing door handles and grab handles for now because they would get in the way of any lining.
Unfortunately there has been a marked lack of progress recently.
I started to plot out where the roof ventilators should go and couldn’t quite work out their positions. So I then ordered the Isinglass drawing. I really should have done that before I started the kit!
While waiting for the drawing, I set about adding the body fixing brackets to the chassis. The kit supplies nice etches.
But there are raised areas on the overlays - this means that the brackets project too far out from the chassis. So I tried to fashion some brackets out of plastic in place of the etched one. As you can see this was not very effective!
Had I realised all of this when I started I could have removed the raised areas from the overlays before I started. Then I would have been able to use the etched brackets. (Although I do think that they are a bit over scale)
Now this is where the information on the Isinglass drawing helped out. I realised that there were two different types of body fixing bracket used on these coaches ( and two types of end panelling...not bad for a group of 10 coaches!). The raised areas on the overlays in this kit represent the earlier type of fixing bracket. In fact there is a photo of coach 3750 with these brackets and the same end panelling as the kit. Now 3750 and 3751 were built at the same time. 3750 was converted to a buffet car and 3751 was not.....looks like I have the numbers for my coaches. ( with a 2 prefix).
Last night I removed the plastic brackets - nail polish remover to loosen the glue helped a lot.
So now that this has been sorted I can go back to working out where the roof ventilators were positioned.