Isinglass 3-D printed coaches

This forum is for the discussion of railway modelling of the LNER and its constituent companies.

Moderators: 52D, Tom F, Rlangham, Atlantic 3279, Blink Bonny, Saint Johnstoun, richard

Woodcock29
LNER Thompson B1 4-6-0 'Antelope'
Posts: 686
Joined: Tue Nov 27, 2012 8:59 am
Location: South Australia

Isinglass 3-D printed coaches

Post by Woodcock29 »

We've had some discussion on these kits over recent times so thought I would start a dedicated thread.

I have inserted a photo of my GN Dia 164F composite kit. I also have an ex GN Dia 78T buffet car conversion kit.
Isinglass GN Dia 164F s.jpg
The Dia 164F comprises body, underframe, bogies and interior kits.

Although I've yet to commence building (I have a number of other projects to complete first) I've had a fairly good look at the kit components.

The body comes as two sides joined on a centre sprue- I have separated these for the photo.

I note that in general the sides and ends have little in the way of obvious lines from the printing process although there is one area on each of the ends where this is quite pronounced and will require some rectification. It is also noted that there is marginal distortion at one end of one side which will need some rectification of the beading as this will be obvious when lined. On the ends where some work is required it maybe necessary to replace a couple of pieces of beading. I also note that along the corridor side there is some distortion at the top on one side of each of the pillars between the windows - whether this will straighten when fixed to the roof I don't know or maybe it will require some heating, eg in hot water/boiling water?

The ends, whilst fitting outside the end of the sides, being bowed don't appear to suffer from the issue Jonathan identified with his non-gangwayed Dia 274 BTL.

The interior corridor partition and compartment partitions are thin printed clip together components with seats printed in the same grey material as the roof and underframe. This grey material is rather tacky (like the Bill Bedford MOUSA 3-D printed kits) and either needs time to become less tacky or thorough cleaning with isopropanol I understand. (My Bill Bedford kits were washed in soapy water before I built them but I had also had them for about 8 months prior to building)

The bogies made form the same grey material include fittings to enable the use of couplings requiring NEM pockets and provide two different pocket heights.

I will report more when I commence building.

Andrew
Last edited by Woodcock29 on Mon Jun 01, 2020 11:37 am, edited 1 time in total.
jwealleans
LNER A4 4-6-2 'Streak'
Posts: 4208
Joined: Wed Oct 25, 2006 8:46 am

Re: Isinglass 3-D printed coaches

Post by jwealleans »

Adding my post of 25-05-20 from the workbench thread for completeness.

I'd been aware of this range developing for some time but wasn't overly taken with some of the early examples I saw. More recently, though, the quality of the printing process has improved and encouraged by the Bill Bedford carriages I recently finished, I thought I'd have a dabble. What tipped the scale was the availability of a 
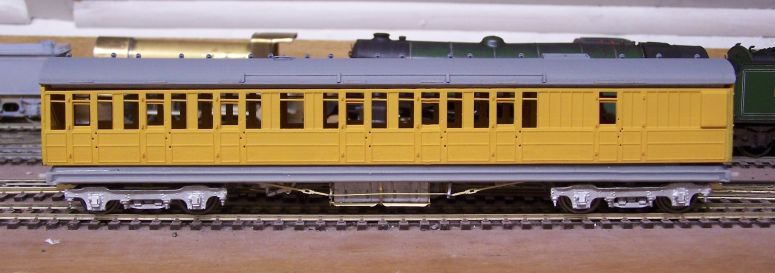
D274 Lavatory Third, one of the 58' Gresley carriages which I think are the best looking carriages to run in this country.

You order the kits in sections, if that doesn't sound tautologous: the body is one item, floor another, bogies another. No underframe components are offered. I went for body and floor in this case and sorted out MJT items for the rest.

Image

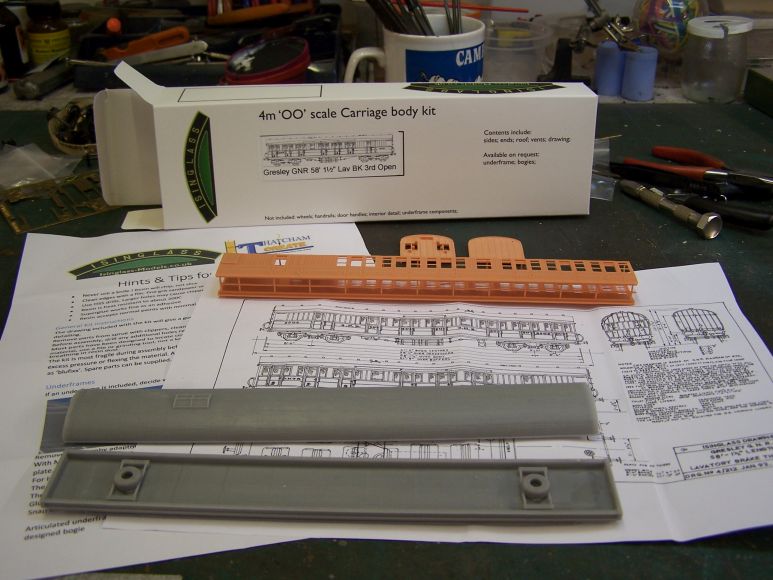
This is what turned up, within a couple of days; body sides still attached to each other, ends, roof, floor, generic instructions and a copy of the Isinglass drawing for this vehicle. As these generally show liveries and variations and list numbers and withdrawal dates, they're invaluable and worth a fair bit of the kit cost on their own.

Image

The floor is designed to take either RTR bogies (using the boss) or MJT ones (snap the boss out and you have guides for the brass MJT mount. Unfortunately the floor was only 56' long, so I had to wait for a replacement. Here the assembled bodyshell is perched on the short floor.

Image

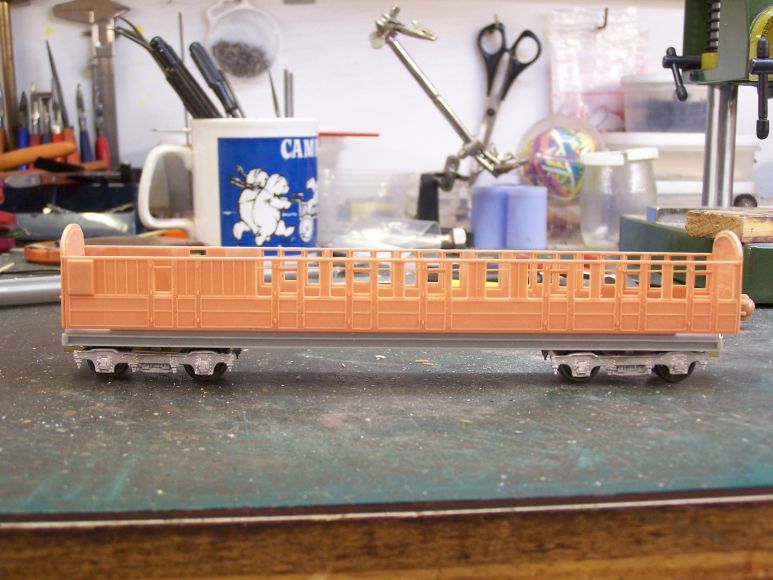
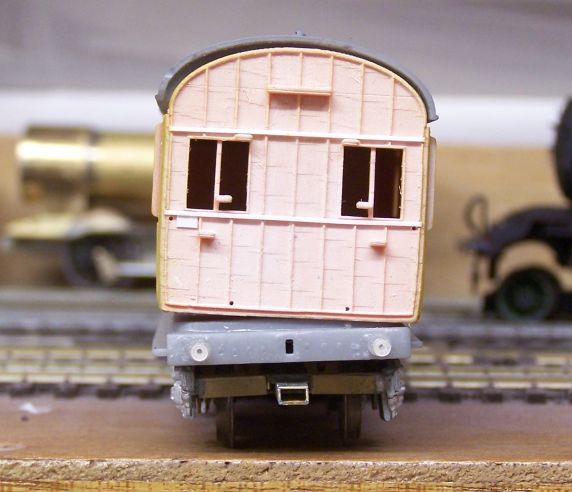
When the replacement came, I was greatly impressed to see that my suggestion of adding the full length footstep to the print had been acted upon. The printed step isn't as fine as a plastic or brass one would have been, but it's much stronger.

Image

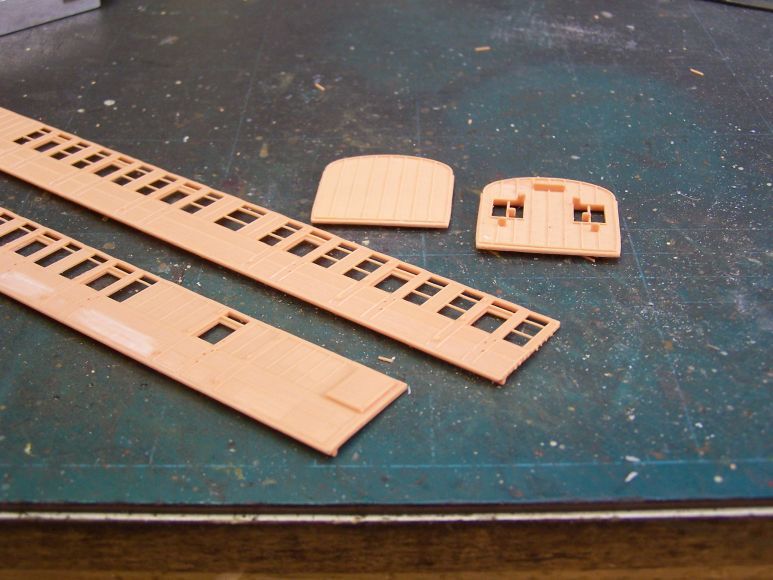
The printing on the sides was much better than I've seen in the past, but it's not yet a match for etched or moulded parts. There are raised square areas on the print and in one place the side much have sagged slightly in the printer so a doorframe and droplight weren't straight. I did some work with a burnishing pencil and left other areas to see how filler primer would help. You can also see the characteristic pips which the Mousa vehicles also had and which have to be filed flat.

Image

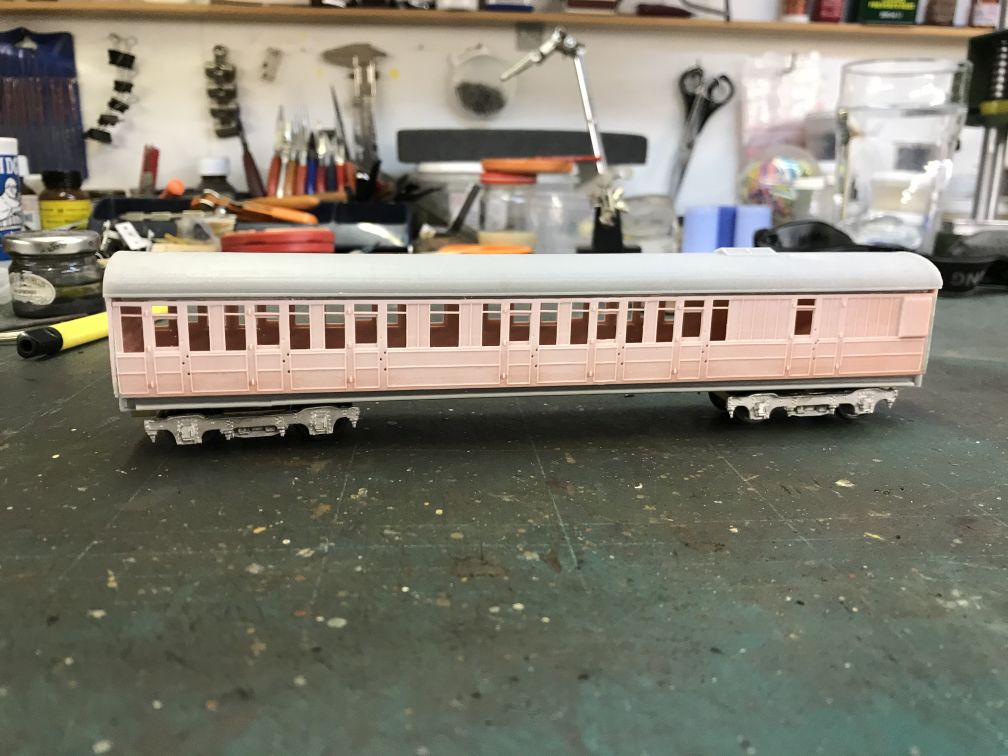
The body went together with cyano and very little effort. Subsequent to the above photo I added 40 thou partitions each side of the lav and at the brake end to make the whole thing more rigid.

Image

After that there were a few days awaiting the replacement floor.

Image

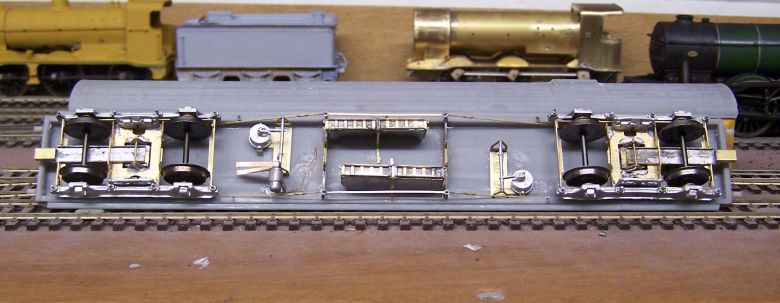
Underframe populated - the MJT components give it a bit of weight as well which is no bad thing.

Image

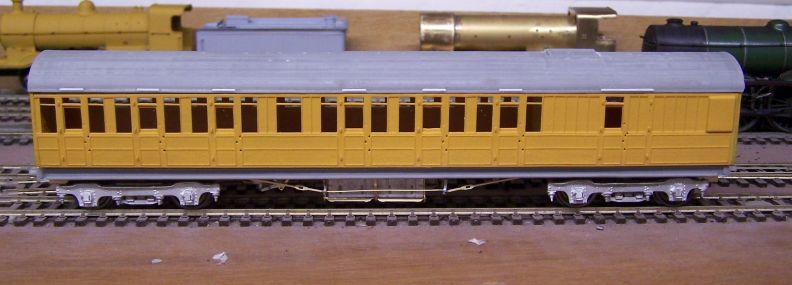
Body primed - it had two or three light coats of filler primer on the sides - and I've started detailing the roof. The roof has a pair of parallel lines in side to help you get the vents central, but no other except, in this case, the skylight for the van end. I haven't checked in detail, but the skylight looks a bit wide and flat to me. I did take some sandpaper to the roof as the striations on that would be very visible on a finished model.

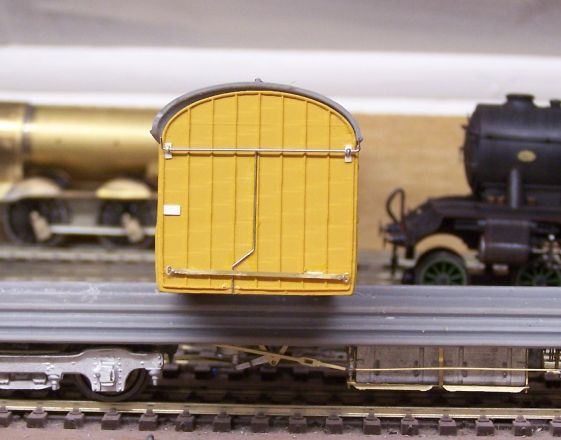
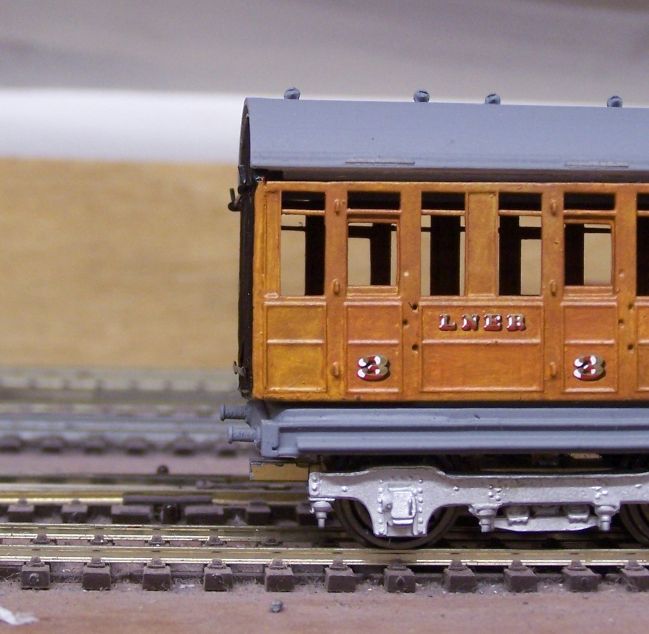
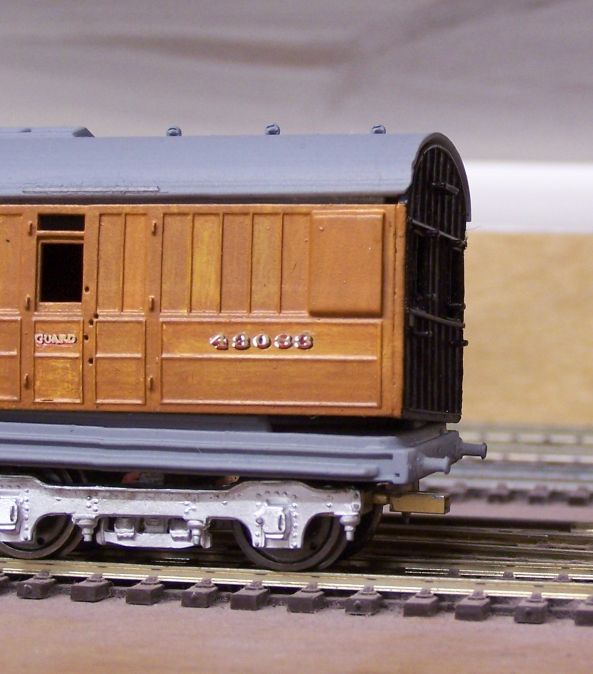
The end detail was a bit of a disappointment - there was very little other than steps. Of course, it's much easier to add than remove, so that's what I did. Passenger end now with alarm gear, brake piping and a cockeyed light switch; van end with revised panelling (the original beading was simply incorrect) and holes for handrails and lamp irons drilled. I've put the lamp irons fractionally high so they don't interfere with the body/floor join.

Image

Image

Roof now with destination board holders, vents, fillers and handrails as well as the rain deflectors. I'm out of Evergreen rod for the rainstrip so that is having to wait for the moment.

Image

So this is where it is right now; I'm also out of black spray cans, so the underframe isn't beyond primer either. I gather our local Halfords is open again so I may get there this week.

Image

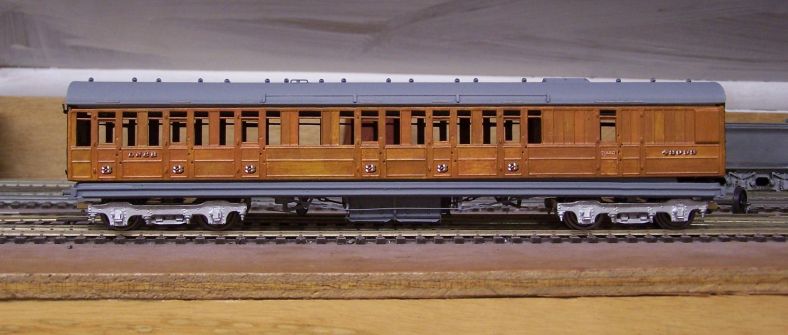
On the whole I'm pleased with this. The sides still show print marks when you look along them and the ends are too thick - this has been raised as a concern elsewhere. Just to give you an idea, here are the model ends compared to prototype shots:

Image Image

Image Image

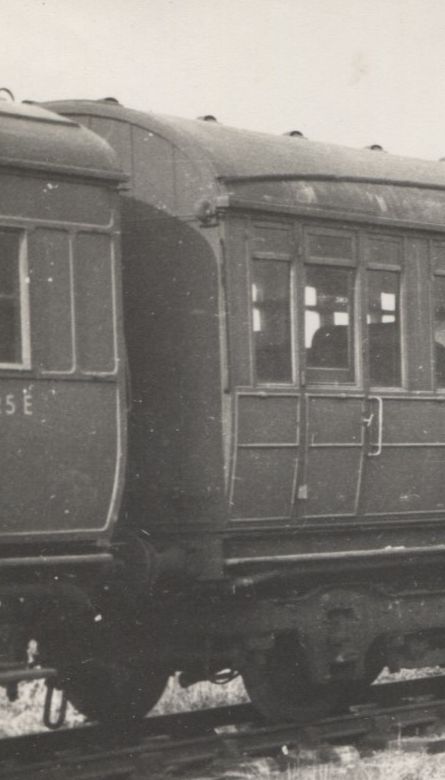
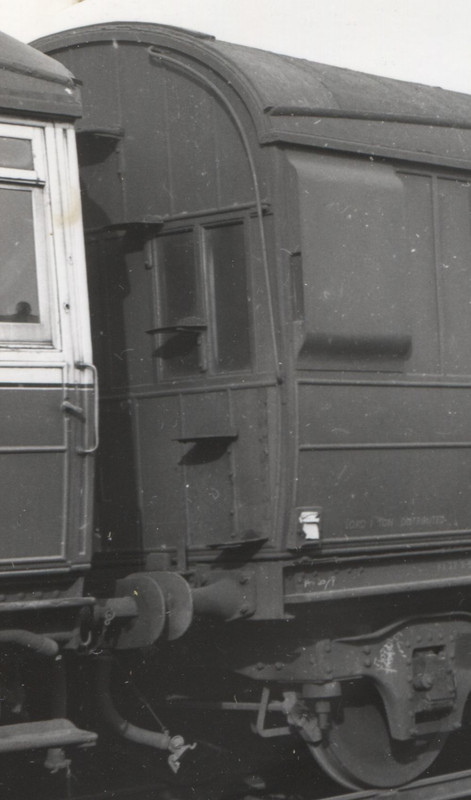
You can see that the end ought to fit between the sides to give a scale thickness beyond the end of the panelling and that isn't the case. However in 4mm it's hardly terminal and the range is still developing, so it remains to be seen what can be done. It's still a handsome vehicle and I can live with the compromise, to be honest. You don't get the level of detail I found on the Mousa kits, but that allows you to do your own personalisation and detailing which, to be frank, isn't rocket science.

Irritatingly that passenger end photo also shows a handrail which isn't on the drawing and I hadn't noticed before.
Graeme Leary
GNR C1 4-4-2
Posts: 751
Joined: Fri Oct 28, 2011 9:43 pm

Re: Isinglass 3-D printed coaches

Post by Graeme Leary »

Jonathon,

Very pleased to see/read your comments as I have just ordered 2 Isinglass d95 SLT 'side only' kits for my 'Aberdonian' express. Obviously some very good attention to detail (and sounds like ease of assembly as well with CA glue - my adhesive of choice).

Graeme Leary
New Zealand
Hatfield Shed
LNER A4 4-6-2 'Streak'
Posts: 1664
Joined: Fri Dec 23, 2011 3:34 pm

Re: Isinglass 3-D printed coaches

Post by Hatfield Shed »

A very welcome posting and I hope it will provide encouragement to others to try these kits, and in turn lead to an expansion of what Andy Edgson can produce.
User avatar
Atlantic 3279
LNER A4 4-6-2 'Streak'
Posts: 6527
Joined: Fri Jun 26, 2009 9:51 am
Location: 2850, 245

Re: Isinglass 3-D printed coaches

Post by Atlantic 3279 »

Woodcock29 wrote: Tue May 26, 2020 3:52 am

You can see that I tried to insert the image above but still haven't worked out how to do that!

Andrew
I've interfered and inserted the image for you. It only requires use of the "place inline" button which is usually only visible to me when I scroll further down the screen below the "attachments" tab. You appeared to have added some more code of some sort, which evidently confused the system.
Most subjects, models and techniques covered in this thread are now listed in various categories on page1

Dec. 2018: Almost all images that disappeared from my own thread following loss of free remote hosting are now restored.
Mercator II
GCR O4 2-8-0 'ROD'
Posts: 508
Joined: Mon Nov 03, 2008 12:14 pm
Location: Lincolnshire

Re: Isinglass 3-D printed coaches

Post by Mercator II »

Woodcock29 wrote: Tue May 26, 2020 3:52 am
The bogies made form the same grey material include fittings to enable the use of couplings requiring NEM pockets and provide two different pocket heights.


Andrew
Hi Andrew

Have the bogies been produced to allow for bearings to be inserted? Or do they recomend a method for wheeling?

Many thanks
oOo

Brian

Garage Hobbit!!
Modelling in 00 on my heritage line, very GCR inspired
Woodcock29
LNER Thompson B1 4-6-0 'Antelope'
Posts: 686
Joined: Tue Nov 27, 2012 8:59 am
Location: South Australia

Re: Isinglass 3-D printed coaches

Post by Woodcock29 »

Yes they cater for standard shouldered brass bearings.
Andrew
Mercator II
GCR O4 2-8-0 'ROD'
Posts: 508
Joined: Mon Nov 03, 2008 12:14 pm
Location: Lincolnshire

Re: Isinglass 3-D printed coaches

Post by Mercator II »

Woodcock29 wrote: Tue May 26, 2020 10:06 am Yes they cater for standard shouldered brass bearings.
Andrew
Thank you, might have to order a pair for trial on the observation saloon I'm hoping to start bashing soon
oOo

Brian

Garage Hobbit!!
Modelling in 00 on my heritage line, very GCR inspired
Woodcock29
LNER Thompson B1 4-6-0 'Antelope'
Posts: 686
Joined: Tue Nov 27, 2012 8:59 am
Location: South Australia

Re: Isinglass 3-D printed coaches

Post by Woodcock29 »

Studying my Dia 164F and 78T further I note that one omission is the toplight hinged ventilators above the windows and door droplights. Whilst the gap is included there is no actual frame for the hinged ventilators. This also applies to the Dia 274 being built by Jonathan. So the toplights in fact appear too large.

I'm not sure how we can replicate those easily. Might have to think about that a bit?

Andrew
Woodcock29
LNER Thompson B1 4-6-0 'Antelope'
Posts: 686
Joined: Tue Nov 27, 2012 8:59 am
Location: South Australia

Re: Isinglass 3-D printed coaches

Post by Woodcock29 »

Time for an update on my findings on the two Isinglass kits I have, the Dia 164F and 78T. I have been in dialogue with Andy Edgson on my findings and have included his response to my comments.

I have been studying the Dia 164F in detail and noticed that there are some discrepancies between the printed sides and John Edgson's Isinglass drawing.

The key issue is the width of the first class compartment windows on the compartment side which are approx. 2mm too wide and correspondingly the panels in between compartments are much too narrow. I have looked closely at the drawing and in the notes on the right hand side it gives dimensions for all the windows. Unfortunately, what should be 1’4½” for the first class windows looks more like 1’9½” in the notes. So what appears to be a 9 is actually a 4. So it seems to me that the CAD work has been drawn up using 1’9½” rather than a 1’4½”as the width of the first class compartment windows in this coach, ie the windows are 5 inches or 1.7mm too wide. Andy confirms my thoughts on this matter and will correct the CAD work.

Another matter I note is that three sides of the frames for the ventilator toplight windows have not been included. Whether its possible to include these in future designs I don’t know? Without these the toplights appear too large. How easy it will be to fit thin plastic strip into the sides and top of the toplights to replicate these I don’t know yet. I have attached a photo I took of part of the compartment side of the preserved Dia 164K at the Severn Valley Railway in 2013. This shows first class compartments. In these its easy to see the toplight ventilator frames and also the size of the first class compartment windows. Andy has indicated that he will give further thought to this after initially deciding to leave this for the modeller to incorporate.
DSC_4293 s.jpg

I also note that the droplights on the Dia 164F are a little thin at the sides and could be improved with a bit of 'meat’ on their sides. The width of these can also be seen in the attached photo.

Following further study of the Dia 78T, I note in this coach the droplights have not been included in the doors and that on the left hand end of each side the handrail holes are in the wrong position (easily fixed with a bit of filler and a drill!). Andy has pointed out that on the kitchen end the handrail is in this position and this can be noted in photos on Steve Banks website (https://www.steve-banks.org/prototype-a ... uffet-cars). The other side is incorrect and he'll correct that.

Also the inner side to the doors at the kitchen end are not the same thickness across the width of the doors. Andy acknowledges there is a technical issue with these prints which has resulted in this change in thickness half way through on the inner side of the doors at one end and will correct this.

The extra bogies I purchased, curiously all had a twist in them yet those included with the actual kits were fine. Although Andy indicated he would replace the twisted bogies I have corrected the twist myself as follows: by immersing in near boiling water (wearing rubber gloves) for 15-20 secs and then straightening them by eye and then immersing in cold water for 30 secs or so. They appear to have held their straightened form well. This method was recommended by Atlantic 3279 who had to do similar to some components of Bill Bedford’s printed resin Howlden 6 wheelers which appeared to be in the same grey resin as the Isinglass bogies, roofs and floors.

In general I think the quality of the printing is very good on the sides, ends and bogies. There are minor areas on the ends of my D164F that need rubbing down - I've done that today with what looks like satisfactory results.

Andy is going to reprint the sides for both coaches for me and hopefully he'll also be able to include the full framing for the toplight ventilators - we'll see?

Without these kits I doubt very much that I would be building such coaches and I can see the potential is huge with this new and emerging technology, considering the range of coach drawings that John Edgson produced.

I think Andy's approach is commendable and working together like this we all win - we get our coaches and hopefully Andy will get more sales!

Andrew

Clearly I've yet to work out how to actually insert the photo into the text - perhaps someone can provide advice on that?
Last edited by Woodcock29 on Tue Jun 02, 2020 12:33 am, edited 1 time in total.
jwealleans
LNER A4 4-6-2 'Streak'
Posts: 4208
Joined: Wed Oct 25, 2006 8:46 am

Re: Isinglass 3-D printed coaches

Post by jwealleans »

I generally put the cursor to the point I want the picture to appear then press 'Place Inline' - is that not working for you?
Woodcock29
LNER Thompson B1 4-6-0 'Antelope'
Posts: 686
Joined: Tue Nov 27, 2012 8:59 am
Location: South Australia

Re: Isinglass 3-D printed coaches

Post by Woodcock29 »

That's what I did. It's strange because I did the same for the first post of this thread and the photo stayed below but now I note its gone into the text but has a border around it.
User avatar
Atlantic 3279
LNER A4 4-6-2 'Streak'
Posts: 6527
Joined: Fri Jun 26, 2009 9:51 am
Location: 2850, 245

Re: Isinglass 3-D printed coaches

Post by Atlantic 3279 »

Atlantic 3279 wrote: Tue May 26, 2020 9:45 am
Woodcock29 wrote: Tue May 26, 2020 3:52 am

You can see that I tried to insert the image above but still haven't worked out how to do that!

Andrew
I've interfered and inserted the image for you. It only requires use of the "place inline" button which is usually only visible to me when I scroll further down the screen below the "attachments" tab. You appeared to have added some more code of some sort, which evidently confused the system.
Most subjects, models and techniques covered in this thread are now listed in various categories on page1

Dec. 2018: Almost all images that disappeared from my own thread following loss of free remote hosting are now restored.
Woodcock29
LNER Thompson B1 4-6-0 'Antelope'
Posts: 686
Joined: Tue Nov 27, 2012 8:59 am
Location: South Australia

Re: Isinglass 3-D printed coaches

Post by Woodcock29 »

This time it worked but I'm sure I didn't add anything else previously- strange. Perhaps I need to make sure I add photos when I've finished all the text?
User avatar
Atlantic 3279
LNER A4 4-6-2 'Streak'
Posts: 6527
Joined: Fri Jun 26, 2009 9:51 am
Location: 2850, 245

Re: Isinglass 3-D printed coaches

Post by Atlantic 3279 »

I plead insufficient knowledge to answer that.
Most subjects, models and techniques covered in this thread are now listed in various categories on page1

Dec. 2018: Almost all images that disappeared from my own thread following loss of free remote hosting are now restored.
Post Reply