Page 1 of 10

Rob's 7mm Scale Coach Workbench

Posted: Tue Oct 22, 2013 7:34 pm
by Robpulham
Having taken the plunge in stripping the cab of the A3 prior to making the roof removable did I continue with the F8?

Nah! I am sure that it will come as no surprise that it didn't take much encouragement from Chris for me to start on one of the coach kits that she bought me for my birthday.

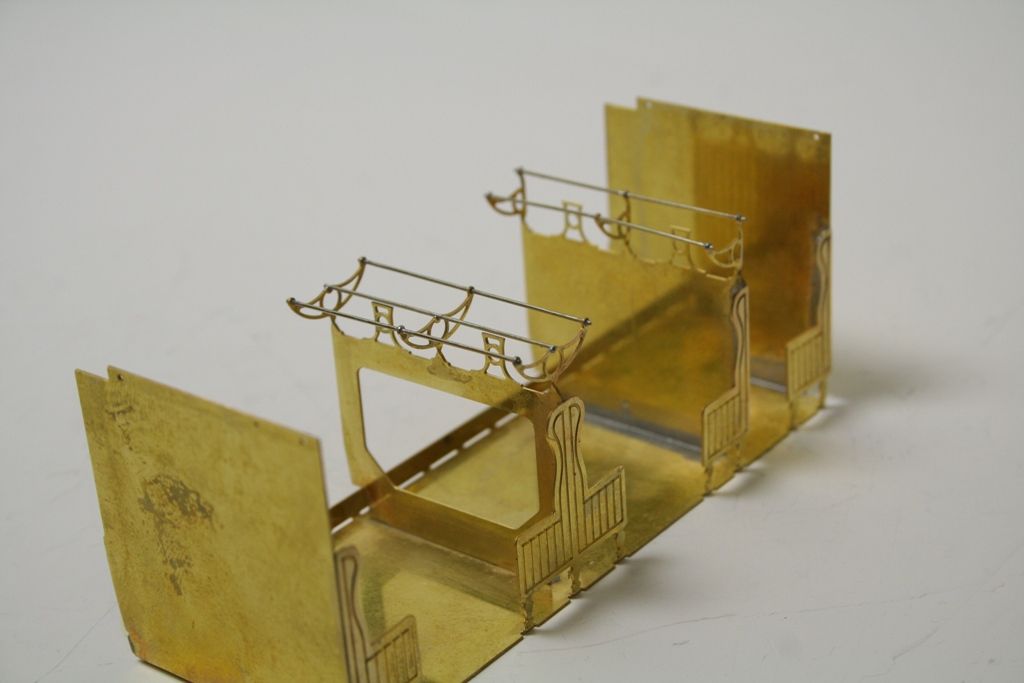
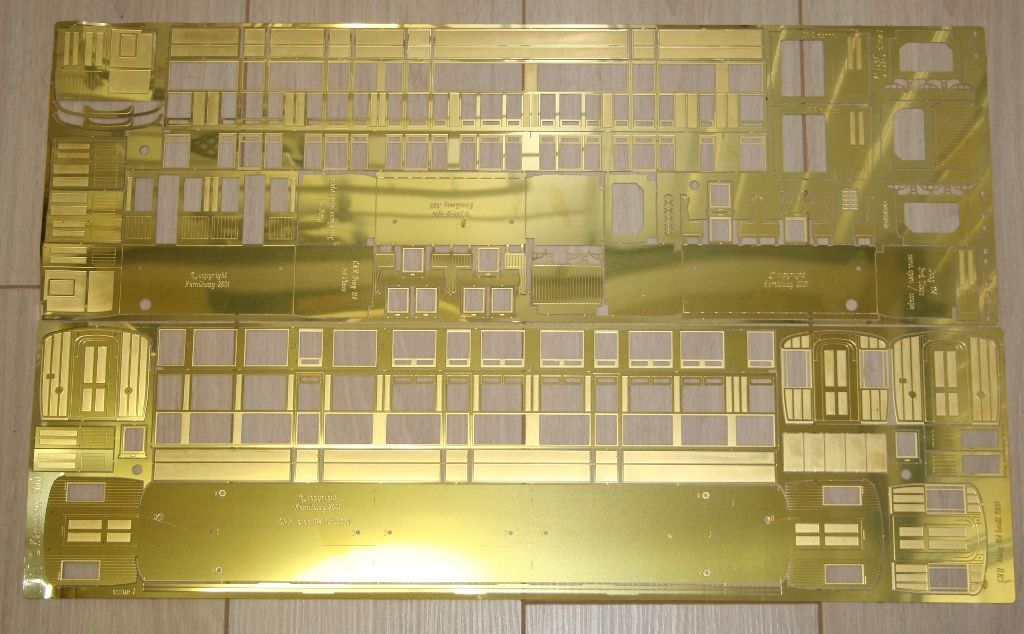
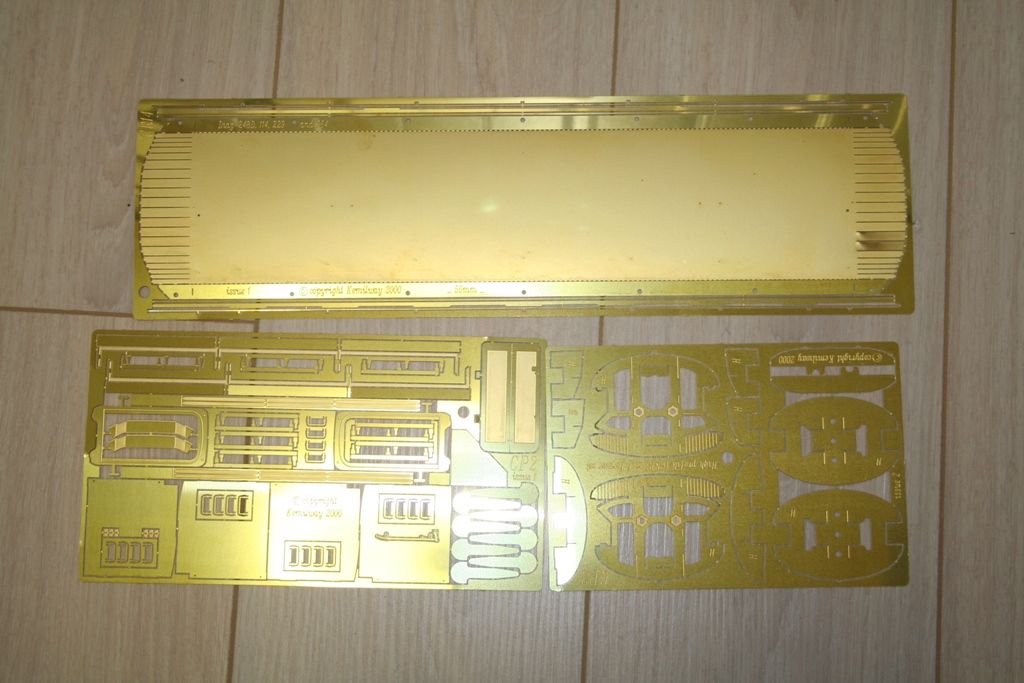
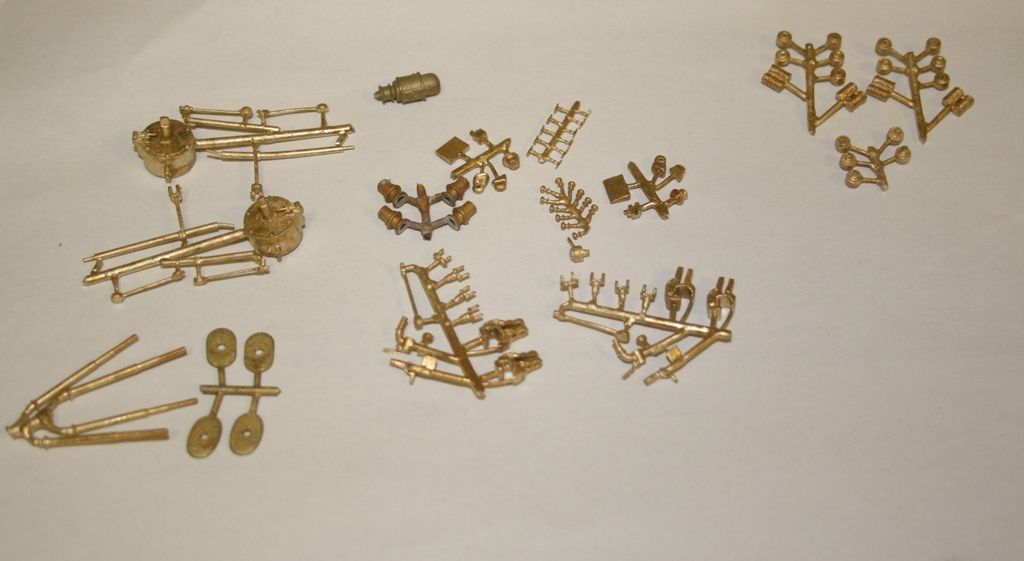
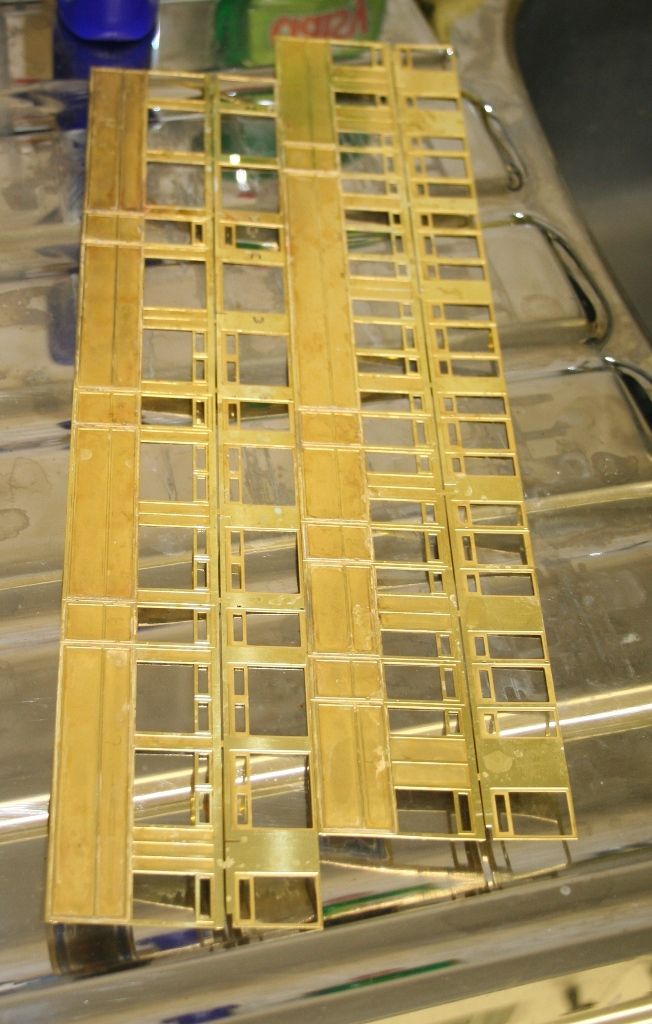
This is some of what's in the box - for this particular coach I am still waiting for the underframe and bogie etches.

Image

Image

Image

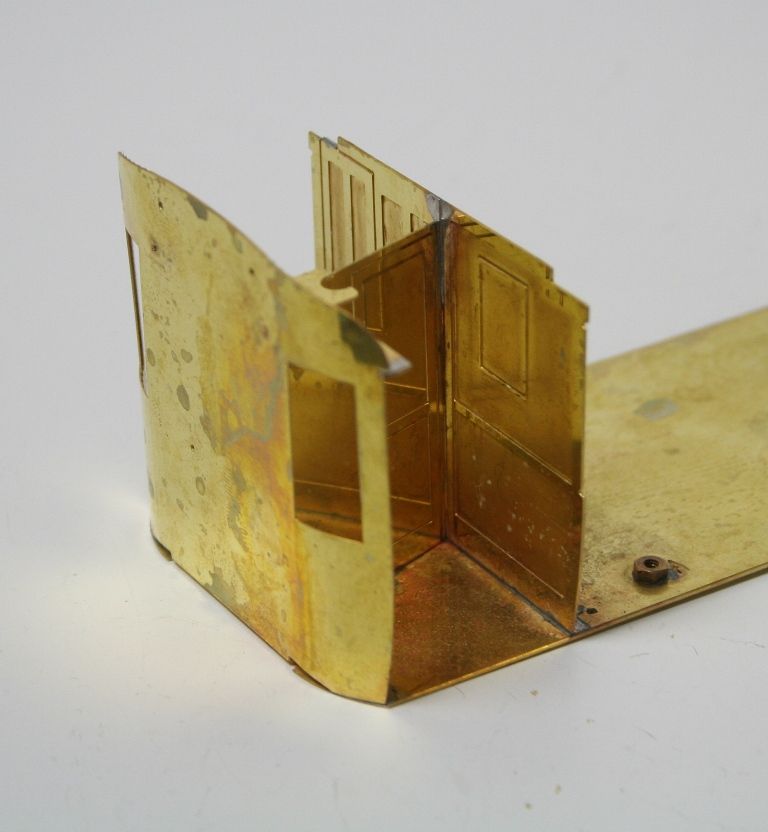
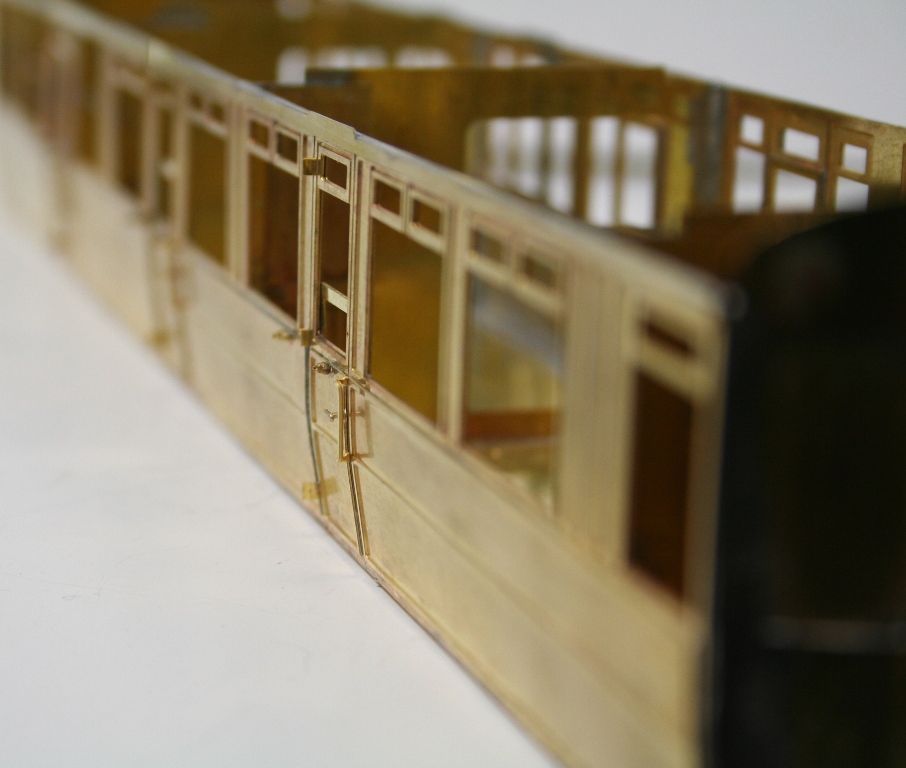
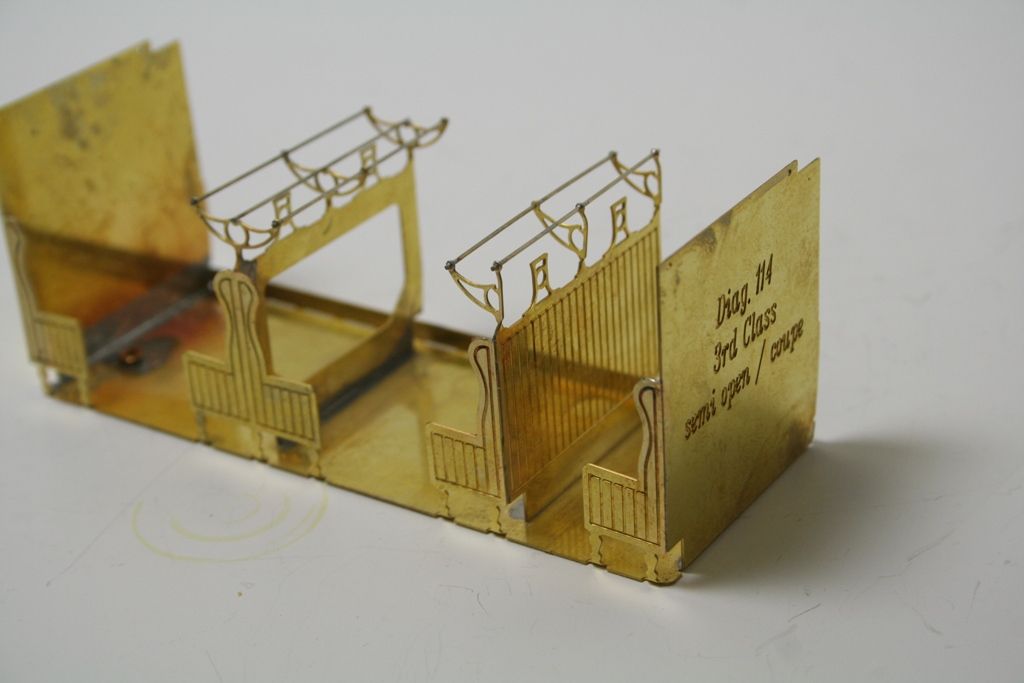
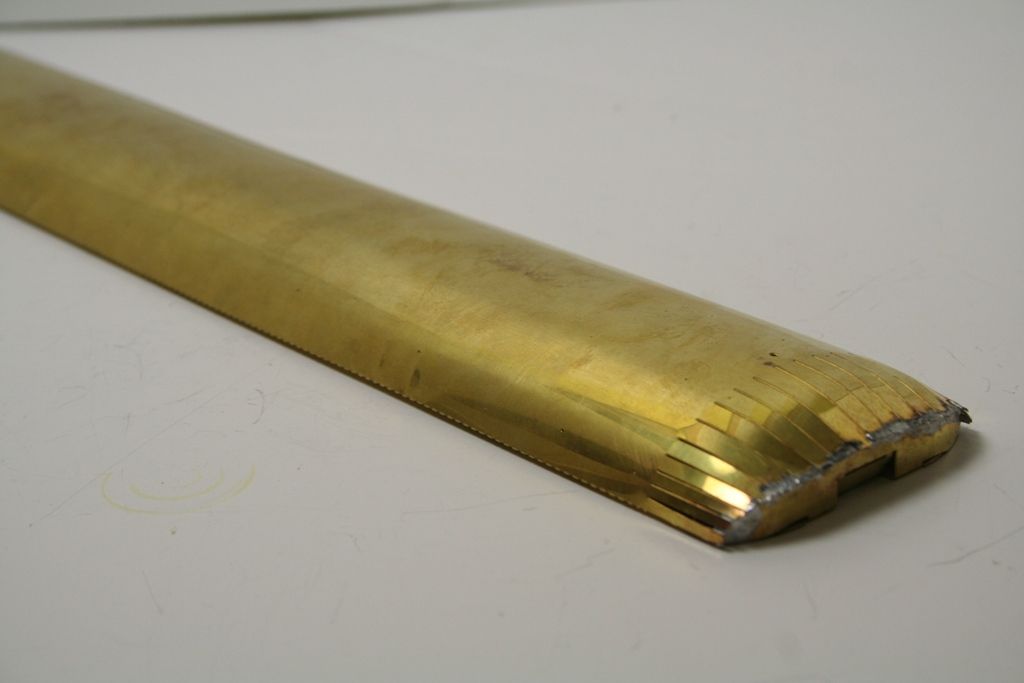
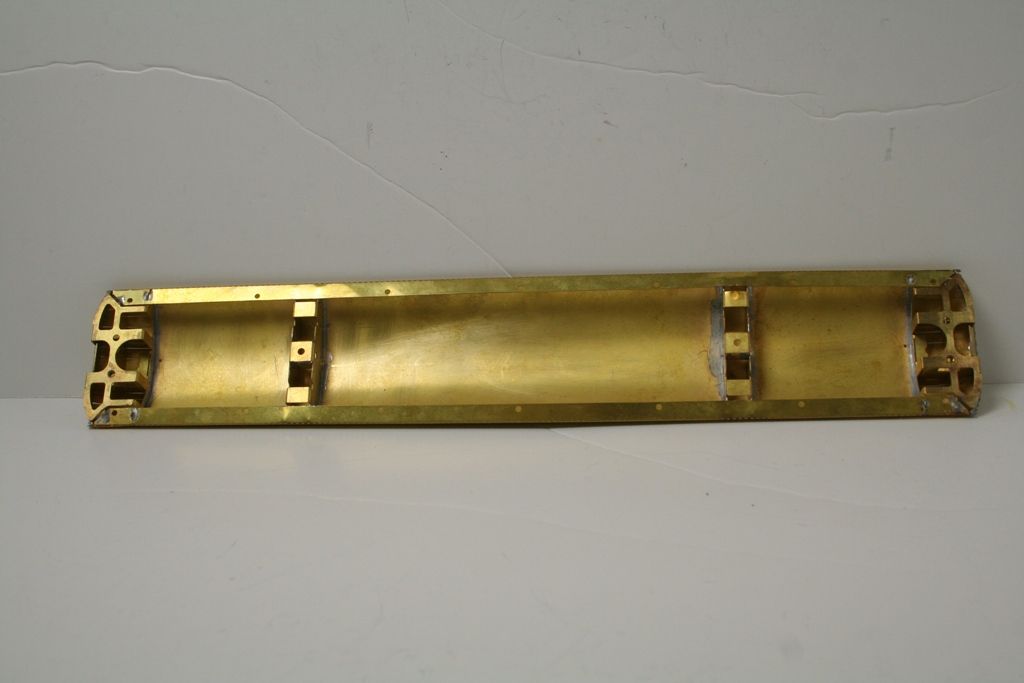
Having had a read of the quite comprehensive instructions available for download from the kemilway site it reckons about a hundred and fifty hours to build a coach depending on experience. Having had some of these kits in 4mm some years ago I had an idea what to expect and this is where I got to after 4 hours yesterday.

Image

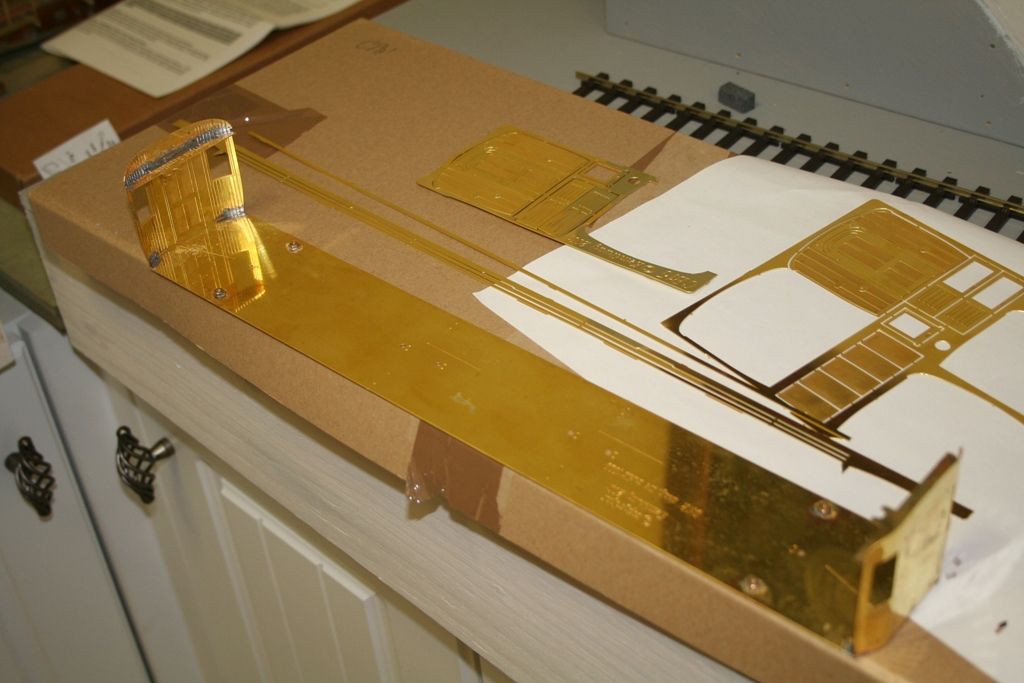
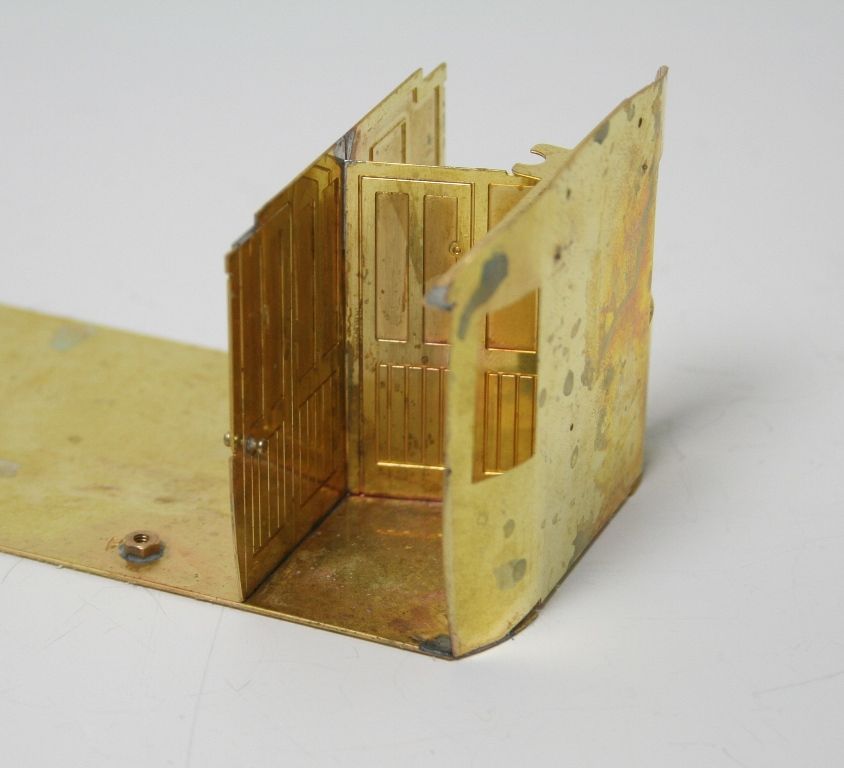
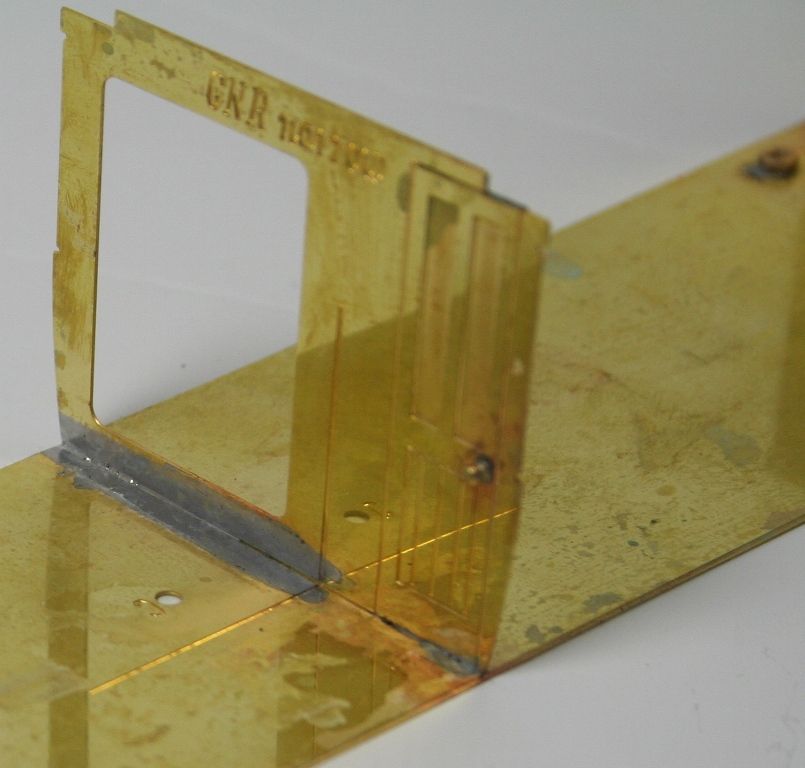
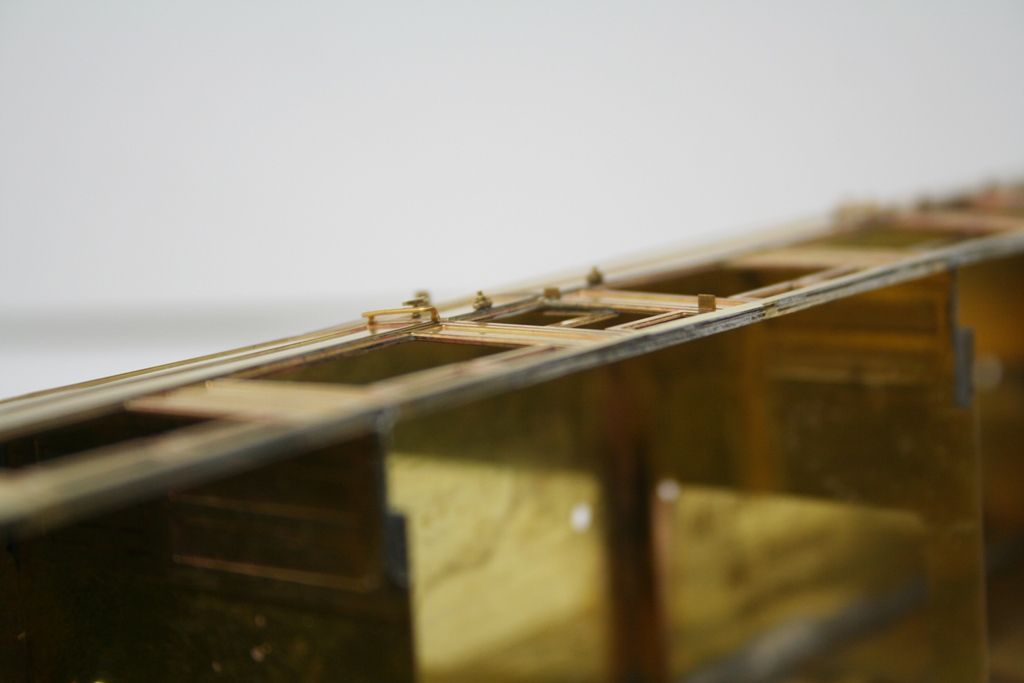
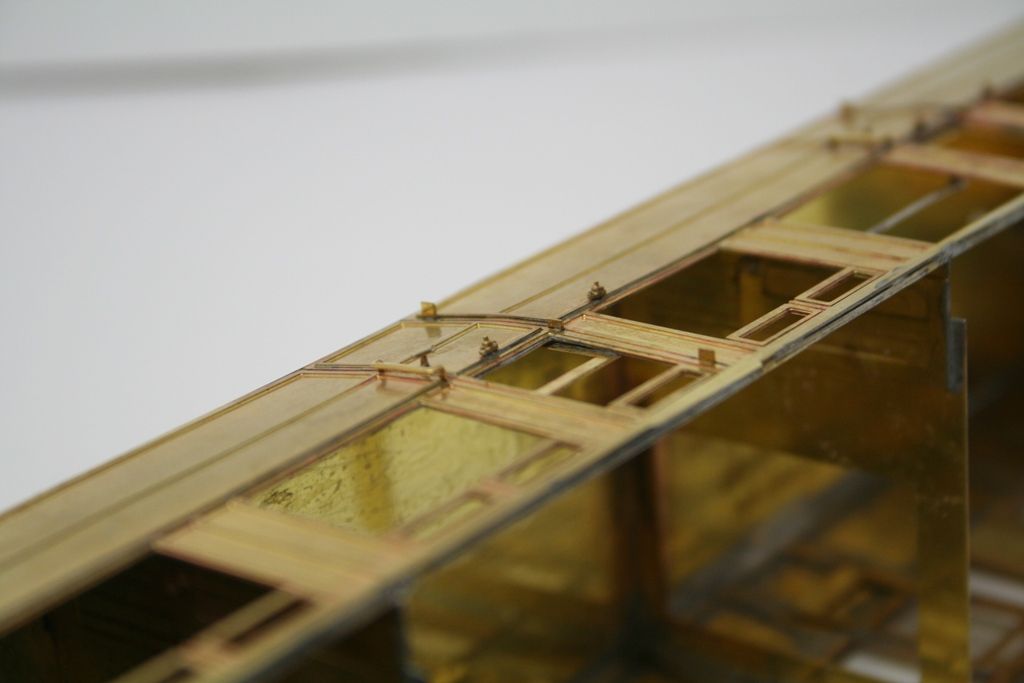
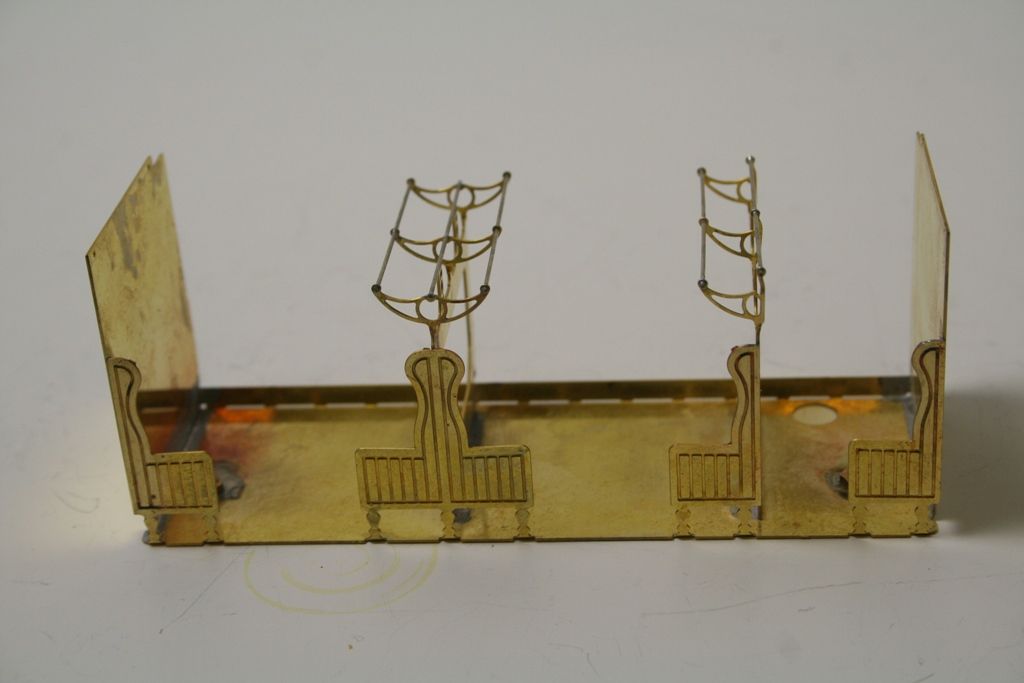
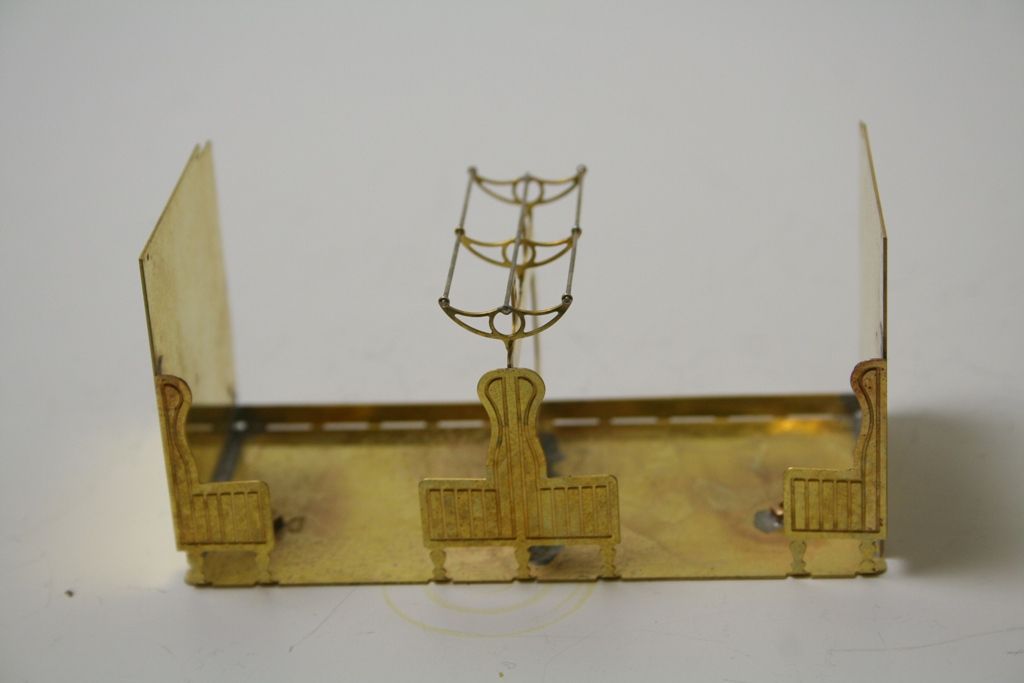
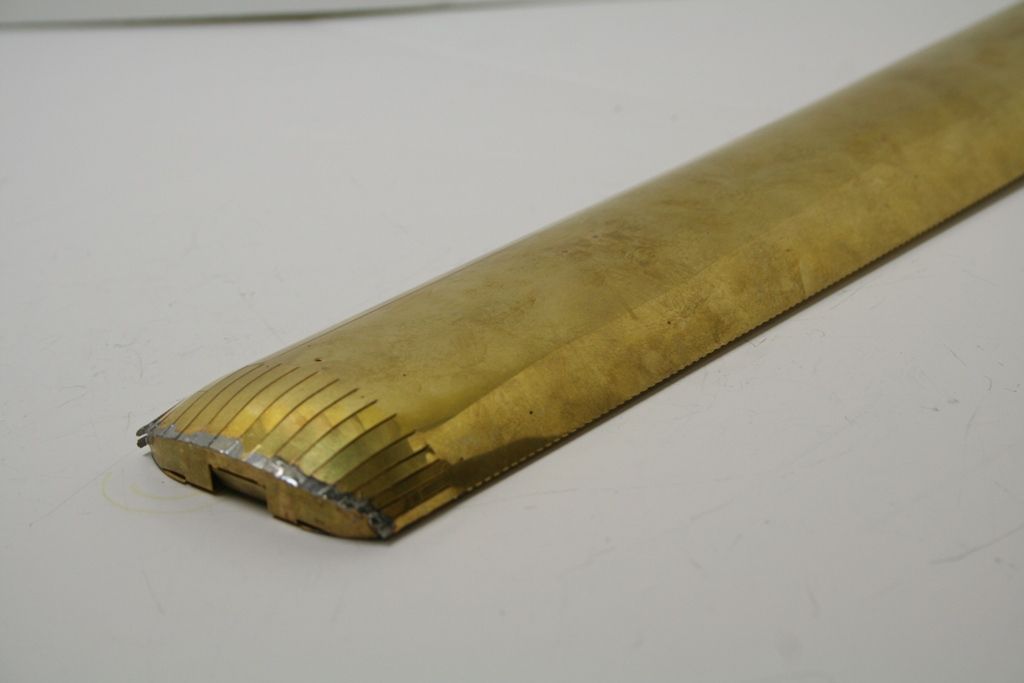
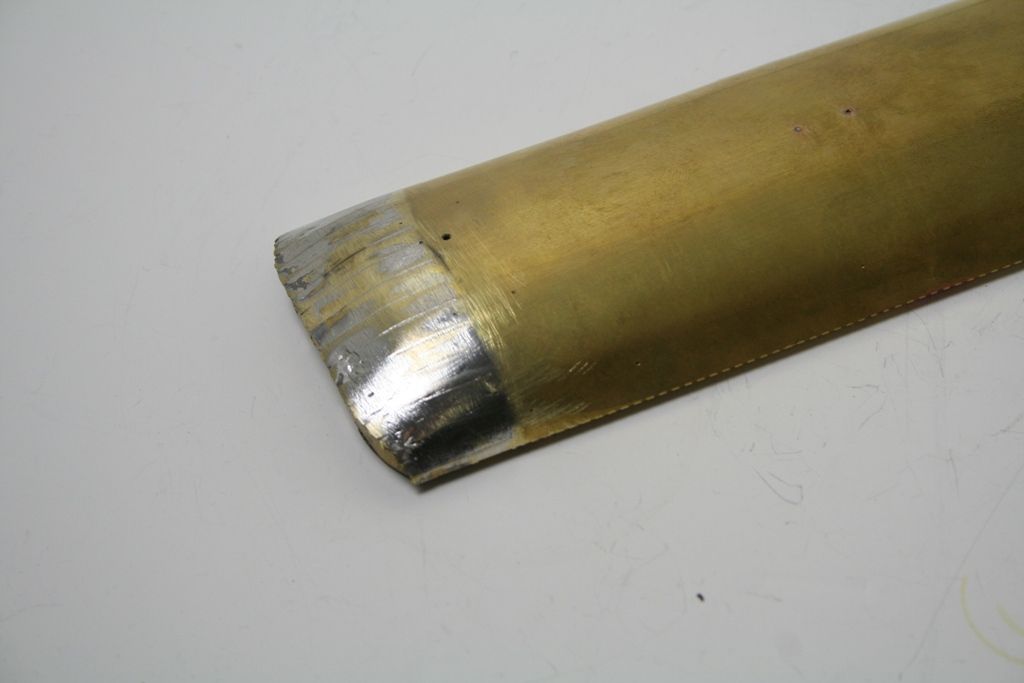
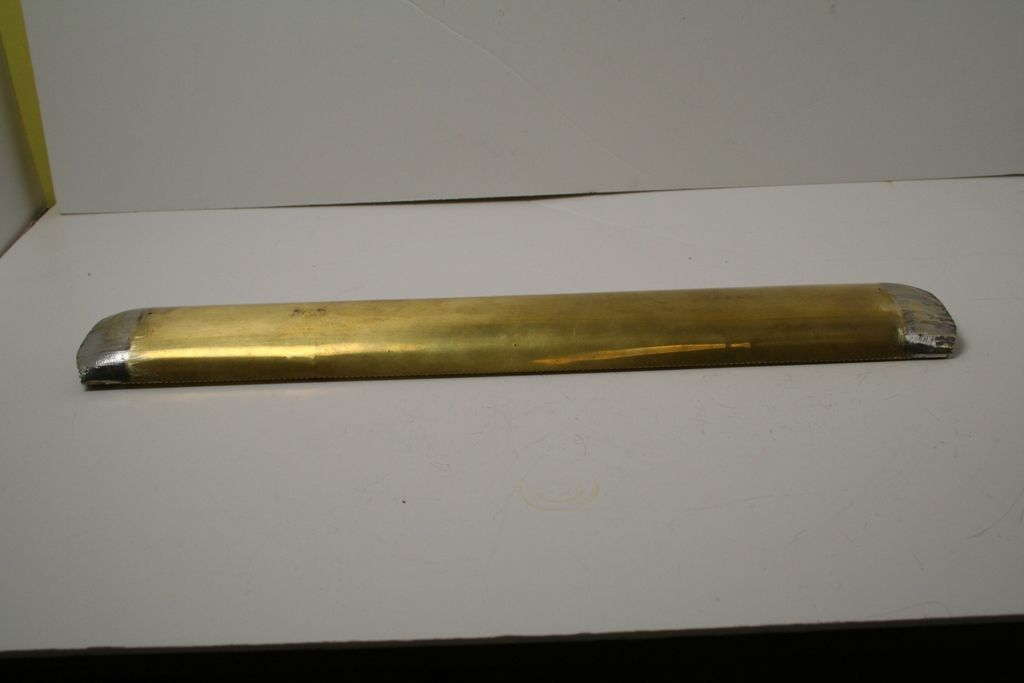
The floor pan folded up and the inner ends curved with the formers soldered in.

Image

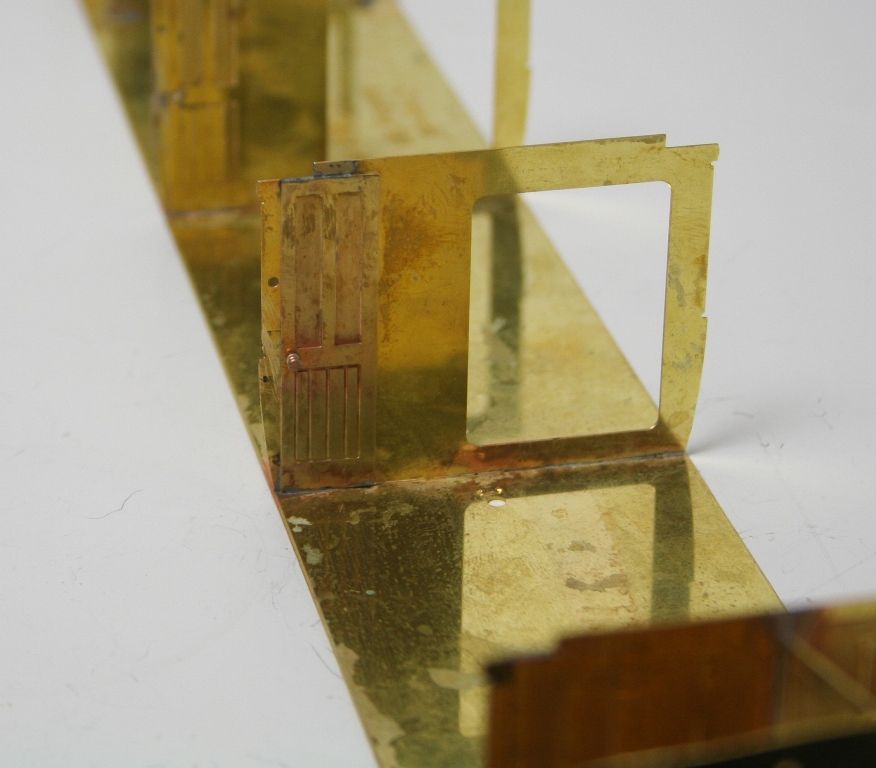
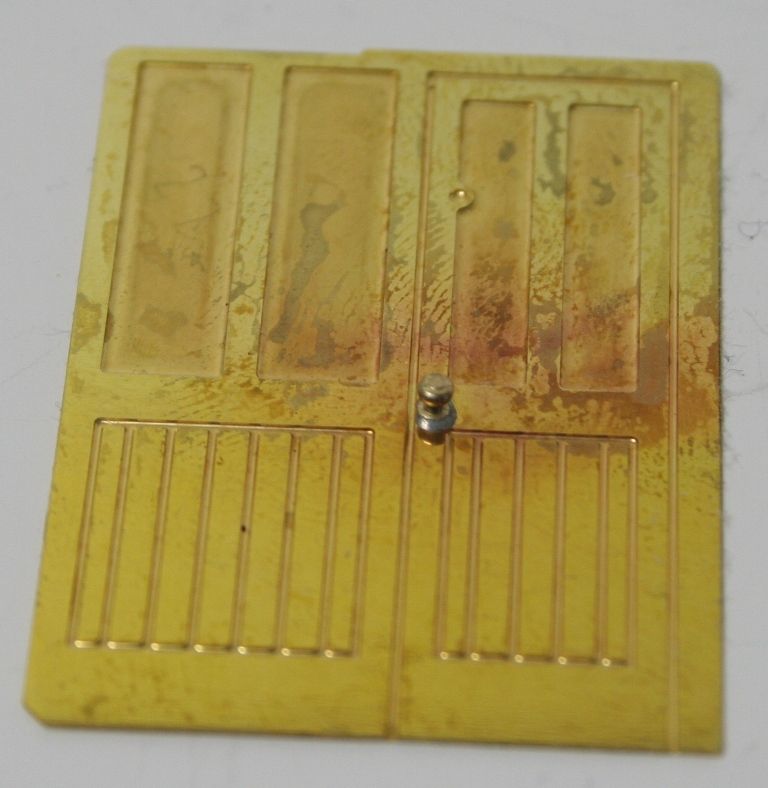
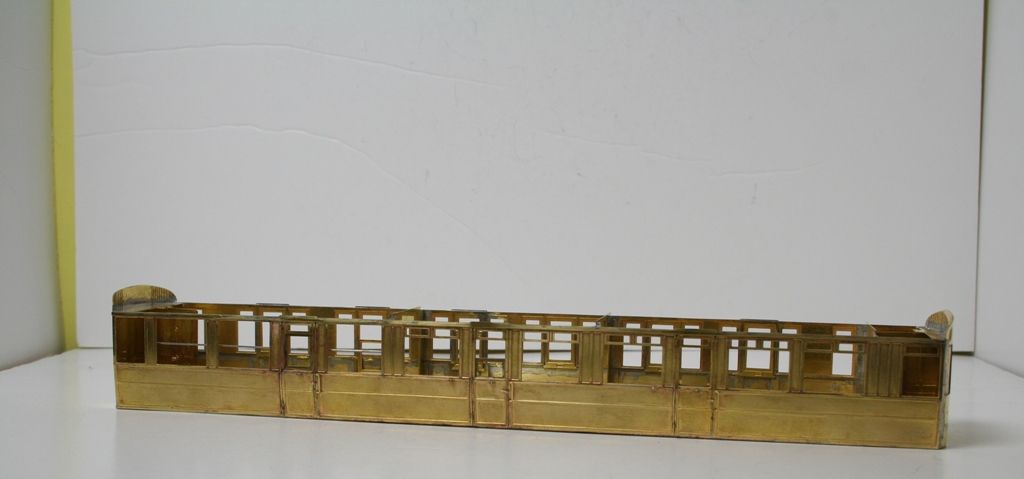
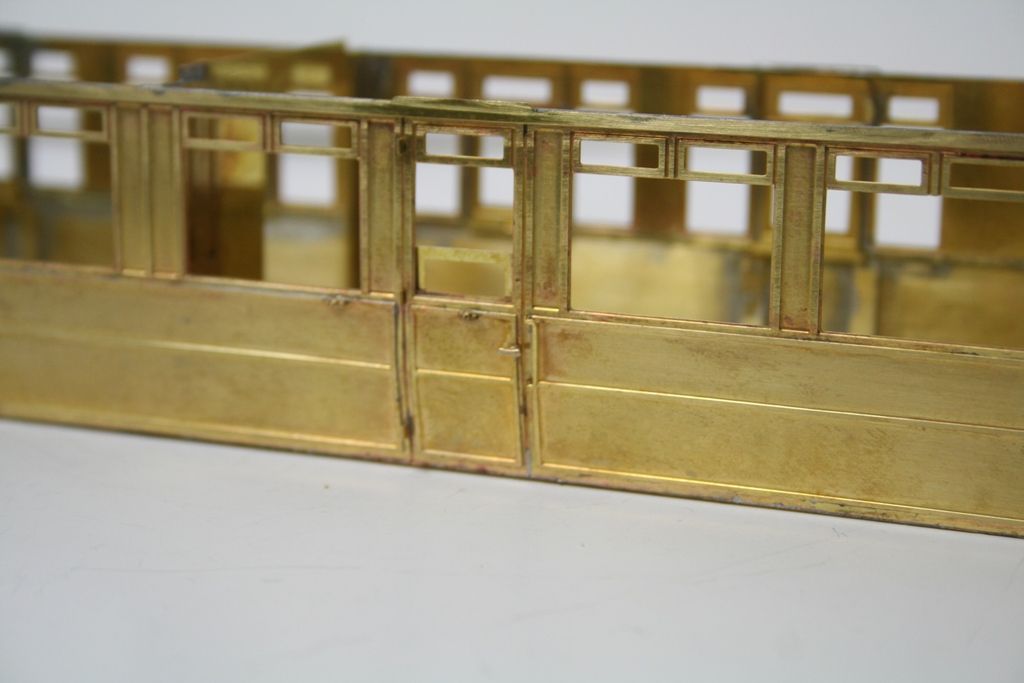
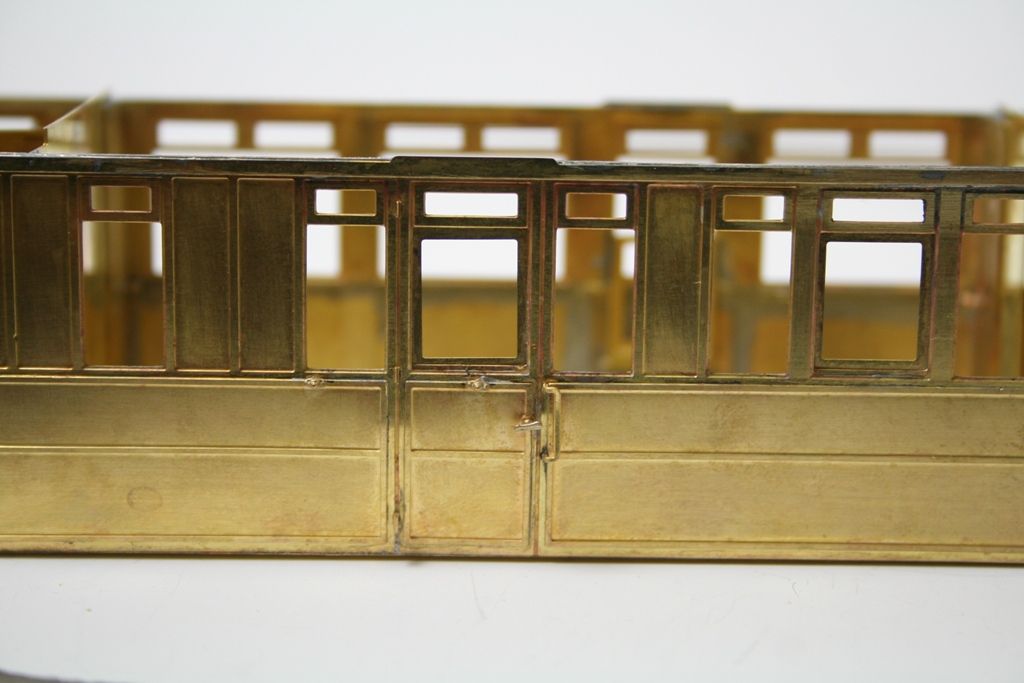
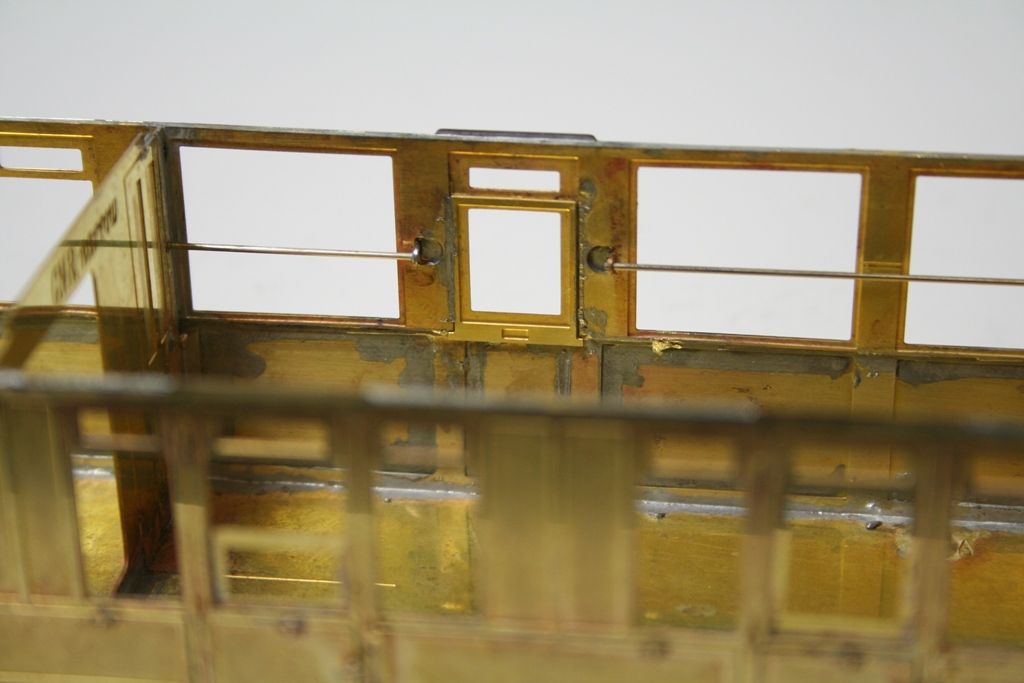
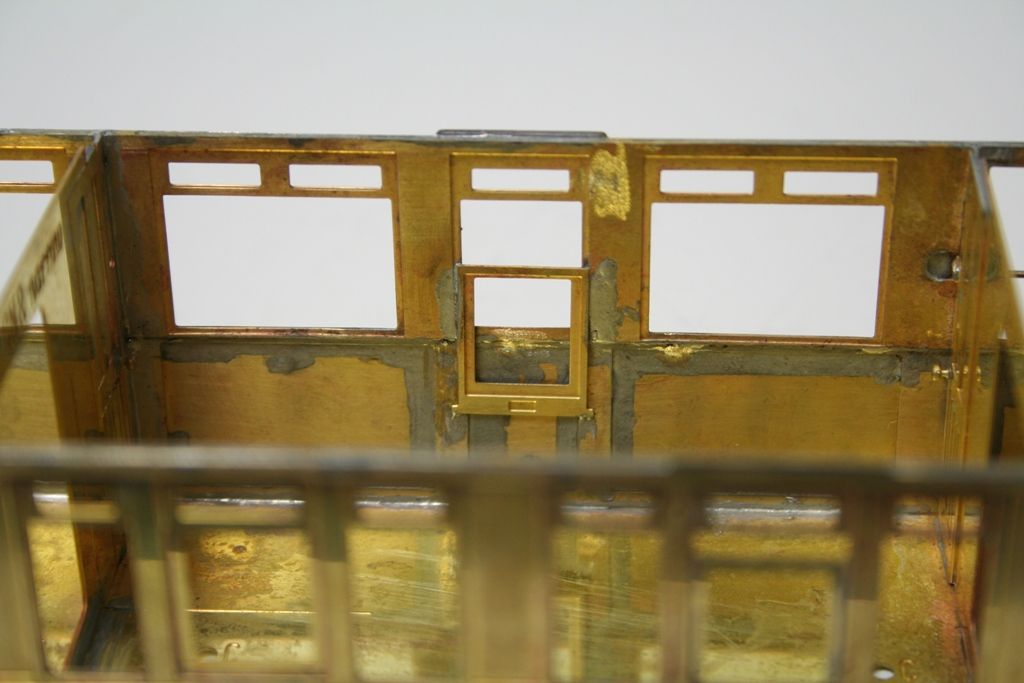
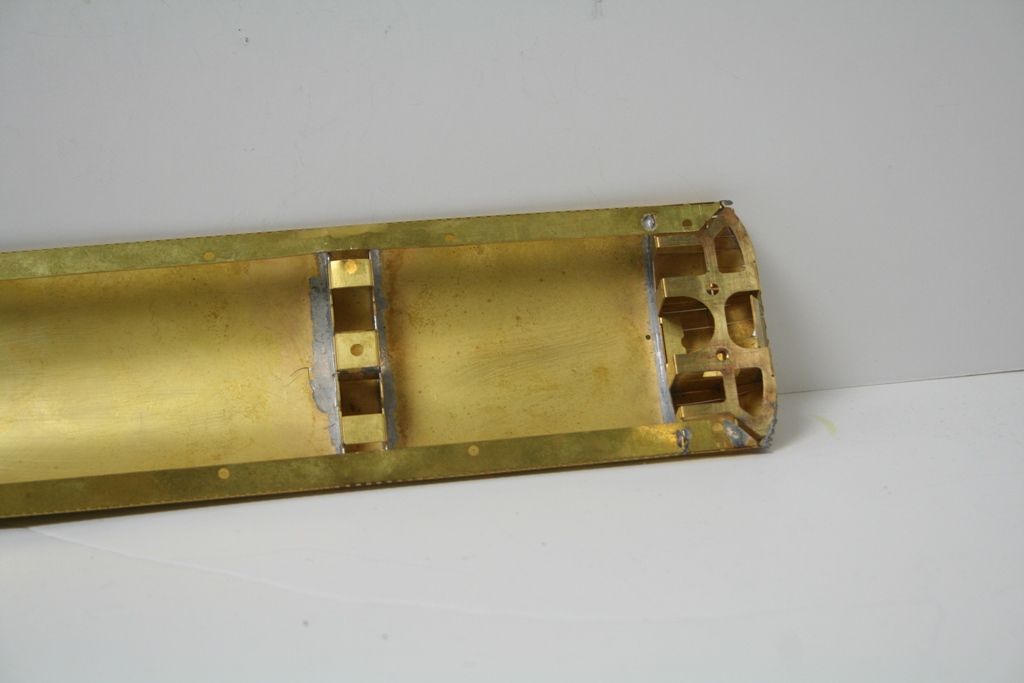
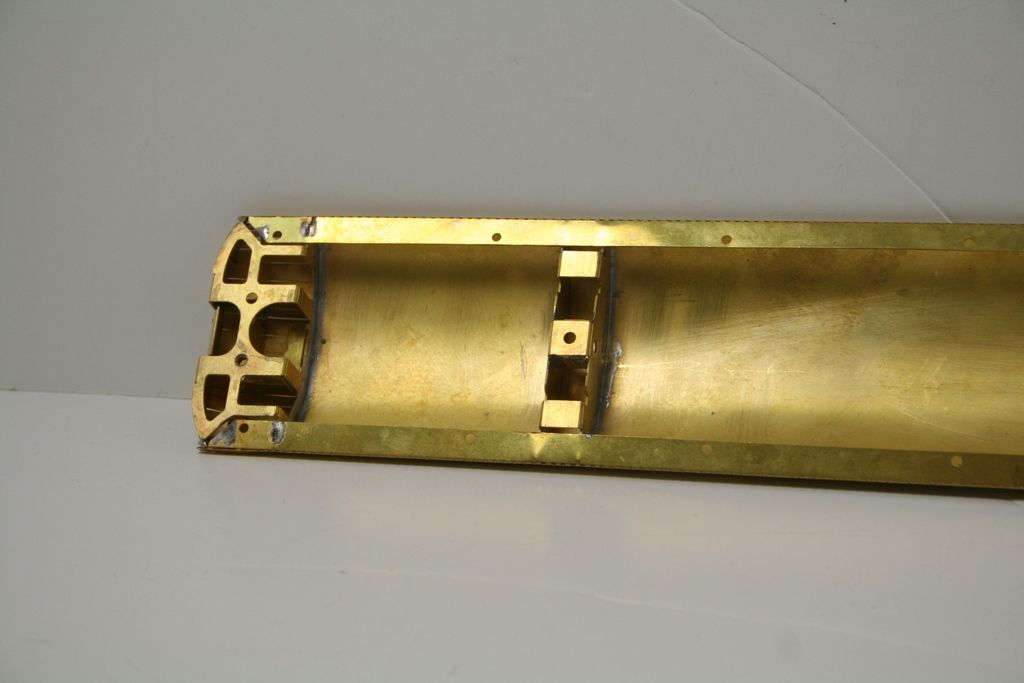
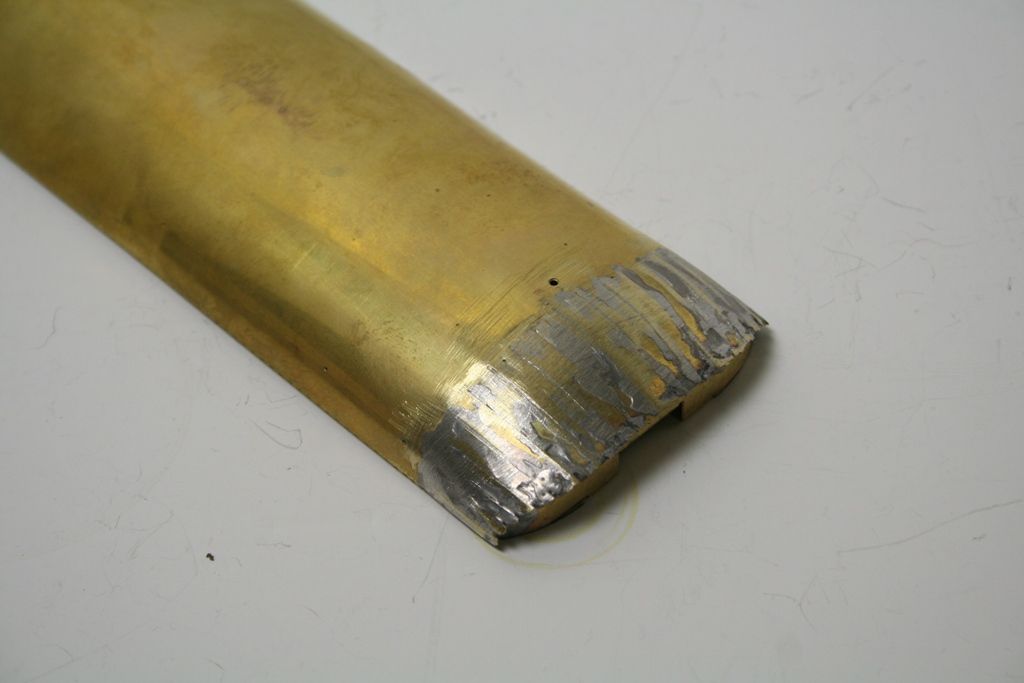
Both sides have their separate bottom panels soldered in.

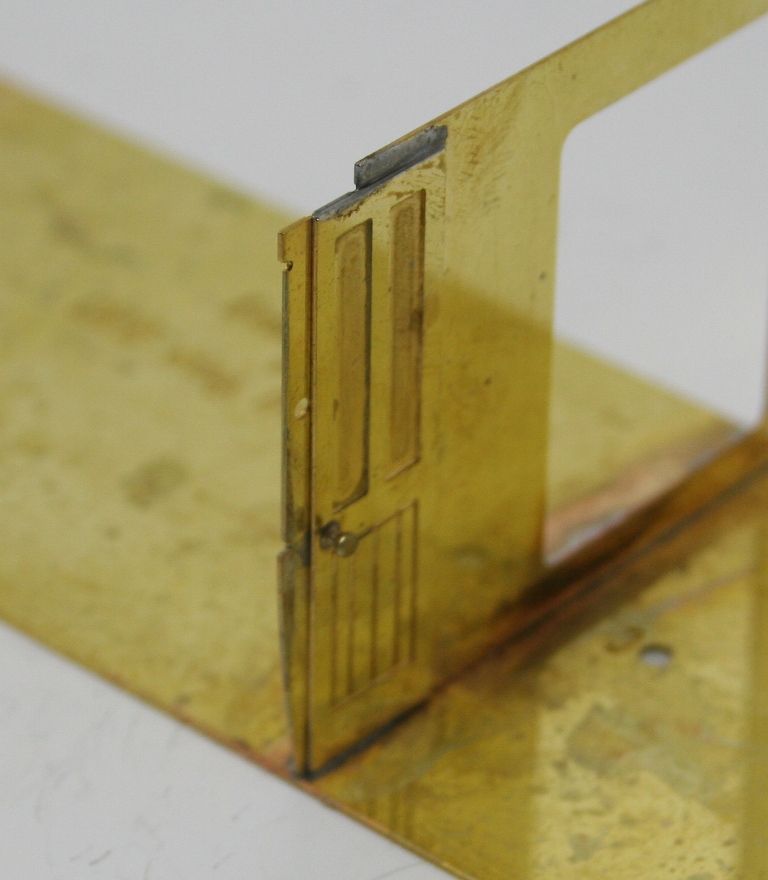
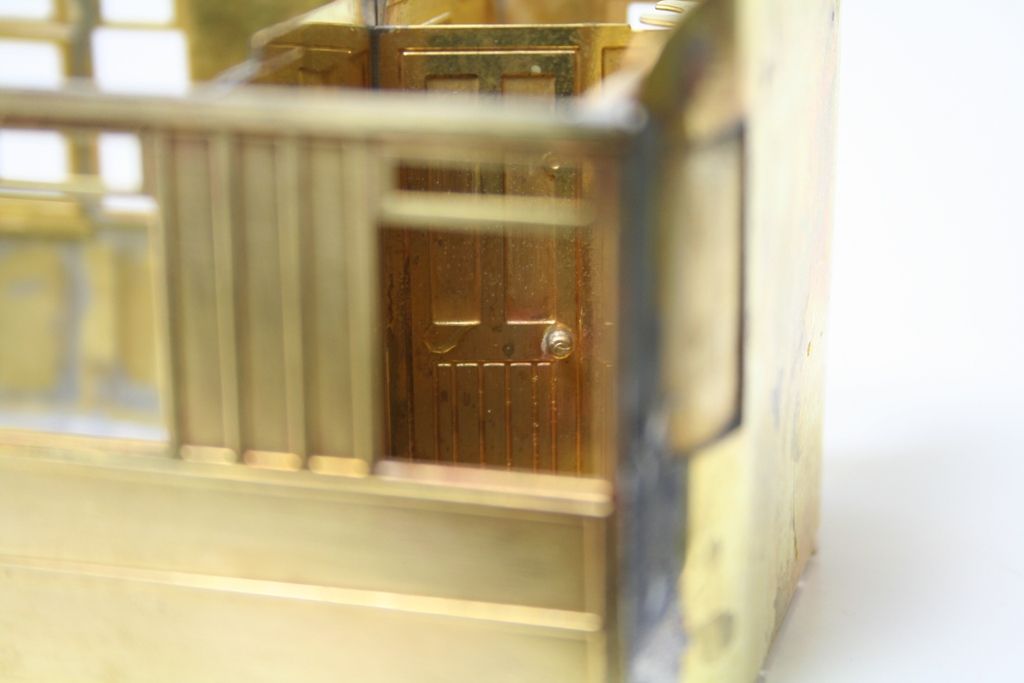
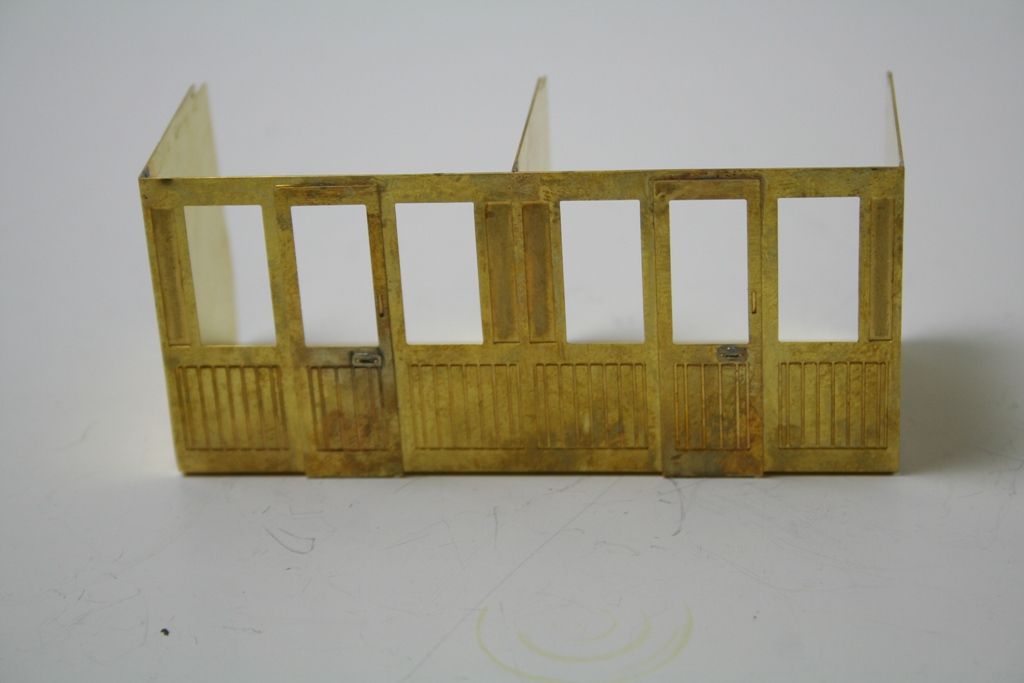
Even though I had filed of the etching cusps I struggled with the first side to get the panels in flat etc. with a couple needing to be dropped out and repositioned. On the second side I made doubly sure that I had removed the cusps and I put a slight chamfer on the edges of each panel. This meant that they snapped into place with ease and I soldered up the second side in half the time it took for the first - a lesson learned for the next one.

Re: Kemilway GNR 52' Composite

Posted: Tue Oct 22, 2013 9:49 pm
by notascoobie
Hi Rob,

I will follow your progress with interest. I have a brake compo in the queue so your experience will be noted.

When you soldered in the lower body panels did you solder the whole lot or just the bottom edge? Obviously my query points towards forming the tumblehome.

Regards,

Vernon

Re: Kemilway GNR 52' Composite

Posted: Wed Oct 23, 2013 4:56 pm
by Atlantic 3279
If I'm correctly interpreting what I'm seeing then the large corridor windows alongside the thirds have toplight ventilation of some sort, but the first class section has sealed corridor windows. I'm just wondering about the reason for that arrangement.

I can see that the "plebs" in third had to put up with restricted access to/from any platforms on the compartment side of the coach too. Obviously they were thought to deserve no better having only bought the cheaper tickets......

Re: Kemilway GNR 52' Composite

Posted: Wed Oct 23, 2013 8:32 pm
by Robpulham
notascoobie wrote:Hi Rob,

I will follow your progress with interest. I have a brake compo in the queue so your experience will be noted.

When you soldered in the lower body panels did you solder the whole lot or just the bottom edge? Obviously my query points towards forming the tumblehome.

Regards,

Vernon
Hi Vernon, I soldered all the way around, except for the longer panels where there are some support ribs which as per the instructions I didn't solder.

Re: Kemilway GNR 52' Composite

Posted: Wed Oct 23, 2013 8:36 pm
by Robpulham
Atlantic 3279 wrote:If I'm correctly interpreting what I'm seeing then the large corridor windows alongside the thirds have toplight ventilation of some sort, but the first class section has sealed corridor windows. I'm just wondering about the reason for that arrangement.

I can see that the "plebs" in third had to put up with restricted access to/from any platforms on the compartment side of the coach too. Obviously they were thought to deserve no better having only bought the cheaper tickets......
Hi Graeme,

It's known as "Cant Rail ventilation" but it seems that it only applied to the open third section on this particular diagram of coach - the little bit I have managed to glean came from Harris's Great Northern Railway and East Coast Joint Stock from 1905 book and at that there was only one paragraph.

Re: Kemilway GNR 52' Composite

Posted: Wed Oct 23, 2013 8:36 pm
by Robpulham
I moved on a little with this last night.

The next step or rather the previous step (it should have been done before fitting the panels to the sides) was to fit the bulkheads/toilet partitions. This is where reading all the instructions first pays off. The instructions for the body would have you fit the bulkheads/toilet partitions while building the body but then when you get to the interior the instructions have you fitting doors and the very nice cast door knobs. This would have been a much bigger and messier job to have done when the coach body was assembled so I chose to add the doors and door knobs in the flat.

The detail on the inside of the toilet compartment its quite something - the only thing missing is that there isn't quite enough door knobs provided to add them on the inside of the toilet door.

Image

Above is the inside of the toilet compartment at one end - I didn't get the last partition in last night.

Image

The inside of the vestibule showing the door knobs on both sides of the door.

Image

Image

One side of the door - the additional etch.

Image

And the other side which is etched as part of the bulkhead.

Image

Lastly a close up of the other toilet partition show the door knob in all it's glory!

Re: Kemilway GNR 52' Composite

Posted: Sun Oct 27, 2013 10:26 am
by Robpulham
Things are coming together nicely but up to yesterday there wasn't much to show.

First I folded down the inside section of the top half on the sides and soldered it in place to and bottom.

Then I drilled out all the holes for the door handles, bump stops etc.

Next was the task that many dread, creating the tumble home or turn under. My method for doing this makes it quite simple (or I think so).

I get a strip of 2" masking tape a bit longer than the coach side and stick it to the outside of the coach, level with the bottom of the windows. I have a length of 28mm diameter tube that is about 18" long (a left over from fitting a curtain rail).

I placed the coach side outside face down on the sheet of plate glass that covers most of my work bench top with the remainder of the sticky side of the masking tape facing upwards.

Next I placed the tube on the sticky tape adjacent to the bottom edge of the coach side. I wrapped the rest of the tape around the tube.

Then grasp the tube at each end where there was no tape I rolled the tube towards the centre of the coach gently but firmly. The masking tape pulls the coach edge around the tube and the tumblehome is formed.

On the first side I went a little too far and had to bring some of the curve back out by laying the back of the side on the glass and gently pressing along it. The second side came out perfectly first time. If there is interest in the method I will do a step by step as I do the next one.

Next I soldered in the bump stops. These are not provided in the kit - the instructions suggest that you solder in 0.45mm wire. These are I believe from Laurie Griffin but I got them in with a lot of other spares and I think that I have enough to do another couple of coaches after this one. I have made them from scrap etch and rod before but to be honest having seen how nice these are I will buy some more in the future when I need them.

The T handles are very nicely cast and are included in the kit. There are also some nicely etched grab handles that I was a bit dubious about initially - initially went to the trouble of soldering a piece of 0.5mm wire to the back of one to beef it up but it was the very devil to bend. So I went back to trying the etch as supplied and they are more substantial than I first guessed. What I do like about this kit is that there are loads of spares of a lot of the pieces. So far I have spare T handles/grab handles/hinges and drop lights.

The hinges are a really nice touch, they come as three fingers that go through the coach side which once you have soldered them solid there is a half etched line which allows them to be snapped off leaving behind differing hinges for the various points on the coach side - some care is needed to get them all the right way up before soldering them in. The etched slits for these needed opening out a little with a .5mm drill.

Once all these were in place you need to snip off the ends that protrude inside and clean/file back so that the drop lights can be fitted. I did this with a diamond coated ball bit in my Dremell.

Next up is fitting the drop lights and then the cornice strip. The cornice strips are handed so once again double check to make that you have the right one with the rain strips above the doors.

Once all this was done I gave everything a good clean up and made sure that all the stubs on the inside face were ground/filed off (I had missed a few earlier).

I had decided that on this coach I would represent the end windows as having been filled in with a solid panel – blanks are provided for this so I bent them to shape and soldered them in before starting to add the sides

Then came soldering the first side on, I started with the compartment side – this being the one that the tumble home had gone perfectly. I initially sat the floor pan on my sheet of glass and placed the side up to it. When I was satisfied that it was all sat level, I tacked the top of the bulkheads leaving the ends free. Once I was happy that it was all going into position where it should I tacked the bottoms of the bulkheads, then I worked my way down the sides of the bulkheads and across the bottom seams finally ding the ends last.

Here are a few shots of what it looks like at this point.

Image

Image

Image

Image

Image

Image
I couldn’t resist a glimpse through the window….
Image

Image

Image
A couple of shots of the drop lights and the “chrome” handrail – this wasn’t supplied I just reasoned that nickel would represent the handrail better and I have just restocked various sizes.
Image

Re: Kemilway GNR 52' Composite

Posted: Mon Oct 28, 2013 7:14 pm
by Robpulham
The next items on the agenda are the interiors. This coach is a little different in that there is a unit that makes up into twin first class compartments, a second unit that makes up into a twin open third bay and a third unit that makes up into a two and half third bay. The generic instructions cover the make-up of the compartments but not the semi open bays so I had to do a bit of head scratching to see what was what and where it went.

This is another area where you get a few spares this time in the form of open partitions without luggage racks. I elected to use those with luggage racks and once I had worked out which went where I had to think about the fact that luggage racks are etched flat so they needed to be twisted into position. I almost did one of them wrong in the single seat bay – I was planning on bending them over the wood panelled area but then I remembered Chris saying that Peter Dawson had told her that the luggage racks screwed on after painting. As I was thinking about it I noticed that at the out end of the full height partitions there are two holes – light bulb moment, to screw the luggage racks to. Once I realised this it was easy to work out which partition went where and which way to twist the low luggage racks to orientate them.


Image

Image

Image

Image

Image

I also found an etch containing some small latches for the sliding doors to the compartments so I added them.

The rest of the luggage racks and the nets for these are to follow with the rest of the bits that are missing.

Re: Kemilway GNR 52' Composite

Posted: Mon Oct 28, 2013 8:55 pm
by Manxman1831
One word from me - WOW!

Re: Kemilway GNR 52' Composite

Posted: Mon Oct 28, 2013 11:19 pm
by Robpulham
Manxman1831 wrote:One word from me - WOW!
Thanks Brian, I can't take all the credit, the kit is superb and everything fits as it should.

Re: Kemilway GNR 52' Composite

Posted: Tue Oct 29, 2013 12:22 am
by JASd17
Rob,

The door hinges on the outside need to be in line, otherwise the door cannot open. So with the tumblehome, the lower hinge projects the most, middle the least, and the top only a little more than the middle. Perhaps I am wrong on this and the top two are the same, but they project very little from the body side, in any scale.

In 4mm scale I rub a nail emery paper board against the three hinges to get everything in line.

John

Re: Kemilway GNR 52' Composite

Posted: Tue Oct 29, 2013 7:12 pm
by Robpulham
Hi John,

I am fairly sure that they do and it's just the camera angle. I will double check though

Re: Kemilway GNR 52' Composite

Posted: Wed Oct 30, 2013 8:02 pm
by manna
G'Day Gents

Excellent work, at least you can leave brass out in the rain :lol:

manna

Re: Kemilway GNR 52' Composite

Posted: Wed Oct 30, 2013 8:25 pm
by Robpulham
manna wrote:G'Day Gents

Excellent work, at least you can leave brass out in the rain :lol:

manna
So true :!:

Re: Kemilway GNR 52' Composite

Posted: Wed Oct 30, 2013 8:25 pm
by Robpulham
What a few of you have been waiting for - The Roof.

I made up the formers exactly as per the instructions and rolled the roof – half etched side inwards. This I really struggled with and contrary to the instruction I had to solder the roof formers to the roof in order to stop coming out of the locating holes while trying to fit some etched wedges. The idea if you can make it work is quite ingenious and I suspect that I didn't get the roof rolled tight enough and I hope to do better on the next one.

Image

Image

Image

Image

Image

Then last night completely contrary to the instructions (they suggest liquid metal or body filler) I filled the end with 100 degree solder. On the second end I also dropped in some .45mm wire to fill a couple of the wider gaps. This was quite successful when I rubbed it down so I will probably do a lot more of that when I do the next one.

I didn't take any photos before I started to rub it down but here are a few as at bedtime last night. Both ends still need more work but I think that on one end at least it will be a bit of Squadron putty to finish it off. I will decide on the other once I have rubbed it down some more

Image

Image

Image