This topic started after John B asked me about ABS bogies for Gresley coaches. I use them because as they're cast whitemetal they add a hefty weight to the coach at the lowest point and make them a great deal more stable.
Mine use only the Kirk sides, ends and roofs and the rest is a mixture of scratchbuilt and other people's components. The ABS 8'6" standard Gresley bogie (ABS K499 from http://www.keykits.net) is what is used on most Gresley coaches, including the non-corridor ones John is looking at. The exceptions tend to be some articulated and many catering vehicles.
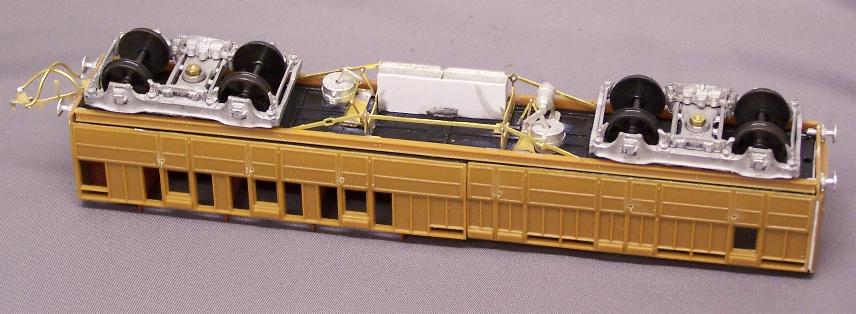
For standard coaches the principle is very simple - attach the ABS pivot on the underside of the floor. Kirk kits will need the moulded 'bump' removing. I then drill through and stick an 8 BA bolt with the head inside the coach. The bogie has a cast sleeve which slides inside the bogie centre and over the bolt; a nut can then be used to attach the whole assembly and tightened up against the sleeve leaving the bogie free to pivot.
This assembly can be seen from the underside here:
For those who are interested, the remainder of the components are Comet, using their trussing and underframe components packs. These latter are also cast in whitemetal which adds further weight to the coach as low down as you can possibly place it. The buffers are MJT and the coupling Bill Bedford.
For articulated coaches I use an idea demonstrated by Steve Banks in one of his excellent articles in Model Rail. I have a Quad-Art built using his approach - I'll get it out and photograph it later in the week.
Last edited by jwealleans on Tue Oct 02, 2018 11:42 am, edited 44 times in total.
I like the underframe detail and particularly the trusses. The bogies look good and I know that they are quite heavy and run well if square. I took the easier way out and used a some that Bachmann provide for the Thompsons. These are Gresley bogies as well.
I believe you have used Bill Bedford Couplings of the kind that have vacuum and steam pipes that hang down. I chose to use the type that have upright standard pipes for the vacuum hoses as I saw this type of on the NER composite coach at Beamish and I thought this looked more correct. Since then the Bill Bedford Couplings have been removed and replaced with kadees to get more reliability and easier un-coupling in the fiddle yard.
Presumably you must have seen your type on the real thing somewhere.
These are corridor coaches and so there isn't a lot of choice about the underslung pipework. I have made up the other type for the non-corridor stock on the Ormesby Hall layout.
For John's non-corridor Gresley stock then the other type would be correct. I've used screw links on the few I've built.
Interested in what you say about 'reliability' - I know it comes down to uneven trackwork but I've extended the pin on all mine so as to avoid that random 'slip' effect which they can be susceptible to.
Last edited by jwealleans on Fri Feb 19, 2010 11:00 am, edited 1 time in total.
I did not twig that your carriage was a corridor type, it looks so short.
My problem was no so much uneven pointwork as the use of diamonds and slip points in OO gauge. Even with "finescale" tolerances there is still a place where the rails cross where there is no checkrail and a choice of routes presents itself to the flange. If the flange is not running dead straight for any reason it can go the wrong way.
This can be caused typically by couplings not pulling on the centre line of the vehicle or by bogies with axles that are not square and parallel, or even by dragging bogie pivots. This is why I decided to change my Ian Kirk bogies and couplings. Now running is perfectly reliable.
On our latest club layout we have chosen to build switched diamonds to eliminate the unsupported areas.
Interesting post Jonathan,I love the short corridor coaches and have a few to build eventually.Pity ABS are not more accessible nowdays-I used be able to get their stuff through Dave Cleal but they are now only supplying direct and don't take credit cards-a great range of parts.Interesting comments about running.My first layout was tiny so the Kirk bogies worked fine but this post is thought provoking.Colombo,very interested in your comments re slips etc-whose wheels are you finding most likely to go off on a tangent? And is this on copperclad pointwork?Icannot make my mind up whether to opt for Peco 75 or the slightly better results I would get from SMP at the expense of less building time for stock!
I think you'll find that Keykits/ABS are now accepting cards via Paypal. Useful to know especially now he's starting to put out the ex-D & S kits.
Colombo - I hear what you say about the BB couplings. We haven't as yet had an issue with them on the handbuilt track on Corfe, but we're a long way from fully switching over to them. One of the side effects of lengthening the hook as I do is that you have to make a hole behind the buffer beam for it to engage into. This keeps the coupling centred at both ends. As long as the bolted end can pivot freely there doesn't seem to be a problem.
Finally, I've always said that I'd never build track as long as Peco were trading and after seeing the time and effort required to repair a single point on Corfe I certainly haven't changed my mind. Properly ballasted and weathered, even Code 100 can look good. Life's too short ansd there are too many kits to build!
I have built my track in the station using copperclad because I wanted less acute diamonds and slips than those offered by Peco. I quite agree about the time element involved in building track for a layout, but is that not the whole point of the exercise? If only Peco would improve the appearance of their code 75 track.
To get reliable running, as well as having to get the track right, I also have to check my rolling stock. It is necessary to set the back to backs on rtr stock as it is purchased and often fine adjustments are needed beacause there is very little scope for error. I now use a digital micrometer rather than a back to back gauge for example.
The same applies to kit and scratch built stock. I have to admit that I would really like to get back to building rolling stock, l but I have set myself the objective of getting my scenics in some kind of order first. Currently I am still held up by the daunting amount of work required to finish my loco shed.
Thanks Jon and Colombo-without sounding like a politician,I agree with both of you and therin lies my dilemma!Its about 4or 5 years since I last built track,so I might perhaps just try a few points and see what the timescale is looking like-it is most satisfactory to see your own locos running on you own track!On the other hand,there are a lot of locos on my hit list and I'm not getting younger.I certainly agree that if Peco just made a few adjustments,even tooled up flexi with improved sleeper spacing it could swing the argument more towards their track,which can run well with a bit of fettling-I used code 100 on an exhibition layout years ago and had a few of those "is that EM moments"-ballasting and rail colour are a big factor.However,accurate copperclad does give better running,and the ability to use larger radii,esp on curved and slip pointsIf I had to make an immediate decision,I think I would go Peco,despite the tight radii.I test my stock on an oval of 3rd rad set track so it can cope with 36" if needed.I still have some time to think so I will run off a point or two a see how it goes......
I very much take Colombos point on the back-to-back,the plague of (Margate) Hornby since the dawn of Tri-ang!Its the single most important dimension in our hobby.I must pay more attention to parallel axles though,a very good point.I did build one of the old McGowan GN brakevans,with one side cast shorter than the other and....oh well,it will look ok in that internal user green I suppose......
Johnathan, the underside of the carriage in the photo you supplied is just excellent, I shall try and emulate your very high standards. I have also read the article you provided a link to, it should help me to understand things I now need to know.
Thank you for all the invaluable information and hints that you are putting on here, it is important to share, as lesser modelling mortals such as myself can save (hopefully) hours of frustration and heartache over potential mistakes in trying to realise our modelling dreams.
The seven coaches I have recently purchased have arrived with me today from the UK and I now see what I need to do.
The bogies are a bit of a mixture (and very light) and I need to replace them all to gain consistency and as suggested, a lower centre of gravity by using metal replacements. The underframes also need replacement, some of the old plastic ones are broken, hopefully this too will add a bit more weight whilst maintaining a uniform appearance, it makes it all a much bigger job but it should be worth it in the end.
The list of my purchased LNER teak non-corridor carriages consists of:
2 x 1st class
3 x 3rd class
2 x 1/2 3rd class 1/2 guards (sorry, I don't know the correct terminology)
The first thing I need help over is the really frightening prospect of having to remove all the roofs to sort out the bogie and other problems, they are glued on and I would hate to damage a roof beyond repair - any suggestions? I shall proceed with caution.
I also need to know if the replacement bogies and metal underframes would be the same for all the coach types I have listed above, would there be any variations amongst them?
The teak finish on all the coaches is virtually perfect and has a very nice aged appearance that will suit what I am doing though not sure about the LNER logo and carriage designations etc, I would hate to have to remove them, guess I may yet have to get brutal. I shall reach for the malt when it becomes necessary.
Johnathan, are you saying that the Kadee couplings would be the most "correct" for my coaches? Ideally I would go for the most correct couplings but not at the expense of reliable running?
This is going to be a long job so I guess I am in for the long haul and I have not even got my baseboard yet, the only other relevant thing I already have, is a very nice Trix Peppercorn A2 in LNER green, named "A. H. Peppercorn", LNER number 525, it looks well with the teaks but "correctly" speaking it would of course have run with corridor teaks.
How are your bogies attached at present? You may not have to remove the roofs to fix new bogies. Self tapping screws might do the trick.
As regards underframes: Some had the girder frames as supplied with Ian Kirks and some later on got the steel tie bars and turnbuckles, if those are the right descriptions. In other words, you can run a mixture. They only way to be absolutely sure that you have got it right is to find a photo and slavishly copy it.
A great deal to go through there and please don't regard me as in any way an authority - I do make a lot of this up as I go along.
I have removed the roofs from these coaches with more or less success. The problem is the sides breaking above the windows if they've been well glued. I'd try a razor saw along the line of the cornice - if you're lucky the cornice will jut out enough for you to follow it along the side. Use a knife to cut along the curve of the ends. If you do break a window top out, some Evergreen strip will replace it. In the worst case scenario new sides are available from Coopercraft.
Colombo is quite right about self-tapping screws and this is the method which both Ian Kirk and ABS suggest and supply. That's why there is that moulded hump on the underside fo the floor - for the screw to bite into. I have found that after a few removals and reinsertions these become slack and lose their grip, hence my preference for nuts and bolts.
The trusses on the coach I illustrated are the Comet turnbuckle type; if you want to model the girder ones, MJT offer a cast set (which I find a bit heavy); I make them up from 1 mm brass angle. BTW if you do use the Comet ones, they don't fit between the Kirk solebars without being chopped in half and having a section removed; don't worry that it's you who's messed them up if you reach this point.
In terms of couplings, that's very much a personal decision; Kadees will allow you to have automatic coupling/uncoupling. I use screw links on mine, but this generally means fitting sprung buffers as well unless your curves are larger than about 36" radius.
If you're in for the long haul then two things come to mind:
Are there interiors and if not have you thought about fitting them?
Invest in a copy of one of Michael Harris' books. I use LNER Standard Gresley Coaches for this kind of work as LNER Coaches is more of an overview. The first book will give you a diagram for each coach, some idea of what they were used for, when built, running numbers, etc. Another handy book is Historic Carriage Drawings, the first volume by Nick Campling. I'm sure this will also cover the coaches you have.
What you've got sounds like most of a cross-country stopping train - I'm not an expert on train formations (perhaps Karl has some info?) but I'd have said that all you need with that lot is a full brake, which seems to have been essential in these trains. I wouldn't worry too much about the A2 either - these locos went to Doncaster shed when ex-works for running in and were used on whatever turn came to hand, so you can use that as an explanation for almost any motive power.
Can we see some pictures?
Last edited by jwealleans on Mon Aug 13, 2007 12:18 pm, edited 1 time in total.
Jonathan,
Thanks very much for the info re ABS,a much improved site with paypal,I have a lot of badly needed NER coach ventilators(for a future project)on their way plus a few wagon kits.I have always found their stuff excellent (my first whitemetal kit was an ABS wagon)and while I try,economy mainly,to work with what a kit provides there is a point at which you do need extras. At some stage I will have to overhaul my original Kirks,(a bit like the job you have on now John B)and fitting ABS LNER ventilators will be the first step.....and if I need the bogies,easily obtained now!
Hi, hope you don't mind me posting this here Jonathan.
I am looking for a diagram of a Gresley bogie showing all the details such as the springs, braking gear and what have you. Does anyone know where I could get any. I have photographs but when a coach is sat on top of them its a bit difficult to see all this detail.
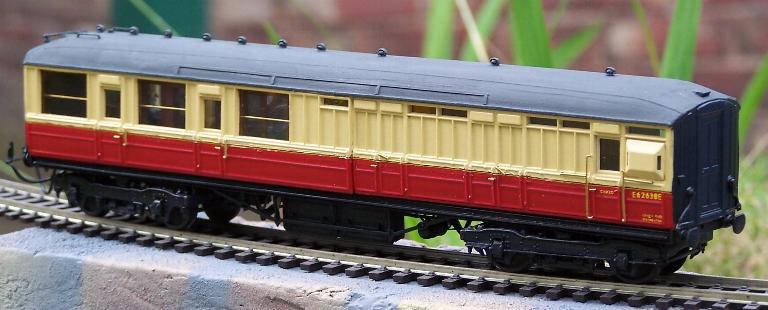
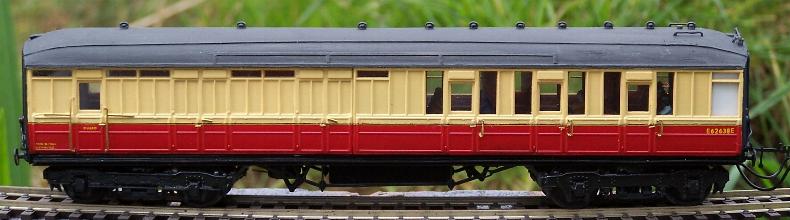
I've dropped this in here for continuity - here is the first of my rake of coaches almost complete. The ducket needs to be glazed and the corridor connections added. This is the D146 Brake 3rd illustrated at the top of the thread.
Handrails are MJT, as are the roof vents. The destination board holders are added using microstrip and the alarm gear is scratchbuilt.
Last edited by jwealleans on Tue Oct 02, 2018 11:42 am, edited 5 times in total.