Morning and thanks, 3279. By 'coarse' I simply meant that the carrier film is thicker than the Precision Labels product and so more conspicuous. The truck above has had two light coats of Games Workshop Satin varnish and the film has all but vanished. Once it's had a couple of applications of matt varnish you won't be able to tell.
Did you get your buffers, BTW?
West End Workbench
Moderators: 52D, Tom F, Rlangham, Atlantic 3279, Blink Bonny, Saint Johnstoun, richard
-
jwealleans
- LNER A4 4-6-2 'Streak'
- Posts: 4217
- Joined: Wed Oct 25, 2006 8:46 am
-
jwealleans
- LNER A4 4-6-2 'Streak'
- Posts: 4217
- Joined: Wed Oct 25, 2006 8:46 am
Re: On my Workbench - ferry vans again.
A few photos I took at Hartlepool, where things ran very well on the whole.
The other K3 which has featured in the thread above, weathered after an Ian C Allen photo of 61834, absolutely filthy, hauling a rake of continental vans near Newmarket. The photo is published in Doctor on the Line
The train - Italian vans now weathered. The German ones still need some work - with impeccable timing, the springs from Dart Castings arrived on the Saturday of the show - but no-one seemed to notice.
Bit off its usual haunt, the milk train for Pilmoor at Ormesby Hall.
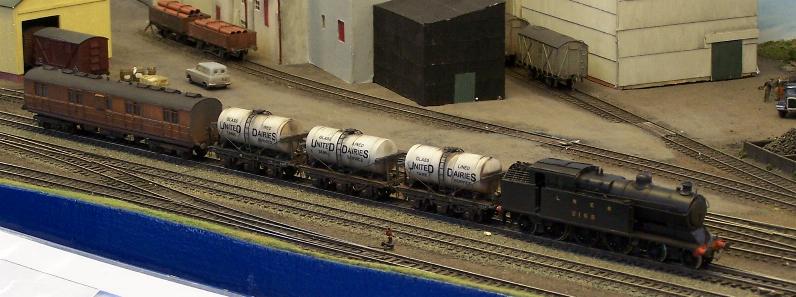
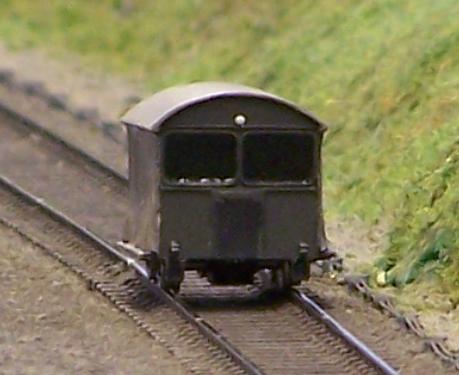
Finally, thanks to Ian Ward for the loan of his DC kits Wickham Trolley. Not strictly LNER, but a very attractive little model nonetheless.
The other K3 which has featured in the thread above, weathered after an Ian C Allen photo of 61834, absolutely filthy, hauling a rake of continental vans near Newmarket. The photo is published in Doctor on the Line
The train - Italian vans now weathered. The German ones still need some work - with impeccable timing, the springs from Dart Castings arrived on the Saturday of the show - but no-one seemed to notice.
Bit off its usual haunt, the milk train for Pilmoor at Ormesby Hall.
Finally, thanks to Ian Ward for the loan of his DC kits Wickham Trolley. Not strictly LNER, but a very attractive little model nonetheless.
Last edited by jwealleans on Tue Oct 30, 2018 8:10 pm, edited 4 times in total.
-
Tom F

- LNER A3 4-6-2
- Posts: 1270
- Joined: Wed May 27, 2009 6:23 pm
- Location: North of the Don.....South of the Tees
- Contact:
Re: On my Workbench - ferry vans again.
That is really fantastic jwealleans.
The weathering on that K3 is spot on.
Whats the trick?
The weathering on that K3 is spot on.
Whats the trick?
Tom Foster
Modelling the North Eastern Area of the LNER - 1935-1939
Modelling the North Eastern Area of the LNER - 1935-1939
-
jwealleans
- LNER A4 4-6-2 'Streak'
- Posts: 4217
- Joined: Wed Oct 25, 2006 8:46 am
Re: On my Workbench - ferry vans again.
Thank you, Tom. Weathering can be a bit of black art until you try it and it takes some nerve sometimes as well. If you're going to have a go, treat yourself to The Art of Weathering by Martin Welsh. That's where I started and it's the best concentrated source of good advice I've found. Take a look at people like Chris Nevard and Paul Marshall-Potter on RMWeb as well.
There are several stages to the weathering on this loco and it was done over a few weeks.
Firstly, the transfers I'd used for cabside numbers and tender were thoroughly sealed with varnish (I use Games Workshop Purity Seal, which gives a satin finish) and allowed to dry for a week or so. That prevents the next stage from lifting them off again.
Smokebox and cab roof were sprayed matt (Humbrol aerosol) and allowed to dry for another week or more.
Mix up a wash of gunge. I use Martin Welsh's recommended mix of Humbrol 62, 64, 27002 (I think) and 112. 112 is getting very hard to find now. No real proportions, as long as you get a browny-grey rather than a grey-brown. Railmatch do a 'Frame Dirt' colour - something which looks like that is fine. Make it more or less runny depending how dirty you want the loco. Thinner = cleaner.
This is the nerve-shredding bit. Take a large brush and plaster the mix all over your loco. Then take kitchen roll and cotton buds and wipe it off again. Wipe in vertical strokes so the residue you leave looks as if it's washed down the loco. Keep wiping until you've taken enough off to get the effect you want. You'll find that it collects around the raised features and details and dulls the finish all over the loco. Take as much off as you can is my advice - you can always add more later. Cotton buds dipped in white spirit will help if it dries before you can wipe it off sufficiently.
Leave that to dry.
I then use powders. Some people do everything with paint but I find I get along better with powder. I have a mixture of Carr's and MIG. I use the MIG ones last as they stick like the proverbial and are less likely to come off with handling. To apply them I have a small pack of makeup brushes I bought in Boots a few years ago. A small brush to put the powder on then a large one to spread it about.
I use rust shades on the loco frames, round the firebox and along the tender frames. Sparingly but enough to give colour variation. Khaki-brown shades from track level up for dirt thrown up from the ground and black for smoke and soot which I apply down from the top. Grey, ashy shades around the front of the smokebox. White streaks from washout plugs, safety valves, other joints which might leak steam.
I don't varnish over powders as I find they just disappear when you do that. Some people suggest varnishing before applying powder, letting it almost dry them putting the powder onto the tacky varnish, but the MIG powders seem to stick well enough for that not to be necessary.
The last thing I did was to drybrush Gunmetal onto the cab steps and handrails and the Humbrol Metalcote black (I forget the number) onto the boiler handrails, smokebox pipework and tender axleboxes. That was in part to cover up the shiny handrail knobs where I'd rubbed all the paint off. You can also use thinned black paint in the tender axleboxes for oil stains. Locos were often cleaned round the cabside number and the tender logo: do that with a cotton bud and clean in circles as a real cleaner would.
That was it for 61834, which as I said was especially filthy in the photo I had. Use photos, BTW, especially the colour collections, to get a feel for where and how locos got dirty.
Some variations on the theme which I've used in the thread; 61970 was gunged as described above, but after that had dried I used T Cut to gently polish the loco. I was then very sparing with the powder, to get that 'used but cleaned' effect. Further back, the Britannia had the powder applied while the gunge mix was still damp. I then polished that off with T Cut. Notice that I also left an uncleaned area on top of the boiler; I've read a few magazine articles from the 1950s which commented on just that and I saw the same effect on 'Bittern' when she was on the NYMR last year.
I hope that helps; everyone has their own preferred method. I don't use an airbrush much, because I'm quite inept with them. Some people swear by them and don't use anything else. I do use one on rolling stock, but very seldom if ever on locos. If you're going to have a go, use something from the junk box or buy a dead loco for a fiver from a swapmeet and have a practice. I'm sure you'll get the hang of it.
-
52D

- LNER A4 4-6-2 'Streak'
- Posts: 3968
- Joined: Sun Jun 03, 2007 3:50 pm
- Location: Reallocated now between the Lickey and GWR
- Contact:
Re: On my Workbench - ferry vans again.
Re uncleaned area on top of boiler. I took a pic of Tornado to send to my mate in Australia from Empress Road overbridge in Loughborough and the cleaner had the self same problem not being able to reach the very top.
That was when she was in Grey so it was very noticeable.
That was when she was in Grey so it was very noticeable.
Hi interested in the area served by 52D. also researching colliery wagonways from same area.
-
jwealleans
- LNER A4 4-6-2 'Streak'
- Posts: 4217
- Joined: Wed Oct 25, 2006 8:46 am
Re: On my Workbench - ferry vans again.
The particular article which stuck in my mind said something along the lines of (cue 1950s cut glass BBC accent) "The locomotive was a credit to the effort of the cleaners of <XXX> shed and it is to be hoped that one day they will grow tall enough to reach the top of the boiler"
-
jwealleans
- LNER A4 4-6-2 'Streak'
- Posts: 4217
- Joined: Wed Oct 25, 2006 8:46 am
Re: On my Workbench - ferry vans again.
Something a bit different on the WB for a while; a few jobs for other people before I return to my own building. This isn't LNER but I thought you might like to see it: it's a K's kit, age and builder unknown, bought for the Corfe layout at Ormesby Hall. It's had the K's motor replaced and some attention to the chassis. I've put Gibson wheels on the bogie and pony and added some more detail. I'm now contemplating whether to patch the extra bits in or strip and repaint it completely.
This GW fish van (Ian Kirk we believe) has been a serial derailler ever since I've been operating the Ormesby layouts. I've fitted one of Bill Bedford's springing units to it and so far it seems to have done the trick. The rest of the train fell off well before this did in speed trials last week. Now awaiting information on brakes and other details before I reassemble it. I hadn't used these springing units previously, but I wish I'd seen them before I built those German vans. I shall be making use of them again in the future.

Lastly the first of a series of pregrouping coach kits I hope to complete over the next few weeks. This one is a Peter K ECJS Luggage Composite. I started this one first as I expected it to be the most difficult and so far it's lived up to the billing. They aren't complete kits, but more like the Worsley Works scratchbuilding aids I used for those GE coaches last year. Floor from copperclad sheet, bogies 247 Developments, roofs rolled by Blacksmith Models. It's now acquired a full set of door hinges, solebars and had that loose clerestory bolt resoldered.
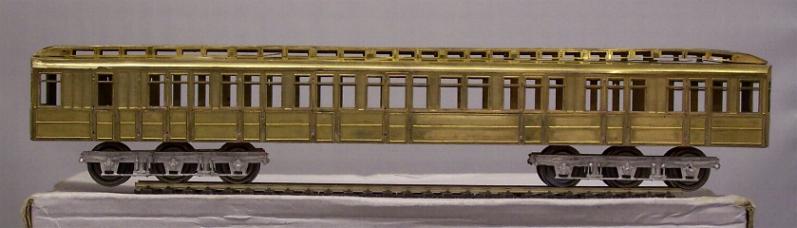
Incidentally, these are apparently now available again at http://www.kemilway.com/
This GW fish van (Ian Kirk we believe) has been a serial derailler ever since I've been operating the Ormesby layouts. I've fitted one of Bill Bedford's springing units to it and so far it seems to have done the trick. The rest of the train fell off well before this did in speed trials last week. Now awaiting information on brakes and other details before I reassemble it. I hadn't used these springing units previously, but I wish I'd seen them before I built those German vans. I shall be making use of them again in the future.
Lastly the first of a series of pregrouping coach kits I hope to complete over the next few weeks. This one is a Peter K ECJS Luggage Composite. I started this one first as I expected it to be the most difficult and so far it's lived up to the billing. They aren't complete kits, but more like the Worsley Works scratchbuilding aids I used for those GE coaches last year. Floor from copperclad sheet, bogies 247 Developments, roofs rolled by Blacksmith Models. It's now acquired a full set of door hinges, solebars and had that loose clerestory bolt resoldered.
Incidentally, these are apparently now available again at http://www.kemilway.com/
Last edited by jwealleans on Tue Oct 30, 2018 8:10 pm, edited 4 times in total.
Re: On my Workbench - before the Grouping.
Hi
Re the ECJS Coach, as you know from other posts I have a LNER TPO to do battle with.
I have been thinking of using a MJT floor and underframe? I know Kemilway advertise a Copperclad sheet for the floor but I am not sure what the best course of action on this one. What have you used as solebars one obvious problem with copperclad floor option.
I presume the Adams footplate is a bit straighter than in the picture!!
cheers
Mick
-
jwealleans
- LNER A4 4-6-2 'Streak'
- Posts: 4217
- Joined: Wed Oct 25, 2006 8:46 am
Re: On my Workbench - before the Grouping.
Hi Mick,
What did SB do in the article he did on the TPO? I had to use single-sided copperclad as I couldn't get any double-sided long enough for the coach (it's 67'). I've built it with the copper side down so I can solder the underfloor equipment on. Doing it like that means I can't use the brass compartment wall in the kit, but I'll use it as a pattern and make up a plastikard replacement as I usually do. The solebars are supplied in the kit, with the footsteps, so I've just soldered those to the copperclad. Tomorrow I'll take them off and solder them again, straight this time.
I wouldn't bet on the Adams being dead straight - I can't look as it's gone back to Peter to have a missing crankpin nut refitted - but the camera does bend things rather alarmingly sometimes.
Re: On my Workbench - before the Grouping.
Hi Jonathan
Just re read the article he used double sided copperclad and brass channel with MJT underframe.
He criticised the layout of the ends as well saying they were etched with the corridor connections on the wrong side. I have looked at the few pictures I have and they are correct on my etch perhaps the etch has been corrected ??
I might try the Kemilway copperclad . I have a couple of other things on the go at the moment so it will be a while before I look further at this one.
cheers
Mick
-
jwealleans
- LNER A4 4-6-2 'Streak'
- Posts: 4217
- Joined: Wed Oct 25, 2006 8:46 am
Re: On my Workbench - before the Grouping.
I got my copperclad from Maplins. I don't recall how much it was but I can get two or three more floors out of the sheet. Until I noticed that the solebars were in the kit I was going to use Evergreen channel and Araldite it, probably with some right angle behind to brace it. It makes sticking steps on much easier.
I can't compare TPO etches as the ones I have aren't Peter K ones.
I made a start on the underframe last night so more pictures when there's appreciable progress.
I can't compare TPO etches as the ones I have aren't Peter K ones.
I made a start on the underframe last night so more pictures when there's appreciable progress.
-
jwealleans
- LNER A4 4-6-2 'Streak'
- Posts: 4217
- Joined: Wed Oct 25, 2006 8:46 am
Re: On my Workbench - before the Grouping.
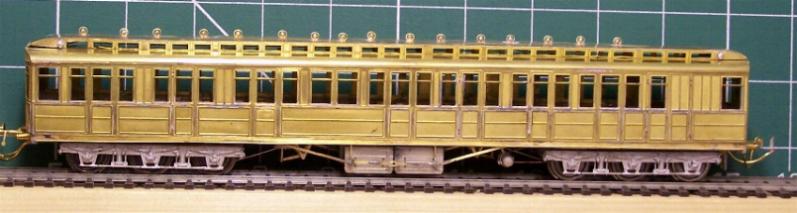
More progress through the evenings this week; I carved up a Comet trussing kit to get a turnbuckle in the middle and bring the queen posts (?) closer together. LNER battery boxes and dynamo as this coach was converted to electric lighting in the early 1920s. Now awaiting buffers (an L & Y pattern were the closest I've found) and some more roof vents before I make a start on the interior.
Last edited by jwealleans on Tue Oct 30, 2018 8:10 pm, edited 3 times in total.
-
Atlantic 3279

- LNER A4 4-6-2 'Streak'
- Posts: 6535
- Joined: Fri Jun 26, 2009 9:51 am
- Location: 2850, 245
Re: On my Workbench - before the Grouping.
That looks superb so far Jonathan, much nicer than some built by a certain prolific buider on another site if I may say so. Did the roof rolling turn out "perfect"? I'd love a set of Howlden 12 wheelers of my own, or just one or two (even if re-bogied with Gresley's as 8 wheelers) to mix in with other stock, if only I could find the enthusiasm to pay the price for the parts and to build them up. I think those Howlden coaches looked magnificent, even if by most standards they were ludicrously heavy per passenger they could carry.
Most subjects, models and techniques covered in this thread are now listed in various categories on page1
Dec. 2018: Almost all images that disappeared from my own thread following loss of free remote hosting are now restored.
Dec. 2018: Almost all images that disappeared from my own thread following loss of free remote hosting are now restored.
-
jwealleans
- LNER A4 4-6-2 'Streak'
- Posts: 4217
- Joined: Wed Oct 25, 2006 8:46 am
Re: On my Workbench - before the Grouping.
Very kind of you to say so, 3279. I don't have to make the compromise between expedience and accuracy which a professional builder does and only I have to live with my own bodges, of course. The roof always takes some dressing as Dave Smith leaves you plenty of spare. I attach a section of .75mm brass angle along the top of the sides, which helps rigidity and allows some leeway in the accuracy of your filing. I'd always try to build in that way, though, as it's much easier to hide a solebar join than a roof one, IMHO. It's also a stronger job; I dug out a D & S GNR 6 wheeler to (ultimately) run with this at the weekend to find that the ballast weight I'd used in it had come unstuck and broken the plastikard roof. I expect that happened when we moved house.
These kits are fiddly because you have to make so much of them up yourself, but I agree with you about the magnificent end product. The clerestory takes some dressing and is very fragile - I'm going to wait until it's had the glazing strip glued in and then reinstate the broken bits, probably with Evergreen strip.
I don't know what it's cost me as a lot of the bits I had anyway or have made up. The sides, ends, clerestory sides, solebars and steps and other odd bits will set you back £23.50 from Peter K. I don't think overal it'll work out much more or less than any other etched kit.
I have some other Howldens to do - of the smaller variety - so we'll see what they look like all together as a set.
-
Bill Bedford
- LNER A3 4-6-2
- Posts: 1241
- Joined: Sat Mar 08, 2008 9:43 pm
Re: On my Workbench - before the Grouping.
If rolling the roof does not appeal, and it is not a very good technique for cove roofs, you could try this http://www.mousa.uk.com/Instr/Roofs.pdfAtlantic 3279 wrote:Did the roof rolling turn out "perfect"?
Bill Bedford
Website: http://www.mousa.biz
Webshop: http://www.shapeways.com/shops/mousa_models
Blog: http://www.mousa.biz/info
Website: http://www.mousa.biz
Webshop: http://www.shapeways.com/shops/mousa_models
Blog: http://www.mousa.biz/info