West End Workbench

This forum is for the discussion of railway modelling of the LNER and its constituent companies.

Moderators: 52D, Tom F, Rlangham, Atlantic 3279, Blink Bonny, Saint Johnstoun, richard

User avatar
manna
LNER A4 4-6-2 'Streak'
Posts: 3793
Joined: Sun May 24, 2009 12:56 am
Location: All over Australia

Re: West End Workbench

Post by manna »

G'Day Gents

I like that, different. :D

manna
EDGWARE GN, Steam in the Suburbs.
jwealleans
LNER A4 4-6-2 'Streak'
Posts: 4223
Joined: Wed Oct 25, 2006 8:46 am

Re: West End Workbench

Post by jwealleans »

I had a day out yesterday, invited to a special running session of Graham Nicholas' Hills of the North layout. Although still in the very early stages of building, there's a lot of scope to run trains round and up to 7 operators can be working, though not (yet) all at once. The occasion was a visitor from Australia, John Nuttall.

Image

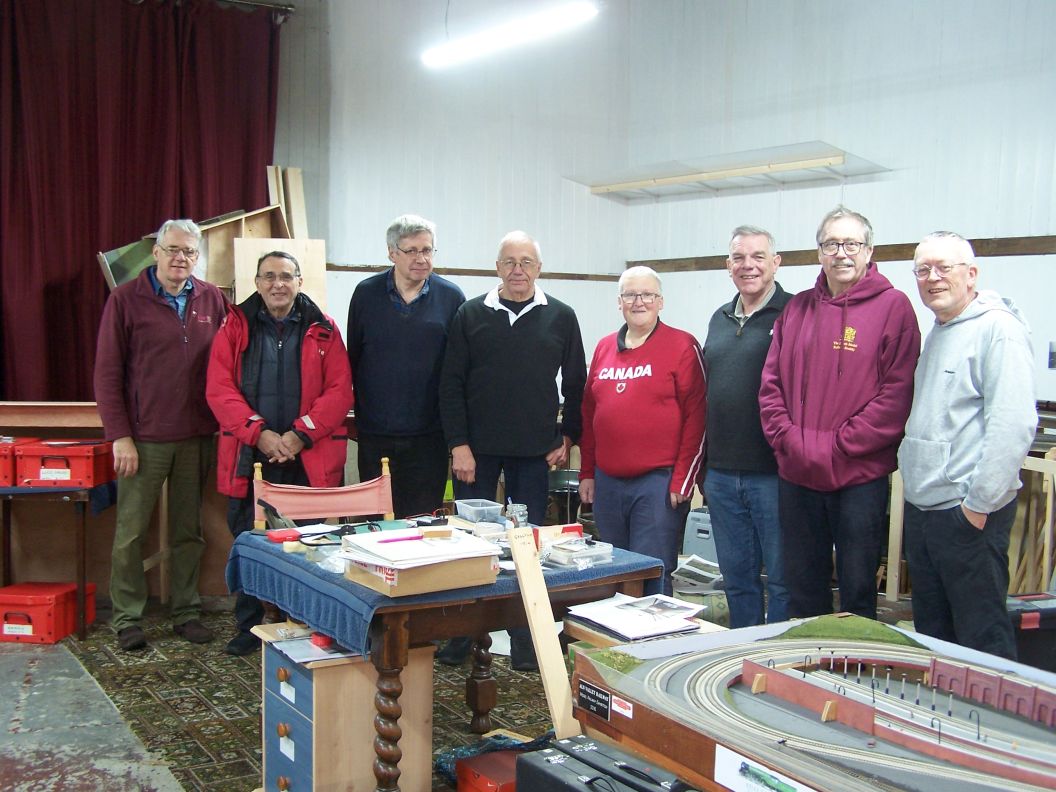
John was a member of Leeds club for some years and some of them came up to join in. From left: our host LNER4479, Tom Dewdney ('Scenery Tom' in the panoply of Grantham Toms), Steve Pearce, Mike Edge, Andy Morris, John Nuttall, Barry Oliver and Yours Truly.

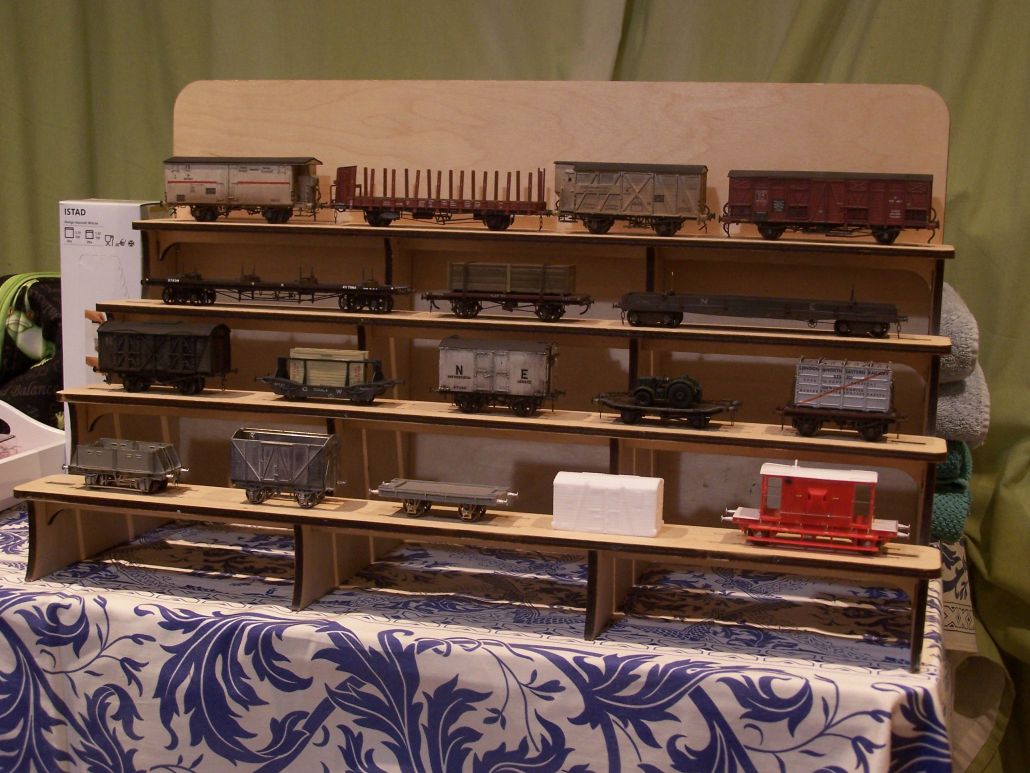
Being centred on Carlisle there's quite an LMS bent to the whole layout, but there will be an LNER element to it when complete. I make sure there's an LNER element whenever I am invited to operate and yesterday tookthe opportunity to try some of the new stock which was denied a run at Newcastle, some I'm still working on and also some from my display for Warley which I'm getting ready. Here it is in Dentonholme Goods yard which is where I found myself.

Image

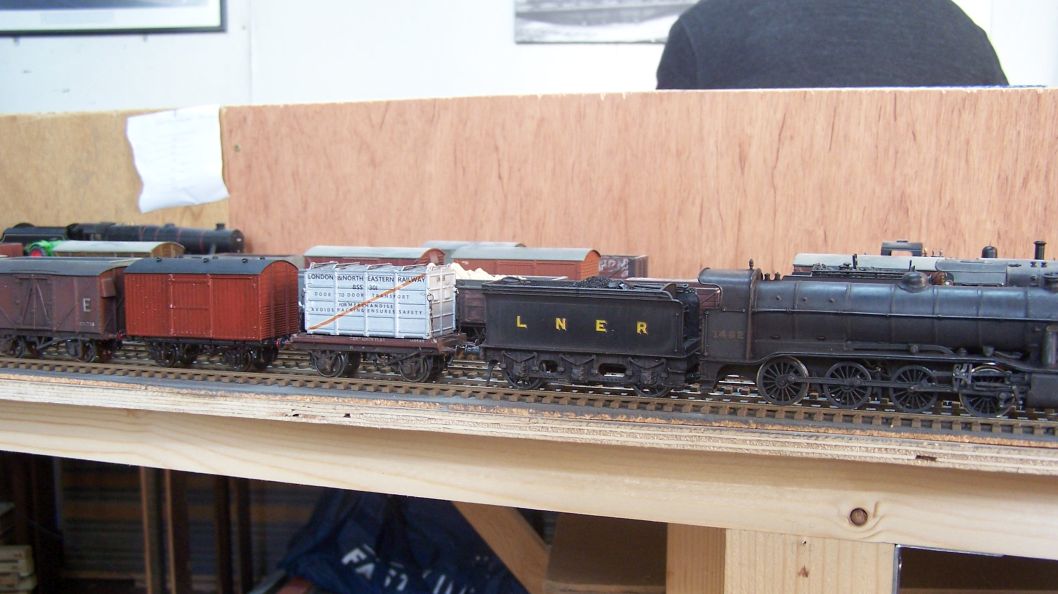
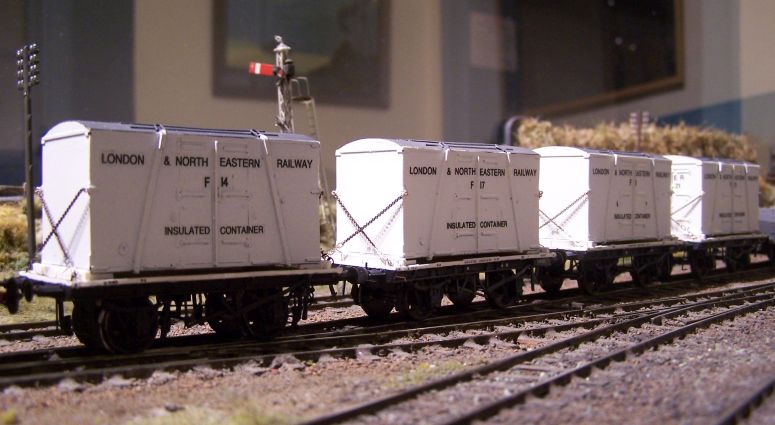
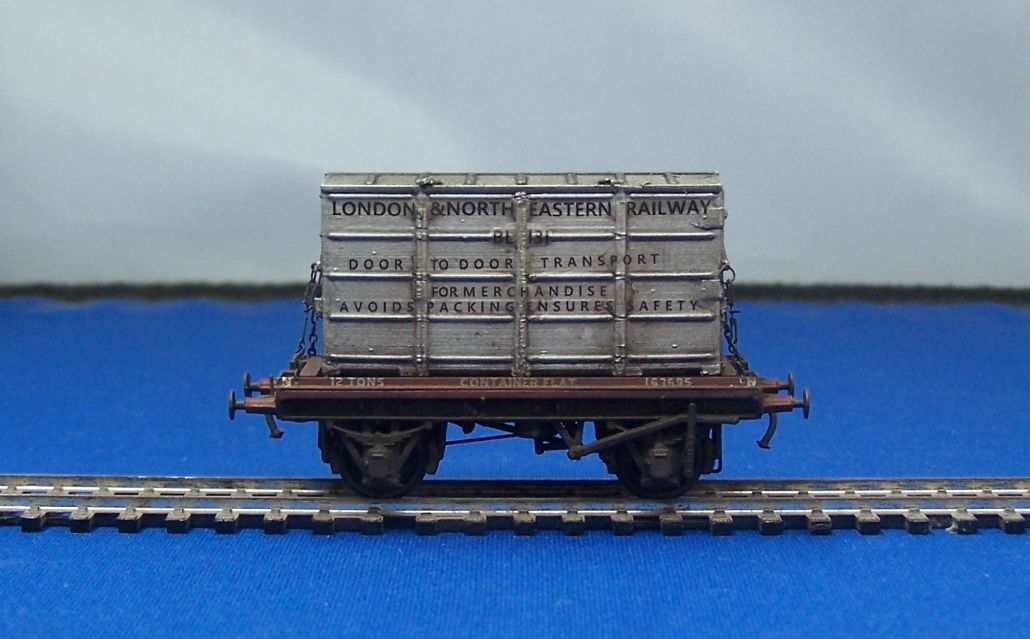
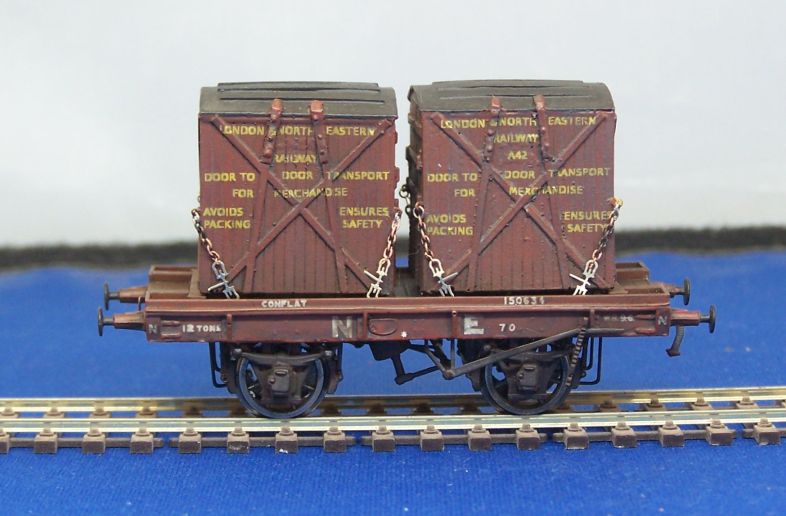
3482 would have been hauing the Iron Ore empties to High Dyke had things gone as planned. Here it has one of the D76 conflats and pressed steel containers you've seen over the last few weeks. Behind that is a steel underframed fruit van. After I refinished one of these a few weeks ago, there was a debate over whether someone had crosskitted it or it was a Parkside release. I can now confirm that it was PC11, LNER Fruit Van (Plank Sides 1935) and it does have the incorrect wooden buffer beam combined with the steel sides. Behind that, the Oxford Rail Banana van made into a fitted ventilated version and relegated from the Grantham Scotch Goods box to make room for the new steel containers.

Image

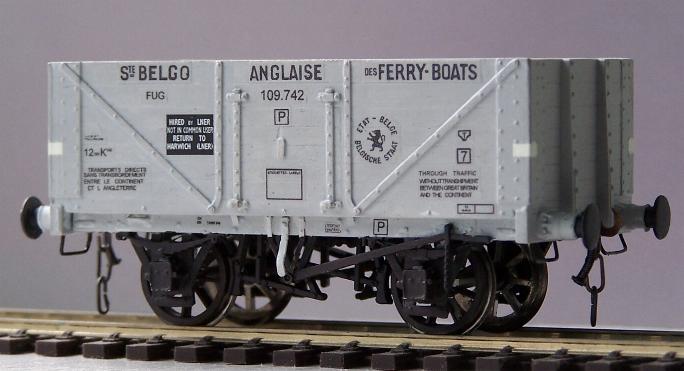
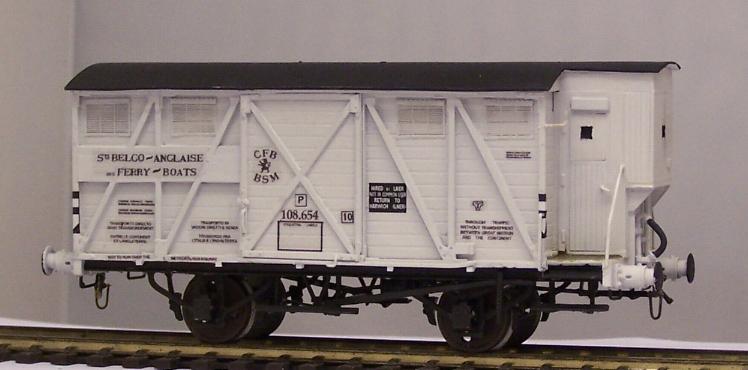
My theme for Warley this year is 3D printing and scratchbuilding. This is one of the first wagons I scratchbuilt, an ex-ROD 20 ton van sold after the War to the Societe Belgo-Anglaise des Ferry-Boats. These were far more common a sight than you might think between 1924 and around 1950.

Image

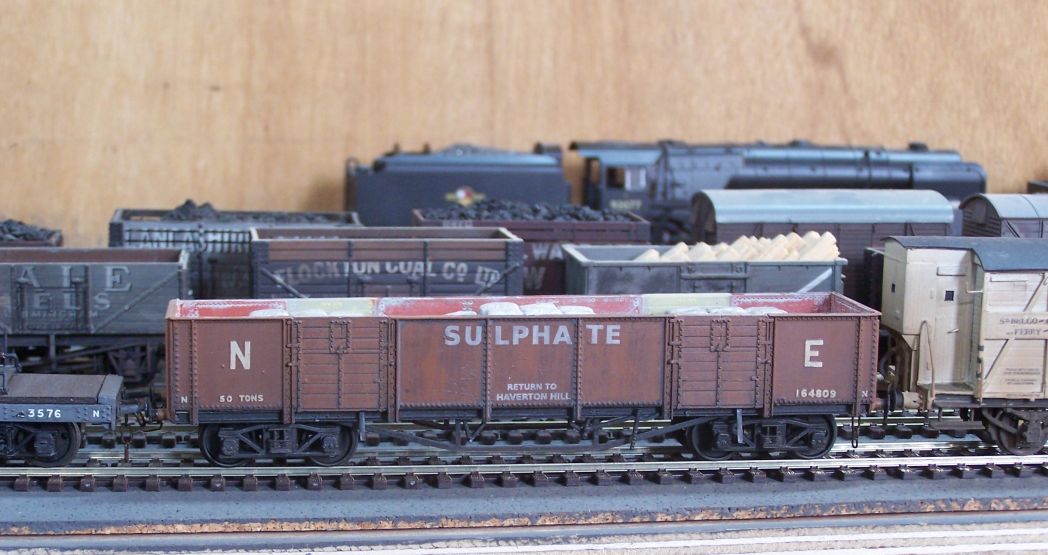
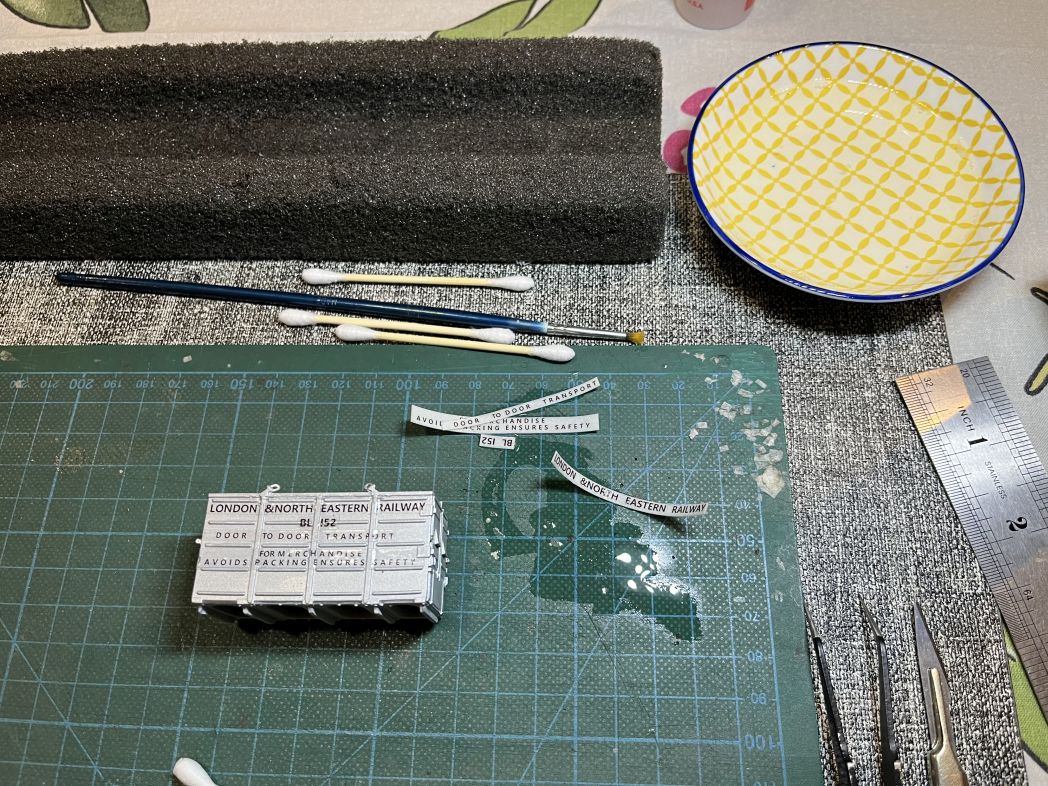
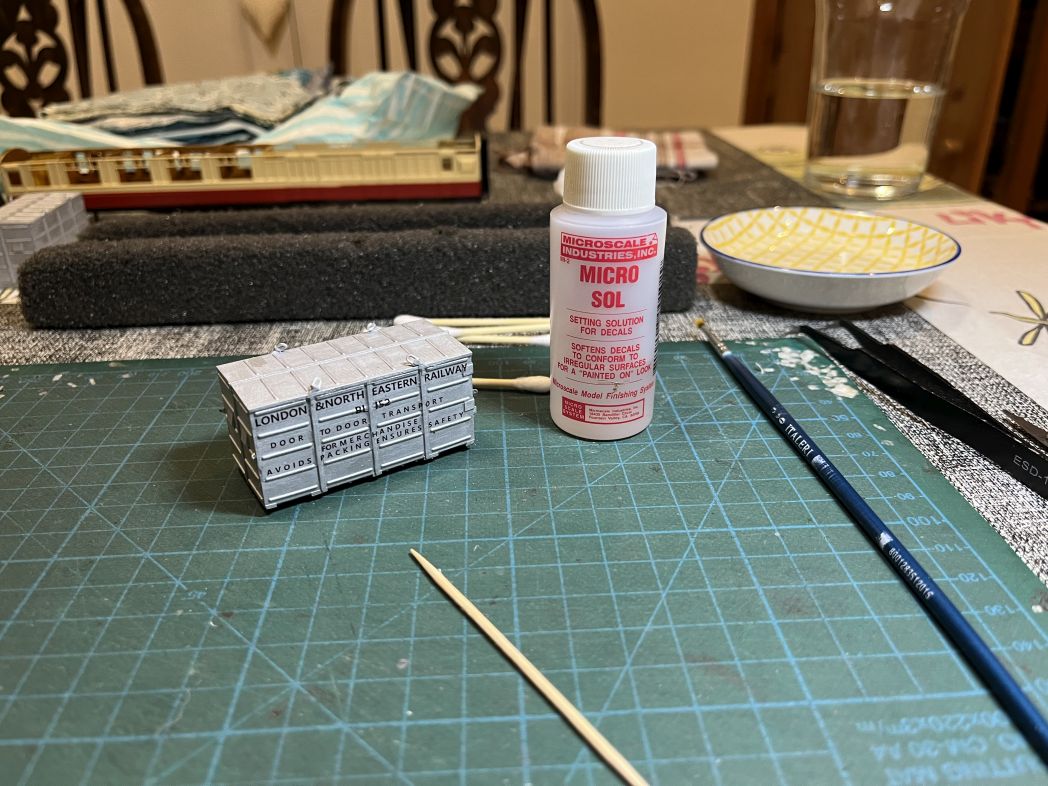
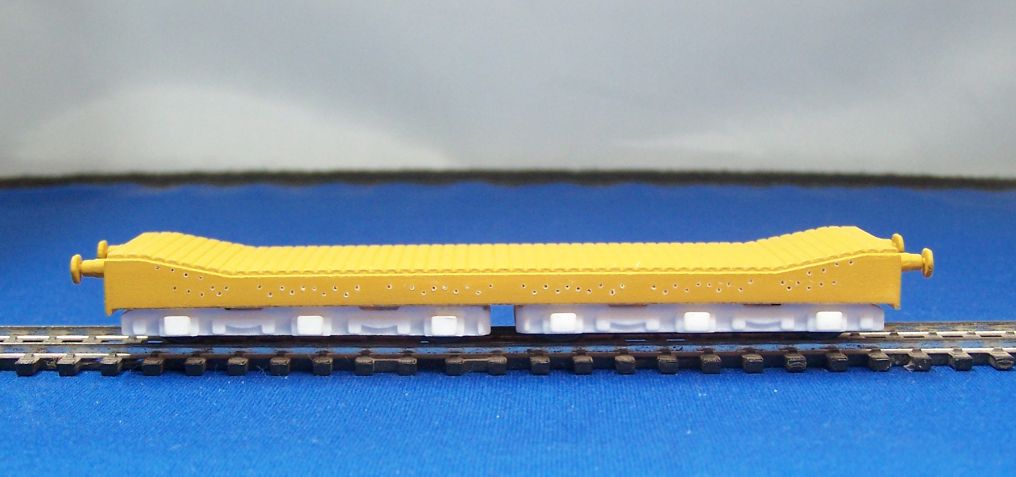
Parkside bogie Sulphate wagon ( PC20). This has also been the subject of debate: as unfitted wagons they ought to be grey, but the Parkside instructions state 'brown'. That may be an error, but putting a scan of the photographs from Tatlow 4B into an online colouriser (3 different ones, in fact) came back each time with a reddish tint. This brown, Humbrol 62, is almost certainly wrong as if they were 'brown', it was most likely red oxide. I ow know it should be black (bituminous paint) inside. The transfers I made up myself as the large lettering is simply not available for the LNER period.

Image

The Quad and 'Cornish Bob' we have just been looking at.

Image

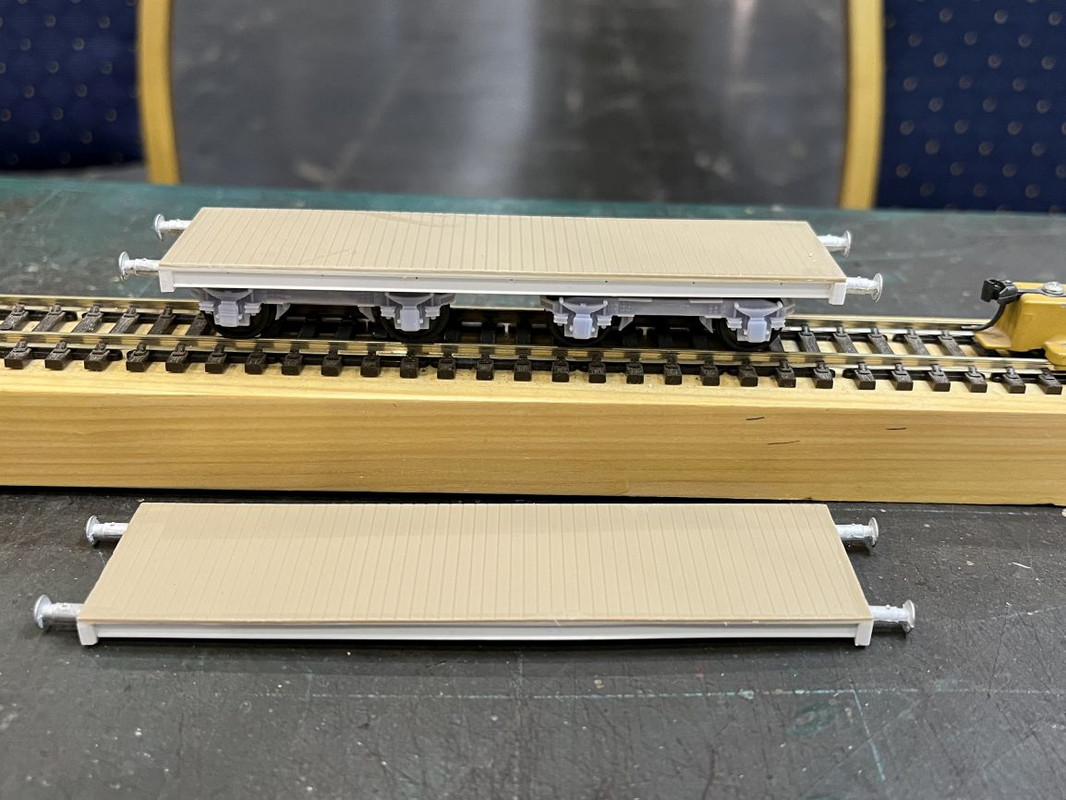
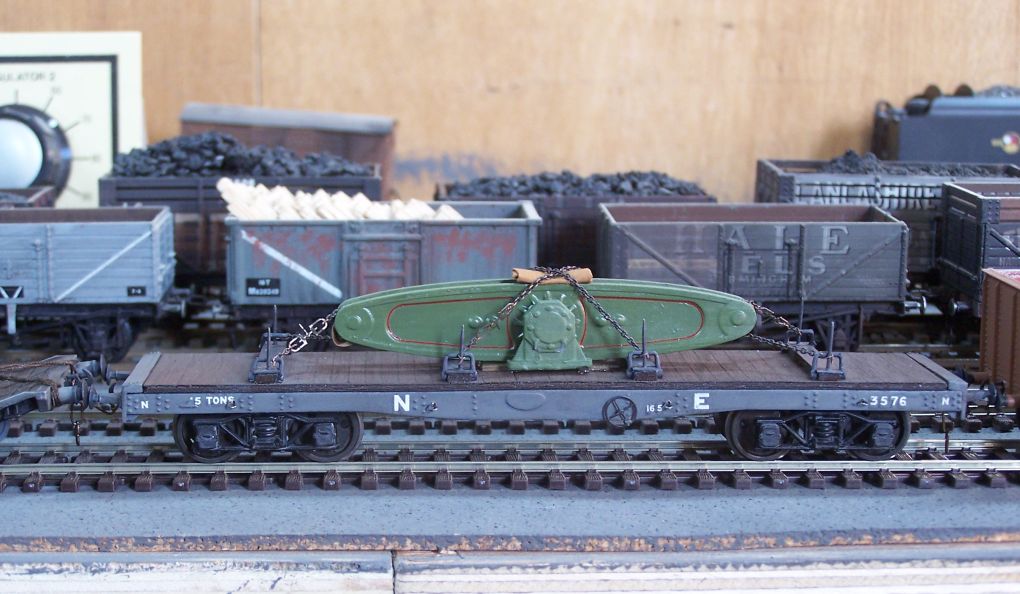
Hurst Nelson 'Gondola' wagon for the North British. This is converted from a Parkside Quad. I've since reinstated the missing bolster pin.

Image

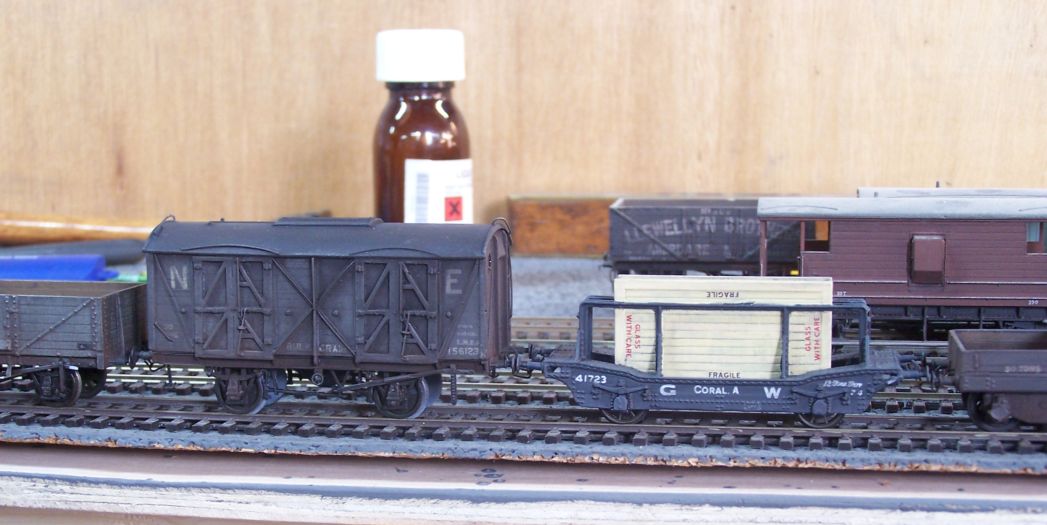
The GW Coral glass wagon is a 3D print from 247 Developments. The original pattern grain hopper is a resin cast by Atlantic 3279 of this parish with a scratchbuilt underframe.

The train can be seen in motion here. It didn't complete the intended drive past as some off scene disaster required the operator's attention and he stopped it , so we had to do a walk by as far as we could.

Image

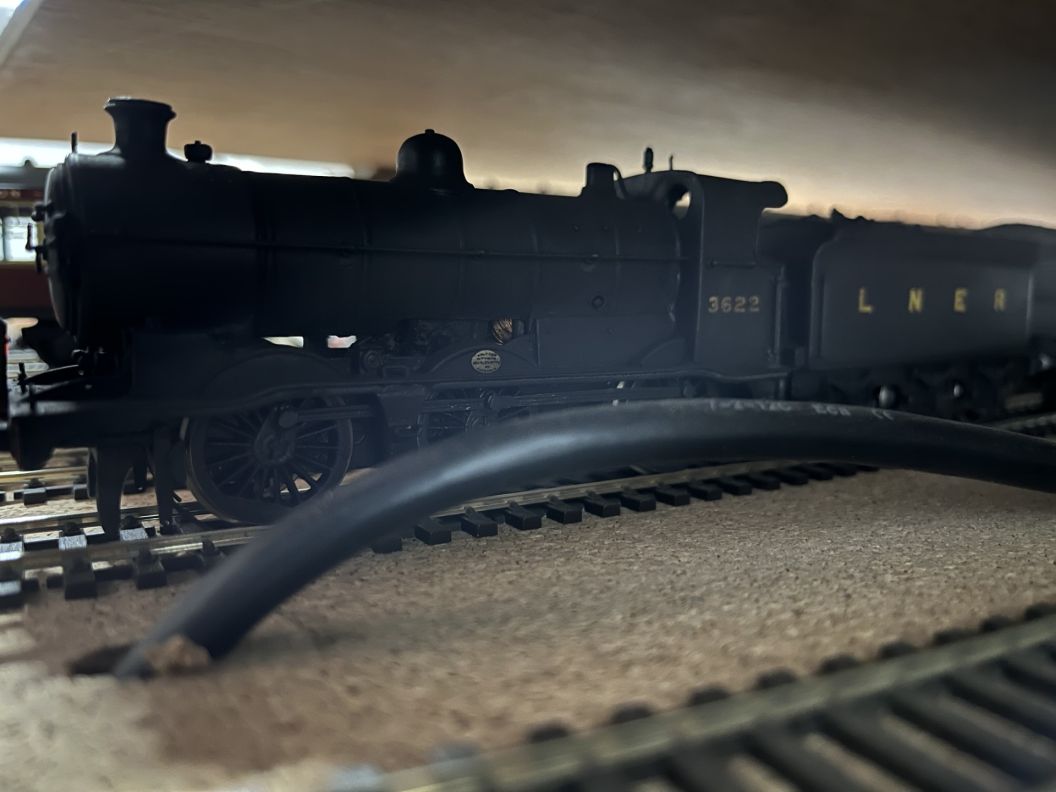
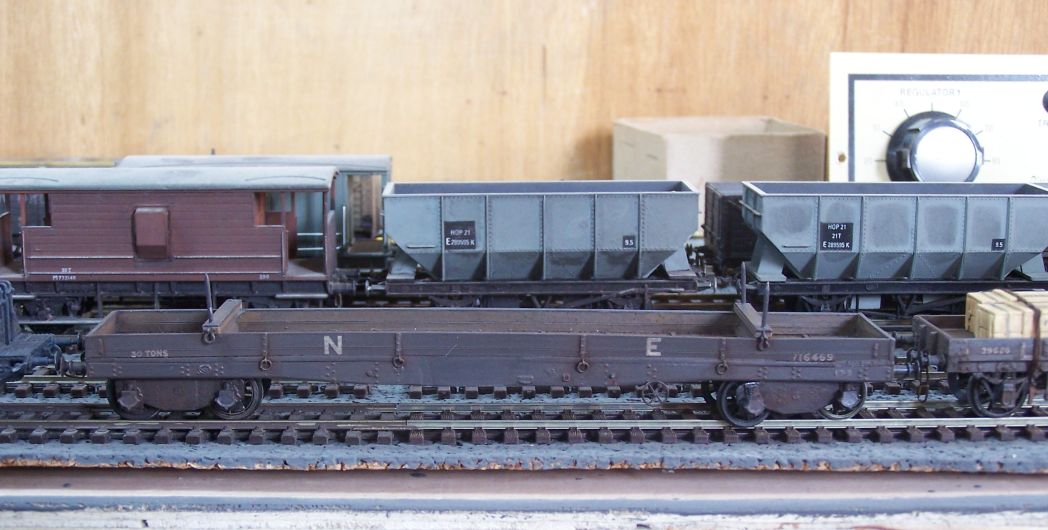
One of the features of this layout is the gradients and multiple levels it will work on - at one point there will be 4 levels crossing each other. Trains therefore vanish and reappear even now and we had to be careful about section occupancy. At one point, as we'd lost track of it, I went looking for 3622, the NuCast J6 I had also recently refinished and found it on the approach to Bog Junction and under the end of Shap Bank.

Image

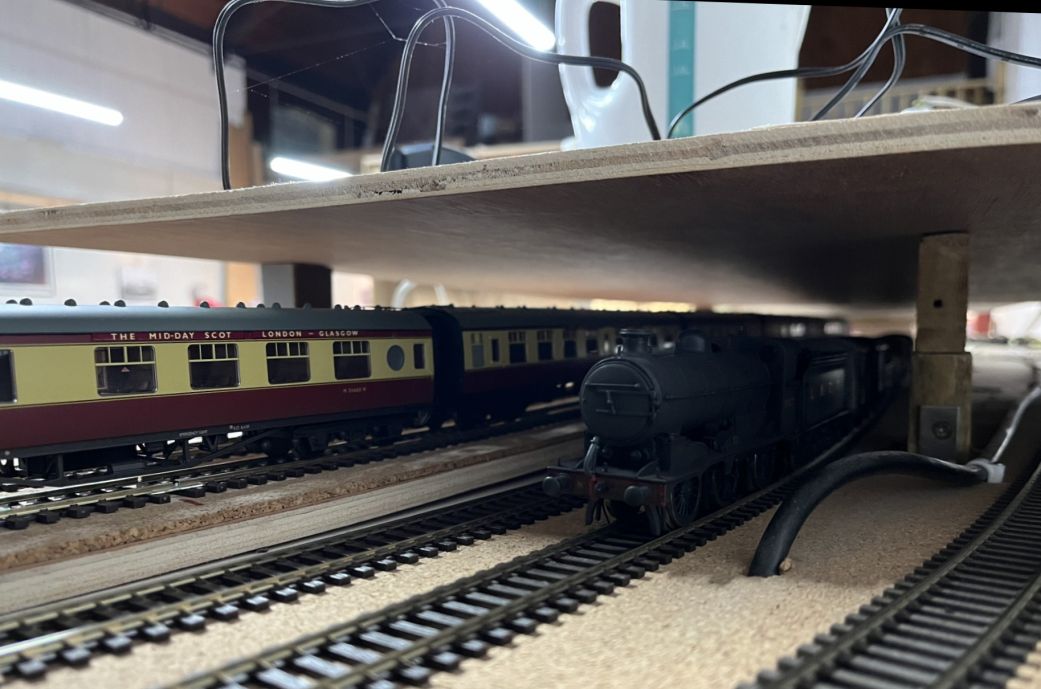
Unusual company for a J6 but you can see some of the multilayered nature of the layout as it starts to take shape. It was a very convivial day out in good company and I thank our host for his hospitality and for the invitation.
jwealleans
LNER A4 4-6-2 'Streak'
Posts: 4223
Joined: Wed Oct 25, 2006 8:46 am

Re: West End Workbench

Post by jwealleans »

Preparing this year's display for Warley over the weekend. This year's theme is scratchbuilding, both the classic approach of cutting up plastic sheets and also using 3D print technology to produce what you want. I hope to be doing a bit of both.

Image

I'm on stand D35 this year. For regular visitors, we have been moved to the diagonally opposite corner of the hall, so ahead and slightly to the left as you come through the doors, then right down to the far end. Closer to the food, further from the gents. Swings and roundabouts......

My good friend and colleague Mr King can be found to my left on stand D33, while Mr. Nicholas is to our rear on stand D29. I see that in a change of subject, he's 'planing' layouts this year, so expect to see him behind a large pile of shavings and bring any awkward bits of wood with you for refinishing.

More details here.
User avatar
Dave
LNER A4 4-6-2 'Streak'
Posts: 1696
Joined: Sat Nov 13, 2010 9:33 pm
Location: Centre of the known universe York

Re: West End Workbench

Post by Dave »

Lovely wagon porn as usual from your good self. I hope you enjoy meeting the great unwashed at that show, the thought of going there gives me a touch of the vapours, I think I would rather play with GWR locos all that weekend.
User avatar
Atlantic 3279
LNER A4 4-6-2 'Streak'
Posts: 6541
Joined: Fri Jun 26, 2009 9:51 am
Location: 2850, 245

Re: West End Workbench

Post by Atlantic 3279 »

In that I case earnestly recommend that you quickly build yourself a GWR Beyer-Garratt. Clive Mortimore has sketched out a design on RMWeb, although he's made the error of arranging at as a 4-6-0 + 0-6-4, with one set of coupled wheels intruding into the cab. As we all know, it ought to be a 4-6-2 + 2-6-4, based on their many Pacifics, thus maintaining Swindon's standardization ....
Most subjects, models and techniques covered in this thread are now listed in various categories on page1

Dec. 2018: Almost all images that disappeared from my own thread following loss of free remote hosting are now restored.
jwealleans
LNER A4 4-6-2 'Streak'
Posts: 4223
Joined: Wed Oct 25, 2006 8:46 am

Re: West End Workbench

Post by jwealleans »

But I'm supposed to be demonstrating wagons?
User avatar
Atlantic 3279
LNER A4 4-6-2 'Streak'
Posts: 6541
Joined: Fri Jun 26, 2009 9:51 am
Location: 2850, 245

Re: West End Workbench

Post by Atlantic 3279 »

Dave isn't. He needs something to do while we suffer the NEC.
Most subjects, models and techniques covered in this thread are now listed in various categories on page1

Dec. 2018: Almost all images that disappeared from my own thread following loss of free remote hosting are now restored.
jwealleans
LNER A4 4-6-2 'Streak'
Posts: 4223
Joined: Wed Oct 25, 2006 8:46 am

Re: West End Workbench

Post by jwealleans »

He could sit between us and man the LNER Society stand?
User avatar
Dave
LNER A4 4-6-2 'Streak'
Posts: 1696
Joined: Sat Nov 13, 2010 9:33 pm
Location: Centre of the known universe York

Re: West End Workbench

Post by Dave »

I could but I will not as I intend to stay here, I have better things to do with my time than go the that show.
A GWR Garrett.....interesting thought, you could call it The Great Mouse.
jwealleans
LNER A4 4-6-2 'Streak'
Posts: 4223
Joined: Wed Oct 25, 2006 8:46 am

Re: West End Workbench

Post by jwealleans »

I've had a request from the Far Colonies to show how I make and apply my own transfers. Now, I've been doing this for quite some time and it's a very easy process which I'd encourage anyone to have a go at. You don't need any special equipment unless you're printing white (which is possible at home but frankly it's easier just to get a professional to do it). I use John Peck at Precision Decals for that, but there are plenty of other equally good suppliers.

What I shan't cover here is generating the artwork; there are plenty of free packages and advice out there but I'll be happy to talk to anyone about that if they call at my stand this weekend.

I've taken pictures of two separate sets of transfers in the last few days, but the process is identical for both.

Firstly, the printer. i have a bog standard inkjet, a HP Deskjet 3000. You don't need anything special to do this.

The paper. I'm still using some clear paper I bought from Crafty Computer Paper about 10 years ago. They are no longer trading. I then needed some white paper, so I went online and found this:

Image

There are plenty of different suppliers to choose from. You just need to be sure that it's for your type of printer, inkjet or laser.

There's nothing special about printing either. I usually print a test sheet on plain paper as a check, but if you've done your own artwork then you'll have done that anyway to check for sizing and appearance. Print using the 'Photo paper best quality' or equivalent setting. Once the sheet has printed leave it to dry thoroughly (I leave it overnight as a rule).

Image

You then need to varnish it. This is what stops the ink spreading everywhere when you wet the paper. This varnish was recommended with the Crafty Computer Paper when I first bought that - check what your paper recommends and go with that. Frankly, I don't know enough about this whole process to know what varnish you should or shouldn't use so I stick with manufacturer's recommendation.

Image

Here are my varnished decals in the spray booth. I leave these overnight again to dry thoroughly. One point here; you can't print on the paper when it's been varnished, so I cut off the printed area before spraying and preserve the rest of the sheet for future use.

Image

You apply the transfers just like any other waterslide ones. A tiny amount of washing up liquid in the water (some manufacturers say lukewarm water, I'm not sure it makes a great deal of difference). Dip the transfer and then let it soak on a mat - they can float off the paper if you leave them in the water and they they're a swine to get out without wrapping themselves up terminally. I use cocktail sticks and a paintbrush to position them and a cotton bud to soak up excess water. These transfers are on a transparent backing - they were produced by Sascha Freudenberg to go with his printed containers.

Image

Position your transfer, slide out the backing paper and carefully blot out the excess water with a cotton bud to make it adhere to the model. one thing to remember here is that the paper you're using is a bit thicker than what the professionals use and therefore can take a bit more work to make it follow the contours of a model. Sascha's artwork is drawn so you can apply the whole side of a container in one piece. I found that I ended up with air bubbles and raised areas when I did that, so I've applied these in sections with better results.

Image

Once the decal has started to dry you can use a softener to make it adhere better to the surface of the model. This only works with waterslide transfers. There are a number of products out there; this is the one I use and I haven't tried any others, but I haven't heard of any to avoid.

That's all there is to it. Once you can do this, like soldering, a whole range of new possibilities opens up. All the following use my own transfers, made and applied at home:

Image

Image

Image

Image

Image

Image

Here's one to show the limitations of the process; I did the artwork for these containers, but couldn't get the intensity of ink required for the final print, so I had to go to John Peck to produce them.

Image
User avatar
NZRedBaron
H&BR Q10 0-8-0
Posts: 196
Joined: Wed Apr 22, 2020 8:58 am

Re: West End Workbench

Post by NZRedBaron »

Where did you source those Anglo-Belgian ferry wagons?
jwealleans
LNER A4 4-6-2 'Streak'
Posts: 4223
Joined: Wed Oct 25, 2006 8:46 am

Re: West End Workbench

Post by jwealleans »

I made them.
jwealleans
LNER A4 4-6-2 'Streak'
Posts: 4223
Joined: Wed Oct 25, 2006 8:46 am

Re: West End Workbench

Post by jwealleans »

Well, Warley has been and gone again. I have to say that I did enjoy this year; thank you to everyone who came and chatted, very nice to put a few faces to names as well as see some regulars (best of British in your exams, Joshua). Something of a surprise to see Bill Bedford there, but no less a pleasure for the unexpected context. I also had a long chat with Mr Cambrian kits, which was interesting.

I did manage to achieve some modelling in between visits - I know it's not the main reason for being there, but it's nice to come away with something made.

Image

A pair of Flat-T bodies. The bogies were a gift from Jesse Sim and are 3D printed by NIU models. He doesn't seem to list them but I'm sure an enquiry would procure some. These were a joint LMS/LNER project as part of war preparations in the late 1930s, so they appear in both Tatlow and Essery. Buffers are from LMS. This was very straightforward to make and I had both of these done by the end of Saturday. I always start two of anything I'm scratchbuilding in case I foul one up, it means you don't have to start again from the beginning. If you complete both, it's a bonus.

Image

Sunday's project was this 3D printed Warwell B (or Flatroll ELL if you prefer). An unusual wagon and a bit of a last minute choice to do. They were built for a very large Sherman tank variant and had to have out of gauge side pieces bolted on to carry them. After the war they went into traffic with the side pieces removed, hence all the bolt holes. This is a very poor 3D print, to be fair from about 10 years ago by a chap called Wild Boar Fell who seems to have dropped out of sight since. It's taken a lot of preparation to get to the state you see. I have found some good drawings, though, so I'm optimistic that with a fair bit of added detail it'll end up a half decent wagon. It'll be out of the ordinary in any case.
Danby Wiske
GER D14 4-4-0 'Claud Hamilton'
Posts: 395
Joined: Fri Oct 19, 2012 12:09 am

Re: West End Workbench

Post by Danby Wiske »

Very interesting wagons as usual JW. Looking forward to seeing them completed.

jwealleans wrote: Tue Nov 28, 2023 5:55 am I made them.
Touché! :wink:
earlswood nob
LNER A4 4-6-2 'Streak'
Posts: 1667
Joined: Tue Mar 09, 2010 9:23 am
Location: Surrey

Re: West End Workbench

Post by earlswood nob »

G'day from chilly Surrey

Thanks for the details of your method for making transfers, JW.

I've often wondered about making my own transfers.

Malcolm (Earlswood Nob, the name lives on as a nickname for a nearby pub called Railway Inn)
Post Reply