West End Workbench
Moderators: 52D, Tom F, Rlangham, Atlantic 3279, Blink Bonny, Saint Johnstoun, richard
-
Atlantic 3279

- LNER A4 4-6-2 'Streak'
- Posts: 6534
- Joined: Fri Jun 26, 2009 9:51 am
- Location: 2850, 245
Re: On my Workbench - before the Grouping.
That looks like an interesting alternative to the carving and sanding of solid wood, the heat-forming of plastic, or the rolling of metal. Perhaps I ought to ask this question in a PM to Bill rather than digress from Jonathans thread, but I hope I'll be forgiven: If working in plastic, I imagine each of the strips has to be bonded to its neighbour with an application of solvent in order to get a rigid final roof shell - does this run the risk of a solvent "overdose" with consequent sagging / warping / wrinkling of the plastic? Assuming that can be avoided, then it occurs to me that hand-cut strip tends not to have square edges owing to the bruising caused by the tapered knife blade. With a bit of care, the taper on the edges of the strips could be exploited to advantage, putting the wider face of each strip on the outside of the roof. This would help to make the joints tighter, and possibly sufficiently close and neat to be capable once bonded of simply being sanded to final shape without any need for wrinkle-free application a paper cover, although I appreciate that some feel that the texture of the tissue paper is more roof-like.
Most subjects, models and techniques covered in this thread are now listed in various categories on page1
Dec. 2018: Almost all images that disappeared from my own thread following loss of free remote hosting are now restored.
Dec. 2018: Almost all images that disappeared from my own thread following loss of free remote hosting are now restored.
-
jwealleans
- LNER A4 4-6-2 'Streak'
- Posts: 4217
- Joined: Wed Oct 25, 2006 8:46 am
Re: On my Workbench - before the Grouping.
Giver your expertise with plastic of whatever form, 3279, I look forward to seeing that. It's certainly an idea. Dave Smith has made quite a tidy job of rolling these up, as he generally does.
Our president in Ely, Phil Giffen, in the days when they were real modellers rather than assemblers of components as we are, made some very good Gresley roofs by having some fine-grained hardwood profiled and then sanding in the end curves when he'd cut them to length. He used them on the old BSL kits, one or two of which he passed on to me. In terms of the shape they stand up with anything we can do today.
I was reminded this morning, 3279, that among the ECJS projects I have is a conversion from 3 Ian Kirk sides for a corridor 3rd into an ECJS Dia 34 3rd. You need 3 panels with 3 large windows in each (hence the need for 3 sides), but you don't need to cut out toplights above the doors as this diagram was at least in part built with what became the LNER arrangement of vents. I may get onto that one while I'm having a coach building phase. Not quite the monster clerestories but something different nonetheless.
-
Bill Bedford
- LNER A3 4-6-2
- Posts: 1241
- Joined: Sat Mar 08, 2008 9:43 pm
Re: On my Workbench - before the Grouping.
That is always going to be a danger.Atlantic 3279 wrote:That looks like an interesting alternative to the carving and sanding of solid wood, the heat-forming of plastic, or the rolling of metal. Perhaps I ought to ask this question in a PM to Bill rather than digress from Jonathans thread, but I hope I'll be forgiven: If working in plastic, I imagine each of the strips has to be bonded to its neighbour with an application of solvent in order to get a rigid final roof shell - does this run the risk of a solvent "overdose" with consequent sagging / warping / wrinkling of the plastic?
I think what I would do is to tape the strips together, this makes them 'flow' easily over the formers. glue the formers into place and once the glue has set firmly use plastic filler to fill the joints between the strips. The filler is much less aggressive than liquid solvents, though you may have to support the underside while you are working.Assuming that can be avoided, then it occurs to me that hand-cut strip tends not to have square edges owing to the bruising caused by the tapered knife blade. With a bit of care, the taper on the edges of the strips could be exploited to advantage, putting the wider face of each strip on the outside of the roof. This would help to make the joints tighter, and possibly sufficiently close and neat to be capable once bonded of simply being sanded to final shape without any need for wrinkle-free application a paper cover
Ahrrr, one of my pet hates. The texture of even the finest tissue is always massively over scale., although I appreciate that some feel that the texture of the tissue paper is more roof-like.
Bill Bedford
Website: http://www.mousa.biz
Webshop: http://www.shapeways.com/shops/mousa_models
Blog: http://www.mousa.biz/info
Website: http://www.mousa.biz
Webshop: http://www.shapeways.com/shops/mousa_models
Blog: http://www.mousa.biz/info
-
rob
- GCR D11 4-4-0 'Improved Director'
- Posts: 425
- Joined: Sat Mar 11, 2006 1:19 pm
- Location: Cork Ireland
Re: On my Workbench - before the Grouping.
Hello Jon,
1`Those wagons look really great,did they cause any "whassat?" reactions at exhibition?They must be truely unique on the circuit.
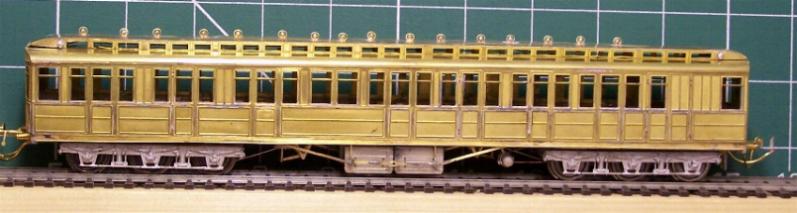
2 The ECJS 12 wheeler is simply beautiful-fully lined teak? Great to see the Peter K range back,along with Bills etches the 12 wheeler fancier is rolling in it!And 247 deserve our thanks for those bogies!
Cheers,
Rob
1`Those wagons look really great,did they cause any "whassat?" reactions at exhibition?They must be truely unique on the circuit.
2 The ECJS 12 wheeler is simply beautiful-fully lined teak? Great to see the Peter K range back,along with Bills etches the 12 wheeler fancier is rolling in it!And 247 deserve our thanks for those bogies!
Cheers,
Rob
-
Robpulham

- LNER A4 4-6-2 'Streak'
- Posts: 1715
- Joined: Thu Mar 27, 2008 9:54 pm
- Location: Lower Wensleydale
- Contact:
Re: On my Workbench - before the Grouping.
Hi Jonathan, I'm back on line at last. I like the Peter K kit it looks superb. I have just taken delivery of the buy two get one free from Kemilway. I must say the etches look good at first glance but I cannot for the life of me remember what I actually ordered. As usual I still have quite a few bits on the go but I haven't done any modelling since before I saw you at Hartlepool - just too busy at work and no energy when I get home.
-
jwealleans
- LNER A4 4-6-2 'Streak'
- Posts: 4217
- Joined: Wed Oct 25, 2006 8:46 am
Re: On my Workbench - before the Grouping.
Cheers, Rob. Pleased to see you back. I was asked at Hartlepool whether the Italian vans were some sort of kit (I forget the manufacturer). I've got a couple more on the back burner and still plans....
Still on a coaching theme, I started the next of these kits I want to complete over the weekend while it rained. I thought this might be marginally easier than the Peter K simply because more of it would be present and I'd have less to make. I was expecting to have to alter some of the components as I went along.
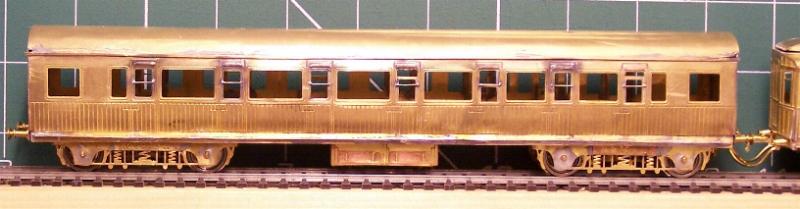
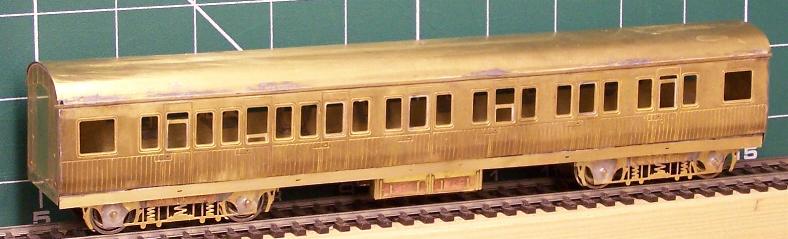
It's a Jidenco GCR 60' Composite. Possibly the first thing, certainly the first coach, I bought on Ebay. I don't know how long it's been kicking around in the heap so I was determined to build it. It wasn't as bad as I might have feared, actually; the end profile matched perfectly to a drawing in Nick Campling's book and the sides, although 2mm too long, are slightly too long right along their length so everything is in the right place relative to everything else. It's gone together quite well - for once the roof was just a bit snug so a bit of filler will be required in the corners. I've had to move the solebars out to allow the bogies to pivot enough for 3' curves. The bogies are a fold up etch and look very frail and easily distorted to me. The sides are very easily distorted as well.
Just the trussing and undergear to fabricate and attach after a tedious evening tonight sweating vents and window bars into place. This will be grained when I get as far as painting it - can anyone tell me whether the graining on the upper panels was vertical (as you'd expect on a Gresley coach, for example) or horizontal? I'm assuming vertical but I'd rather find out now if I'm wrong.
This is almost ready for primer - just alarm gear and destination board holders to make up. Those vents from 51L really look the business.
Still on a coaching theme, I started the next of these kits I want to complete over the weekend while it rained. I thought this might be marginally easier than the Peter K simply because more of it would be present and I'd have less to make. I was expecting to have to alter some of the components as I went along.
It's a Jidenco GCR 60' Composite. Possibly the first thing, certainly the first coach, I bought on Ebay. I don't know how long it's been kicking around in the heap so I was determined to build it. It wasn't as bad as I might have feared, actually; the end profile matched perfectly to a drawing in Nick Campling's book and the sides, although 2mm too long, are slightly too long right along their length so everything is in the right place relative to everything else. It's gone together quite well - for once the roof was just a bit snug so a bit of filler will be required in the corners. I've had to move the solebars out to allow the bogies to pivot enough for 3' curves. The bogies are a fold up etch and look very frail and easily distorted to me. The sides are very easily distorted as well.
Just the trussing and undergear to fabricate and attach after a tedious evening tonight sweating vents and window bars into place. This will be grained when I get as far as painting it - can anyone tell me whether the graining on the upper panels was vertical (as you'd expect on a Gresley coach, for example) or horizontal? I'm assuming vertical but I'd rather find out now if I'm wrong.
This is almost ready for primer - just alarm gear and destination board holders to make up. Those vents from 51L really look the business.
Last edited by jwealleans on Tue Oct 30, 2018 8:09 pm, edited 3 times in total.
-
Atlantic 3279
- LNER A4 4-6-2 'Streak'
- Posts: 6534
- Joined: Fri Jun 26, 2009 9:51 am
- Location: 2850, 245
Re: On my Workbench - before the Grouping.
The matchboard compo looks nice too and has the same bogies as my Jidenco Barnums. I believe that Dan Pinnock and/or Chris Parrish used to provide some nicer "3 dimensional" cast whitemetal GCR 10' bogies, but in either case that's not much help now is it? I've not done it, but I did think about at least cutting out the flat zig-zags and putting in some coiled wire to represent the springs.
Oddly enough, on the Barnums I had to move the solebars INWARDS from the apparently "Jidenco intended" position, otherwise it was impossible to model the inset end doorways correctly. Even with the inward shift, mine still seem to go around curves a shade under 3' rad.
That coach might give you an excuse to model an example of Robinson's "armoured coach ends, interlocking fenders and reserve stroke collision buffers".
If you are stuck I think I've got a sheet of home-made but passable small paper prints to portray the GCR frosted WC window with etched crest.
Most subjects, models and techniques covered in this thread are now listed in various categories on page1
Dec. 2018: Almost all images that disappeared from my own thread following loss of free remote hosting are now restored.
Dec. 2018: Almost all images that disappeared from my own thread following loss of free remote hosting are now restored.
-
Bill Bedford
- LNER A3 4-6-2
- Posts: 1241
- Joined: Sat Mar 08, 2008 9:43 pm
Re: On my Workbench - before the Grouping.
jwealleans wrote: It's a Jidenco GCR 60' Composite. Possibly the first thing, certainly the first coach, I bought on Ebay. I don't know how long it's been kicking around in the heap so I was determined to build it. It wasn't as bad as I might have feared, actually; the end profile matched perfectly to a drawing in Nick Campling's book and the sides,
There is a problem with this kit. There should be two small windows and a panel between the third and fourth door from the right. There was a door in the corridor between the first and third compartments which needed a solid bit of side for the frame.
Just the trussing and undergear to fabricate
Camplings drawings of the underframe are in error too. There should be two visible v-hangers for the brakes, one on each side, both close to the battery boxes. The position of the v-hanger that Campling shows near the bogie is only correct for one end of dual fitted coaches. On these coaches the Westinghouse cylinder was fitted next to the battery boxes and the vacuum cylinders move outward to accommodate it..
There should be some fine beading between the windows. The panels between the beading had the grain vertical, above and below the beading the grain was horizontal.This will be grained when I get as far as painting it - can anyone tell me whether the graining on the upper panels was vertical (as you'd expect on a Gresley coach, for example) or horizontal? I'm assuming vertical but I'd rather find out now if I'm wrong.
Those vents from 51L really look the business.
They look too high to me, I think the lower part of the 'ring' should just sit at roof level.
Bill Bedford
Website: http://www.mousa.biz
Webshop: http://www.shapeways.com/shops/mousa_models
Blog: http://www.mousa.biz/info
Website: http://www.mousa.biz
Webshop: http://www.shapeways.com/shops/mousa_models
Blog: http://www.mousa.biz/info
-
jwealleans
- LNER A4 4-6-2 'Streak'
- Posts: 4217
- Joined: Wed Oct 25, 2006 8:46 am
Re: On my Workbench - before the Grouping.
Thanks for that, Bill. I knew it was all going too smoothly...
I may have some of the vents set too high - my third hand was a bit unsteady holding the coach while I incinerated my second one soldering them in - but if correctly fitted they sit on a small projection on the base at a height such that the outer ring just touches the roof. That puts them a midge's proverbial over 2mm high and about matches the Isinglass drawing. They definitely don't look like the more flattened post-grouping version, which was what I was most concerned about.
Couldn't understand how I'd missed that until I looked at the Campling drawing and realised it's a composite one and doesn't show that part of this coach. I've looked at the outline drawing in Dow Vol. 3 and see what you mean. I'd have realised when I built the interior - or I'd have been scratching my head trying to work out what I'd done. It should be possible to make up a panel and inset it - after all the windows are 3/4 in place already.There should be two small windows and a panel between the third and fourth door from the right.
That did have me wondering, but I hadn't pinned down a photo which showed what I was looking for. I thought it was odd that there was only one vac cylinder on the drawing (and in the kit). So, looking at the drawing, they should be in the gap between vac tanks and battery boxes - with the V hanger innermost.There should be two visible v-hangers for the brakes
ROFLMAO. This is a Jidenco kit. I'll paint it in when I get that far.There should be some fine beading between the windows.
I may have some of the vents set too high - my third hand was a bit unsteady holding the coach while I incinerated my second one soldering them in - but if correctly fitted they sit on a small projection on the base at a height such that the outer ring just touches the roof. That puts them a midge's proverbial over 2mm high and about matches the Isinglass drawing. They definitely don't look like the more flattened post-grouping version, which was what I was most concerned about.
-
wehf100
- GCR D11 4-4-0 'Improved Director'
- Posts: 486
- Joined: Thu Nov 01, 2007 3:42 pm
- Location: Cambridgeshire
Re: On my Workbench - before the Grouping.
Looks great- Interesting to think that there aren't actually that many years between the 12-wheeler and the GCR carriage!!
I think underframe arrangement drawings can be got from HMRS drawings service.
The GCR panelling had a horizontal panel running above the windows, and as they had a lot of 'glass' for the side each window frame was made from beading. There was no panel as such seperating them. The remaining 'above-waist' panels had a vertical grain. That said, on most pictures (admittedly when new-'frontline' carriages) grain doesn't appear very apparent at all. I have seen some models of matchboard Robinson carriages finished with a 'checkerboard' effect to the matchboading- the real carriages wood work and varnishing seems to have been to a very high quality and consistent in colouring. Indeed, in some pictures it almost looks like brown paint!
looking great as always!
Will
-
jwealleans
- LNER A4 4-6-2 'Streak'
- Posts: 4217
- Joined: Wed Oct 25, 2006 8:46 am
Re: On my Workbench - before the Grouping.
They did and I tried to obtain some from Chris Parrish last year, but they never arrived. I'd like a set of Barnums but I'm inclined to wait for the moment. Tackling this kit hasn't endeared me to the prospect of the ex-Jidenco version. Adding the spring/axlebox castings last night has reduced the amount of swivel on the bogies even further, so I'm looking at raising them .5 mm and shaving a little off the top of the corner of each bogie. I may have to take a little off the bottom of the solebars as well but that's probably the final option.Dan Pinnock and/or Chris Parrish used to provide some nicer "3 dimensional" cast whitemetal GCR 10' bogies
on most pictures ... grain doesn't appear very apparent at all
Precisely the problem I had trying to decide in which direction it ran.
I've made a start on adding in the window - a brass backing strip and then I'll build it up to the same level as the coach side in plastikard. It'll be easier to shape and groove in the beading to match what's already there.
-
jwealleans
- LNER A4 4-6-2 'Streak'
- Posts: 4217
- Joined: Wed Oct 25, 2006 8:46 am
Re: On my Workbench - before the Grouping.
We've had a nice few days up here so I've been employed outdoors instead of hiding away in the workshop. I have had a crack at correcting this coach, though and here is progress so far:
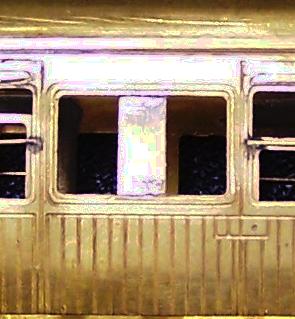
First step was to solder a strip of scrap brass behind the window to support the new panel. This is (deliberately) narrower than the final panel piece.
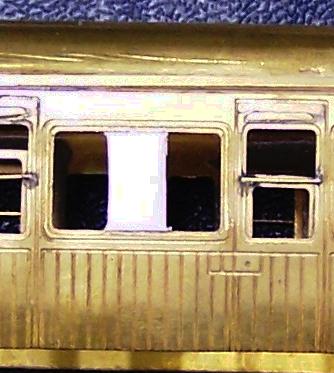
20 thou plastikard panel piece filed to shape and stuck in to give the basic outline of the windows.
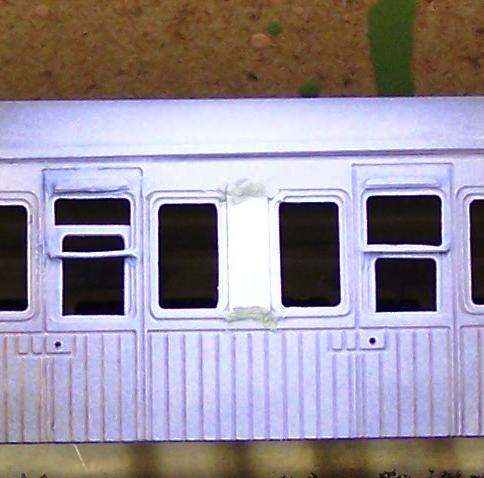
Beading stuck in place (10 x 20 thou Evergreen strip) allowed to harden and then filed down to the right depth. A 5 thou piece of plastikard then added to give the raised panel section between the windows. Milliput added to fill in the etched panel lined which are no longer required. One corner piece snapped off when I was forming the curve in the corner of the window: this will have to be carved out of the Milliput once it's hardened. The left hand window isn't quite right either, as I can now see in the photo; I'll work on this some more once everything's hardened off again.
First step was to solder a strip of scrap brass behind the window to support the new panel. This is (deliberately) narrower than the final panel piece.
20 thou plastikard panel piece filed to shape and stuck in to give the basic outline of the windows.
Beading stuck in place (10 x 20 thou Evergreen strip) allowed to harden and then filed down to the right depth. A 5 thou piece of plastikard then added to give the raised panel section between the windows. Milliput added to fill in the etched panel lined which are no longer required. One corner piece snapped off when I was forming the curve in the corner of the window: this will have to be carved out of the Milliput once it's hardened. The left hand window isn't quite right either, as I can now see in the photo; I'll work on this some more once everything's hardened off again.
Last edited by jwealleans on Tue Oct 30, 2018 8:09 pm, edited 3 times in total.
-
Hucknall Central
- LNER J94 0-6-0ST Austerity
- Posts: 47
- Joined: Tue Mar 03, 2009 5:32 pm
Re: On my Workbench - before the Grouping.
Hello Jonathan
Have been following your thread for some months, and enjoying the diversity of your stock. The continental vans are a treat.
The sight of the Jidenco GC coach made me sit up and take notice In my "to be built before I peg it" stock I have five matchboard corridors and three Barnums - all Jidenco. Just the time and (a little) courage needed to start them; I will continue to watch your progress. Having built over 100 PO wagons and the same again in all-company goods stock (the GC was predominantly freight in the 30s), it's time passenger stock came into force.
When will we see the Ferry Vans on the next Thurston video?
Well done.
Paul.
Have been following your thread for some months, and enjoying the diversity of your stock. The continental vans are a treat.
The sight of the Jidenco GC coach made me sit up and take notice
When will we see the Ferry Vans on the next Thurston video?
Well done.
Paul.
-
jwealleans
- LNER A4 4-6-2 'Streak'
- Posts: 4217
- Joined: Wed Oct 25, 2006 8:46 am
Re: On my Workbench - before the Grouping.
Morning Paul. Thank you for your kind words and I'm pleased to have incited you to post. Please put up a few pictures of your stock - the more the better as far as I'm concerned. There are more Continental vans on the way although I'm taking a bit of a break from them at the moment.
Should I ever build another Jidenco coach - unlikely unless I'm offered them very cheaply - I'd look to replace the bogies if possible and also brace the bottom of the sides with something. The brass is very thin and if you built them as designed - just two cross-pieces to support the bogies and (presumably) a removable roof to allow the interior to be fitted - they'd be unbelievably flimsy. The plastic roof is awful and best consigned to the bin.
It's been a nuisance having to make up this window section but it's also a reminder how useful this forum is and the benefit of having the expertise of someone like Bill B available. I'd have been much more peeved about having to alter it if it had already been painted.
I'm not sure there'll be any more Thurston videos - our Chairman (who shot the first two) used to make them as a hobby but has since had an enforced career change and is now a full time filmmaker. I suspect another version would be a bit of a busman's holiday for him.
-
Bill Bedford
- LNER A3 4-6-2
- Posts: 1241
- Joined: Sat Mar 08, 2008 9:43 pm
Re: On my Workbench - before the Grouping.
How many of you would want GC bogies?jwealleans wrote: I'd look to replace the bogies if possible and also brace the bottom of the sides with something.
Bill Bedford
Website: http://www.mousa.biz
Webshop: http://www.shapeways.com/shops/mousa_models
Blog: http://www.mousa.biz/info
Website: http://www.mousa.biz
Webshop: http://www.shapeways.com/shops/mousa_models
Blog: http://www.mousa.biz/info