Atlantic's works: Portable layout update
Moderators: 52D, Tom F, Rlangham, Atlantic 3279, Blink Bonny, Saint Johnstoun, richard
-
Atlantic 3279

- LNER A4 4-6-2 'Streak'
- Posts: 6534
- Joined: Fri Jun 26, 2009 9:51 am
- Location: 2850, 245
Re: Loco workbench - many done,but time for a break (van or two)
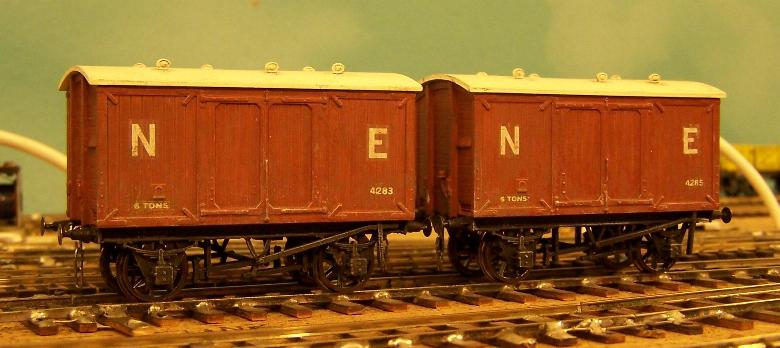
A further side view of one of my less heavily weathered original Hornby F10 vans, complete with ultra chunky moulded couplings, thick roof, disc wheels, and inappropriate livery details suited only to the LNER group standard version of the van, printed much too high up on the sides.
Close up of original solebar, with commendable (but wrong for the vehicle) NE style builders plate, illogical upside-down representation of brake reversing cams (none required anyway on this side of the chassis), and keeper strip at bottom of W iron sticking out by a mile. All of these were trimmed off or altered on my "improved" van.
My "Oscar" for the W1 conversion, received on Saturday at Doncaster. A very effective paperweight and dead certain breaker of toes if dropped too, I reckon. So highly polished that it is difficult to photograph without merely seeing all of the reflections and none of the trophy, or making the thing look falsely transparent. It's the very devil to keep free of fingerprints too, although I'm greatly flattered to have received it.
Most subjects, models and techniques covered in this thread are now listed in various categories on page1
Dec. 2018: Almost all images that disappeared from my own thread following loss of free remote hosting are now restored.
Dec. 2018: Almost all images that disappeared from my own thread following loss of free remote hosting are now restored.
Re: Loco workbench - many done,but time for a break (van or two)
Congratulations on the gong, I hope that your receiving speech was suitably tearful. It is awards season afterall.
don't forget about the Great Eastern Railway
-
Atlantic 3279
- LNER A4 4-6-2 'Streak'
- Posts: 6534
- Joined: Fri Jun 26, 2009 9:51 am
- Location: 2850, 245
Re: Loco workbench - many done,but time for a break (van or two)
Thanks Simon
Fortunately no speech was required, so I did not have to conjure up any crocodile tears!
As an alternative last night to doing a load more cutting and carving, and drilling the forty-odd new holes that will be required to upgrade two more F10 vans, I decided to have an easy preliminary "dabble" with the Hornby "almost H & B" ventilated refrigerator van. Save for the end posts, the body framing on this van should all be flush with the planking, not raised as Hornby made it. also the doors look too wide in relation to the adjoining van sides, because the latter as modelled are missing a plank which sort-of appears as part of the door posts. The frame corner straps with diagonals that adjoin the door hinges are wrongly separated from the hinges too, they appear to have been conjoined in one piece of fancy ironwork on the actual vans, perhaps a good demonstration of the blacksmith's skills. The cantrail area isn't quite right too. I believe this can all be put right without shedding too many tears along the way. My donor van has a replacement 9' whitemetal underframe that somebody else fitted, which is a better model of an underframe than Hornby offered but still nothing like the right one for the van so that will be re-worked too. The scale wheels on pin-point axles are a joke, as they appear to run directly in the whitemetal in such deep holes that the plain part of the axle actually acts as the bearing surface. They probably offer more rolling resistance than anything that Triang or Hornby ever offered as standard!
Most subjects, models and techniques covered in this thread are now listed in various categories on page1
Dec. 2018: Almost all images that disappeared from my own thread following loss of free remote hosting are now restored.
Dec. 2018: Almost all images that disappeared from my own thread following loss of free remote hosting are now restored.
-
Atlantic 3279
- LNER A4 4-6-2 'Streak'
- Posts: 6534
- Joined: Fri Jun 26, 2009 9:51 am
- Location: 2850, 245
Re: Loco workbench - many done,but time for a break (van or two)
The first challenge was to deal with the wrongly raised framing. As there is actually quite a lot of detail worth keeping on the framing, which would certainly be a chore and a challenge to renew as neatly, it occurred to me that it was easiest to look at the problem as being one of recessed planking rather than raised framing. It turns out that 15 thou plastkard provides a nice flush fill-in for the plain areas of the sides, and 20 thou works for the doors. The planking is all almost precisely 2mm, so Slater's planked plastikard appealed. As this is only available 20 thou thick it is no good for the plain sides, but 20 thou x 2mm strip from a VERY old pack of mixed microstrip does a good job of new planking for those areas, and it is easy to cut it to go around the diaginals of the corner straps. I removed the inner corner straps of course, as they are in the wrong places. The planked card does more-or-less work on the doors but the planking here ought to be a fraction wider to suit the framing, so the result isn't perfect. I may scribe some bespoke planking on plain material for the doors on the other side.
Here's two thirds plus (right part and doors) of my first side re-planked:
Here's two thirds plus (right part and doors) of my first side re-planked:
Most subjects, models and techniques covered in this thread are now listed in various categories on page1
Dec. 2018: Almost all images that disappeared from my own thread following loss of free remote hosting are now restored.
Dec. 2018: Almost all images that disappeared from my own thread following loss of free remote hosting are now restored.
-
davidwest
- GER D14 4-4-0 'Claud Hamilton'
- Posts: 337
- Joined: Tue Sep 08, 2009 12:18 pm
- Location: West Midlands
Re: Loco workbench - many done,but time for a break (van or two)
Congratulations on the award!
-
Robpulham

- LNER A4 4-6-2 'Streak'
- Posts: 1715
- Joined: Thu Mar 27, 2008 9:54 pm
- Location: Lower Wensleydale
- Contact:
Re: Loco workbench - many done,but time for a break (van or two)
Hi Graeme, the trophy looks the business. It was good to catch upon Saturday and I hope you enjoyed your lunch?
This is as far as I got with mine - I think it was the Weetabix flavour livery originally.
This is as far as I got with mine - I think it was the Weetabix flavour livery originally.
Re: Loco workbench - many done,but time for a break (van or two)
Graeme
Have you seen the pictures ridge Van in the Tatlow NER Volume ? The end louvres are raised in the pictures probably not as deep as the model but not far out. I would go for screw couplings as fitted vehicle in both types of use and a nice etched ladder would be a vast improvement
Nice work as usual
Have you seen the pictures ridge Van in the Tatlow NER Volume ? The end louvres are raised in the pictures probably not as deep as the model but not far out. I would go for screw couplings as fitted vehicle in both types of use and a nice etched ladder would be a vast improvement
Nice work as usual
Last edited by mick b on Tue Feb 15, 2011 9:33 pm, edited 1 time in total.
-
manna

- LNER A4 4-6-2 'Streak'
- Posts: 3793
- Joined: Sun May 24, 2009 12:56 am
- Location: All over Australia
Re: Loco workbench - many done,but time for a break (van or two)
G'Day Gents
Congratulations on your award, well deserved, you do some fantastic work, and with a small chain attached to your gong and around your neck we can now keep you chained to your workbench
manna
Congratulations on your award, well deserved, you do some fantastic work, and with a small chain attached to your gong and around your neck we can now keep you chained to your workbench
manna
EDGWARE GN, Steam in the Suburbs.
-
rob
- GCR D11 4-4-0 'Improved Director'
- Posts: 425
- Joined: Sat Mar 11, 2006 1:19 pm
- Location: Cork Ireland
Re: Loco workbench - many done,but time for a break (van or two)
Graeme,allow me second Mannas post,both the congratulatory aspect and the chained to the workbench element!
Wonderful,well deserved!
Wonderful,well deserved!
-
2512silverfox
Re: Loco workbench - many done,but time for a break (van or two)
May I add my congrats with everyone else. You should have got one with your P1 - now that was a labour of love!
-
Atlantic 3279
- LNER A4 4-6-2 'Streak'
- Posts: 6534
- Joined: Fri Jun 26, 2009 9:51 am
- Location: 2850, 245
Re: Loco workbench - many done,but time for a break (van or two)
Thank you all for your kind remarks. I shall look into the matter of a chain to keep me at the workbench. Shall I have to form up the links and solder them myself  . I'm glad the P1 was appreciated too, perhaps I should make myself find time to write that one up for BRM and see if I can do a Nick Dunhill double (he's a very nice bloke to talk to, by the way).
Mick is not the only one to have advocated an etched ladder for the F10 vans, which I shall look into. I'm still not absolutely certain about whether I want to leave the end louvre panels alone for simplicity and to save the last shreds of my sanity, or cast some resin copies, cut out the originals and sink the resin items into the body ends. In which version of Tatlow do you see an image suggested raised panels please Mick? New Tatlow vol 2 as far as I can see shows only flush louvre panels on the F10s, and unless I've misinterpreted the views of surprisingly similar vans in the older general Tatlow, they depict only GN and LNER standard vehicles, not the NE F10s .
.
Mick is not the only one to have advocated an etched ladder for the F10 vans, which I shall look into. I'm still not absolutely certain about whether I want to leave the end louvre panels alone for simplicity and to save the last shreds of my sanity, or cast some resin copies, cut out the originals and sink the resin items into the body ends. In which version of Tatlow do you see an image suggested raised panels please Mick? New Tatlow vol 2 as far as I can see shows only flush louvre panels on the F10s, and unless I've misinterpreted the views of surprisingly similar vans in the older general Tatlow, they depict only GN and LNER standard vehicles, not the NE F10s
Most subjects, models and techniques covered in this thread are now listed in various categories on page1
Dec. 2018: Almost all images that disappeared from my own thread following loss of free remote hosting are now restored.
Dec. 2018: Almost all images that disappeared from my own thread following loss of free remote hosting are now restored.
-
Atlantic 3279
- LNER A4 4-6-2 'Streak'
- Posts: 6534
- Joined: Fri Jun 26, 2009 9:51 am
- Location: 2850, 245
Re: Loco workbench - many done,but time for a break (van or two)
I see that Wizard-51L-MSE-Hatshorne includes this in the range, for £1.75:
Instant ladder, one x 30ft
Scale:4mm:1ft; (1:76) OO, P4 & EM Gauges
Made by:MSE [S009/4]
I suspect I may be able to get the four ladders that I would need for two F10 vans, as 30mm per ladder ought to suffice, but no image of the ladder is available in the web catalogue so I'm not sure. Can anybody familiar with the MSE range confirm that this kind of ladder has parallel sides, and roughly what the width and rung spacing might be? I will obviously try Andrew Hartshorne by e-mail too.
Most subjects, models and techniques covered in this thread are now listed in various categories on page1
Dec. 2018: Almost all images that disappeared from my own thread following loss of free remote hosting are now restored.
Dec. 2018: Almost all images that disappeared from my own thread following loss of free remote hosting are now restored.
-
jwealleans
- LNER A4 4-6-2 'Streak'
- Posts: 4217
- Joined: Wed Oct 25, 2006 8:46 am
Re: Loco workbench - many done,but time for a break (van or
You've forged ahead so quickly it's almost no longer worth posting these I took for you a couple of Mondays ago... these are the same van Craig tarted up (I hope he's not insulted by that) for use on Pilmoor. Basically a repaint and a cut down Parkside underframe.
I've got one of those ladder kits for another project as well; I'll get it out and have a look after lunch.
Edit - ladder is 4mm wide when folded and the rungs are 3mm apart.
I've got one of those ladder kits for another project as well; I'll get it out and have a look after lunch.
Edit - ladder is 4mm wide when folded and the rungs are 3mm apart.
Last edited by jwealleans on Tue Nov 06, 2018 11:33 am, edited 3 times in total.
Re: Loco workbench - many done,but time for a break (van or two)
Graeme
The old mince pies are playing up The vents are flush with body in the latest Tatlow NER wagon book. I didnt look hard enough
  the handrail in black below the right hand vent looked like a shadow when I didnt look properly last time. I presume you have this book which is excellent.
Sorry
The MSE ladder etch is good value. I solder a extra 0.33mm wire to the front edge of the sides , makes it much stronger for any use.
The old mince pies are playing up
Sorry
The MSE ladder etch is good value. I solder a extra 0.33mm wire to the front edge of the sides , makes it much stronger for any use.
-
Atlantic 3279
- LNER A4 4-6-2 'Streak'
- Posts: 6534
- Joined: Fri Jun 26, 2009 9:51 am
- Location: 2850, 245
Re: Loco workbench - many done,but time for a break (van or two)
Thanks for those images JW. They look a bit odd on a standard 10 foot u/f with Morton (?) brakes. Rather a long w/b for the wagon. Are those GN section running numbers, or just a lack of HB prefix thanks to a deficiency on the transfer sheet? Proper vents on the roof certainly look better.
I like the idea of the extra wire on the etched ladder Mick. Andrew Hartshorne is kindly checking his range for me to see if he can offer any 4mm wide ladder with correct 4mm rung spacing. If not, I shall have to compromise, leave as plastic, or make my own.
Here's how far I've gone so far with the H & B van:
I changed the planking on the doors as I wasn't happy - the "as cut" Slater's 2mm sheet planking didn't quite fill the space with a whole number of planks. I dug out the pieces I had already fitted, cleaned up the door and tried again. I had an idea that if I scribed in the plank lines more heavily on cut-to-size piece of the sheet, it might grow width-wise to a sufficient degree to fill the door. It didn't  , so I cut it down into individual planks which, after cleaning up, still had enough waste/bruised material on their edges to fill the width.
After studying photos and drawing I also trimmed off some of the original moulded hinges, scribed in a new line to split the original hinge-edge frame of the door into two narrower vertical strips, and re-created the barrel of the hinge and adjoining body strap using microstrip and rod. This has moved the hinges, and I hope the visible door edge, inboard by something like a whole plank width, as the witness on the top body rail, to top left of the door, ought to show. I hope all this is going to look okay after primer, filler if necessary, and paint. I still haven't got the barrels of the hinges in exactly the right place, nor are the legs of my new straps exactly the right lengths, but I couldn't be bothered to struggle to achieve more. The van will never be exactly right in any case, as the body isn't quite tall enough. I could have gained a little height by adding strips all around the top edge, but as the visible part of the top rail was already too thick/deep, I settled for adding only the narrow strip that appears under the edge of the roof to mask some of the unwanted depth of rail. I have also chamfered off some material under the edges of the moulded roof to make it look thinnner, and trimmed back the end overhangs a little. Ventilators will be dealt with later.
As you can see, I have also cleaned off the all-wrong boltheads and washer plates from the solebar, taken off the Morton brake gear, and the axleboxes, ready for an attempt at applying something more like the real thing, probably including Iracier axleboxes - after I have fitted proper bearing cups at a height to suit Mansell wheels! I'll have to cut out framing under the floor to take those too....
On the van ends it seemed more expedient to trim off the excessive depth of framing rather than fill in yet more recessed planking. There were few details to lose that way, and it preserved the louvres at the bottom corners, although they are not quite in the right places as I subsequently realised - they should sit above a bottom rail. I've reinstated the upper end corner straps but will have to decide whether to ignore the lower ones, or fit them only to the corner posts since there is no rail for them to hold onto
I like the idea of the extra wire on the etched ladder Mick. Andrew Hartshorne is kindly checking his range for me to see if he can offer any 4mm wide ladder with correct 4mm rung spacing. If not, I shall have to compromise, leave as plastic, or make my own.
Here's how far I've gone so far with the H & B van:
After studying photos and drawing I also trimmed off some of the original moulded hinges, scribed in a new line to split the original hinge-edge frame of the door into two narrower vertical strips, and re-created the barrel of the hinge and adjoining body strap using microstrip and rod. This has moved the hinges, and I hope the visible door edge, inboard by something like a whole plank width, as the witness on the top body rail, to top left of the door, ought to show. I hope all this is going to look okay after primer, filler if necessary, and paint. I still haven't got the barrels of the hinges in exactly the right place, nor are the legs of my new straps exactly the right lengths, but I couldn't be bothered to struggle to achieve more. The van will never be exactly right in any case, as the body isn't quite tall enough. I could have gained a little height by adding strips all around the top edge, but as the visible part of the top rail was already too thick/deep, I settled for adding only the narrow strip that appears under the edge of the roof to mask some of the unwanted depth of rail. I have also chamfered off some material under the edges of the moulded roof to make it look thinnner, and trimmed back the end overhangs a little. Ventilators will be dealt with later.
As you can see, I have also cleaned off the all-wrong boltheads and washer plates from the solebar, taken off the Morton brake gear, and the axleboxes, ready for an attempt at applying something more like the real thing, probably including Iracier axleboxes - after I have fitted proper bearing cups at a height to suit Mansell wheels! I'll have to cut out framing under the floor to take those too....
Most subjects, models and techniques covered in this thread are now listed in various categories on page1
Dec. 2018: Almost all images that disappeared from my own thread following loss of free remote hosting are now restored.
Dec. 2018: Almost all images that disappeared from my own thread following loss of free remote hosting are now restored.