.... Went up and down those stairs a fair few times Tim.
Brilliant crafting by you, Jim and Matthew.
Copenhagen Fields & TFW’s workshop
Moderators: 52D, Tom F, Rlangham, Atlantic 3279, Blink Bonny, Saint Johnstoun, richard
-
StevieG

- LNER A4 4-6-2 'Streak'
- Posts: 2335
- Joined: Sat Oct 10, 2009 9:08 pm
- Location: Near the GN main line in N.Herts.
Re: Copenhagen Fields & TFW’s workshop
BZOH
/\ \ \ //\ \
/// \ \ \ \
/\ \ \ //\ \
/// \ \ \ \
-
Tim Watson
- GER D14 4-4-0 'Claud Hamilton'
- Posts: 320
- Joined: Mon Oct 24, 2016 11:37 am
Re: Copenhagen Fields & TFW’s workshop
Any idea what the space under the arch was used for?
Tim
Tim
-
StevieG
- LNER A4 4-6-2 'Streak'
- Posts: 2335
- Joined: Sat Oct 10, 2009 9:08 pm
- Location: Near the GN main line in N.Herts.
Re: Copenhagen Fields & TFW’s workshop
No, not at all I'm afraid : I was only an occasional visitor.Tim Watson wrote: ↑Sun Aug 01, 2021 5:16 pm Any idea what the space under the arch was used for?
Tim
Never saw anyone in or around it. Platelayers' store room possibly ?
BZOH
/\ \ \ //\ \
/// \ \ \ \
/\ \ \ //\ \
/// \ \ \ \
-
Tim Watson
- GER D14 4-4-0 'Claud Hamilton'
- Posts: 320
- Joined: Mon Oct 24, 2016 11:37 am
Re: Copenhagen Fields & TFW’s workshop
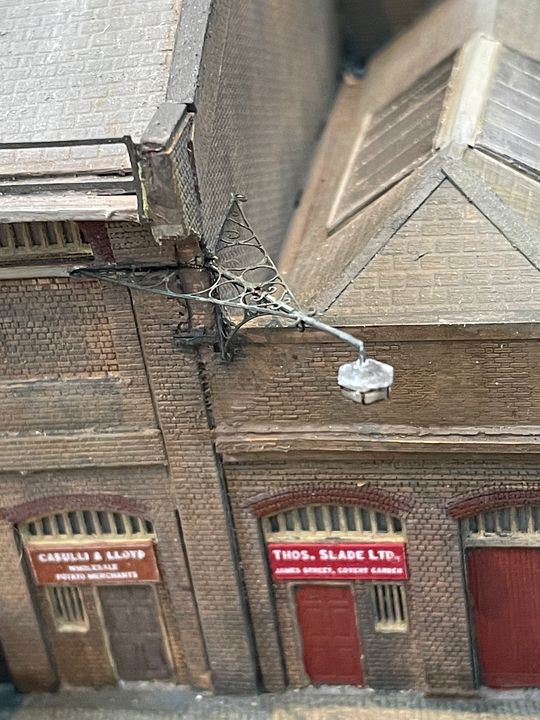
This light really should be on the Midland Office building that Tom Knapp is making in Hawaii, but it wouldn’t last five minutes in that location. The fantastic etches were from Jim Watt.
Tim
-
Tim Watson
- GER D14 4-4-0 'Claud Hamilton'
- Posts: 320
- Joined: Mon Oct 24, 2016 11:37 am
Re: Copenhagen Fields & TFW’s workshop
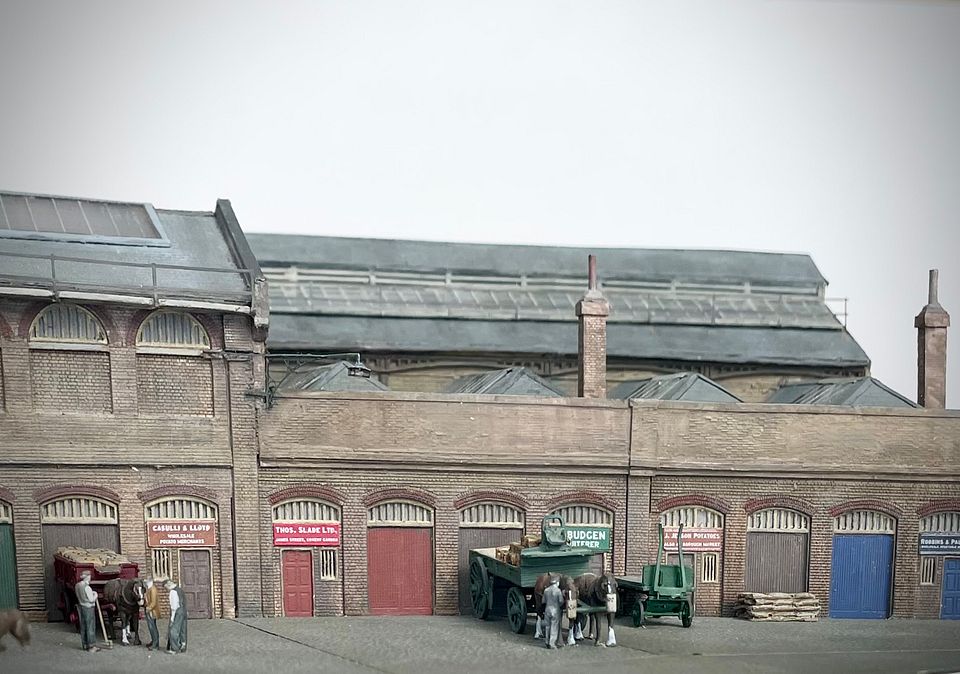
Another of Jim’s etches is now in place. The original 1851 GNR terminal at Maiden Lane was incorporated into the eastern goods sheds in KX Yard, once the 1852 Cubitt station at KX opened. The iron work can just be seen below the eaves of the shed, with the sides filled in by brickwork. The fancy lamp is also visible on the corner of the building: nice and subtle.
A close up, not the most exciting photo, shows how Jim has made a really good representation of the cast iron spandrels, some of which still exist at KX.
These probably wouldn’t have been particularly visible where we have modelled them, but it does show a bit more history in the overall scene, albeit our interpretation rather than strictly accurate. The canopy on the end will be the next construction for the sheds.
Tim
-
Tim Watson
- GER D14 4-4-0 'Claud Hamilton'
- Posts: 320
- Joined: Mon Oct 24, 2016 11:37 am
Re: Copenhagen Fields & TFW’s workshop
A random question, would a ballast brake have been painted blue in the LNER period?
Tim
Tim
Re: Copenhagen Fields & TFW’s workshop
Some say Oxford Dark Blue, others Cambridge Pale Blue. Personally I went for Dark Blue , it maybe faded in due course.
-
Atlantic 3279

- LNER A4 4-6-2 'Streak'
- Posts: 6547
- Joined: Fri Jun 26, 2009 9:51 am
- Location: 2850, 245
Re: Copenhagen Fields & TFW’s workshop
As now shown in another place too, I went for Oxford blue. There's probably some discussion of the matter in the pages covering the construction of my van, i.e. https://www.lner.info/forums/viewtopic. ... start=5205 plus or minus one page.
Most subjects, models and techniques covered in this thread are now listed in various categories on page1
Dec. 2018: Almost all images that disappeared from my own thread following loss of free remote hosting are now restored.
Dec. 2018: Almost all images that disappeared from my own thread following loss of free remote hosting are now restored.
-
Tim Watson
- GER D14 4-4-0 'Claud Hamilton'
- Posts: 320
- Joined: Mon Oct 24, 2016 11:37 am
Re: Copenhagen Fields & TFW’s workshop
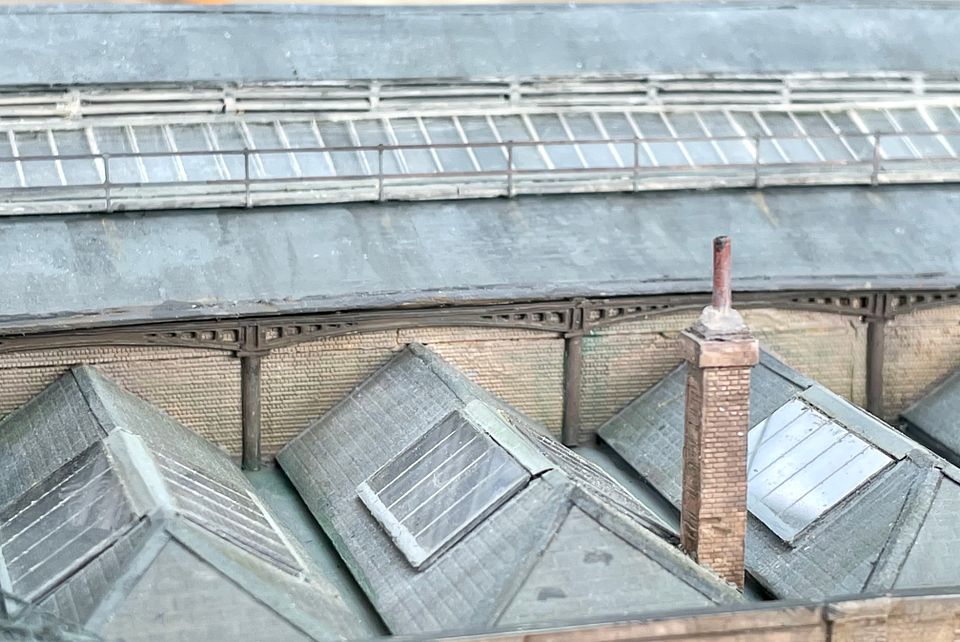
Jim Watt’s canopy has now gone together. The etches assembled very easily (Jim had already done the hard work on the beams). The structure was quite rigid, but desperately fragile at this stage.
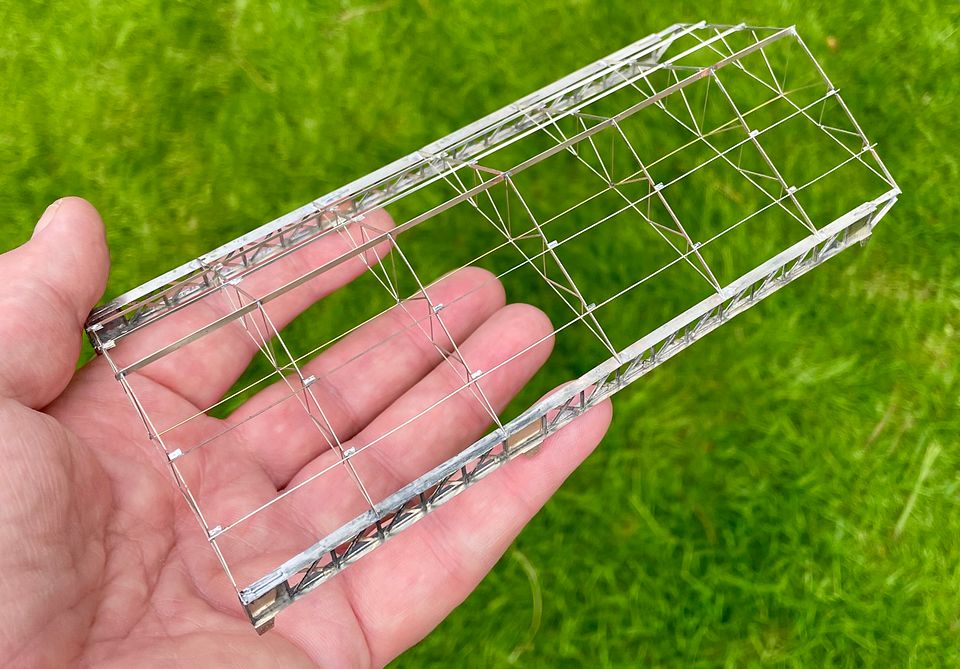
The ends were made from Evergreen planked styrene and black styrene pads for the roof eaves added, which also serve as gutters. Getting a bit more protected now, with the ends in place.

The glazing was guillotined to the exact tight fit between the ends and scribed for the glazing bars. The whole assembly has now become quite strong. Roof slates were also attached, using Slaters sheet; heavily sanded, of course.
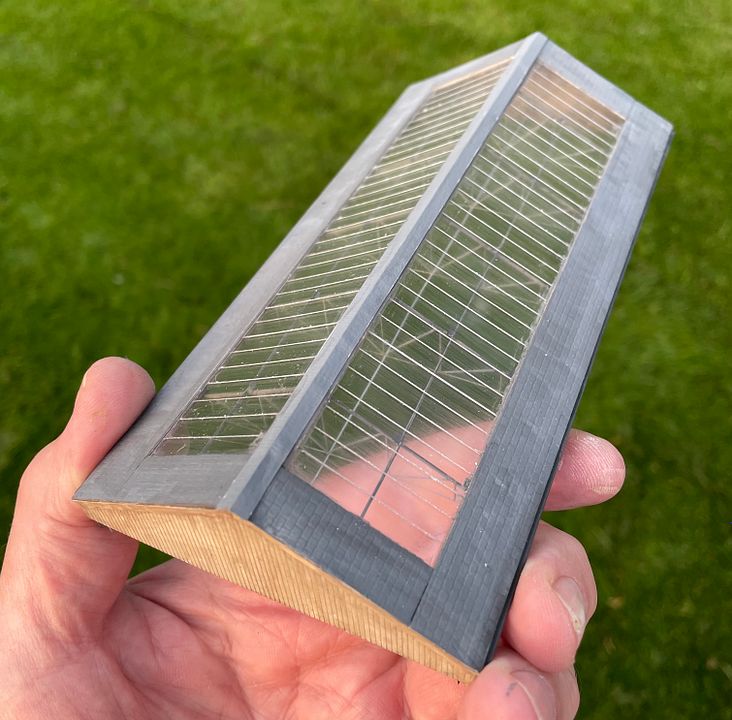
This view will be difficult to get on the layout, but shows the finesse of Jim’s etches. The canopy valance was from a Scalelink etch: the last time I used this was on Luton Hoo station 40 years ago!
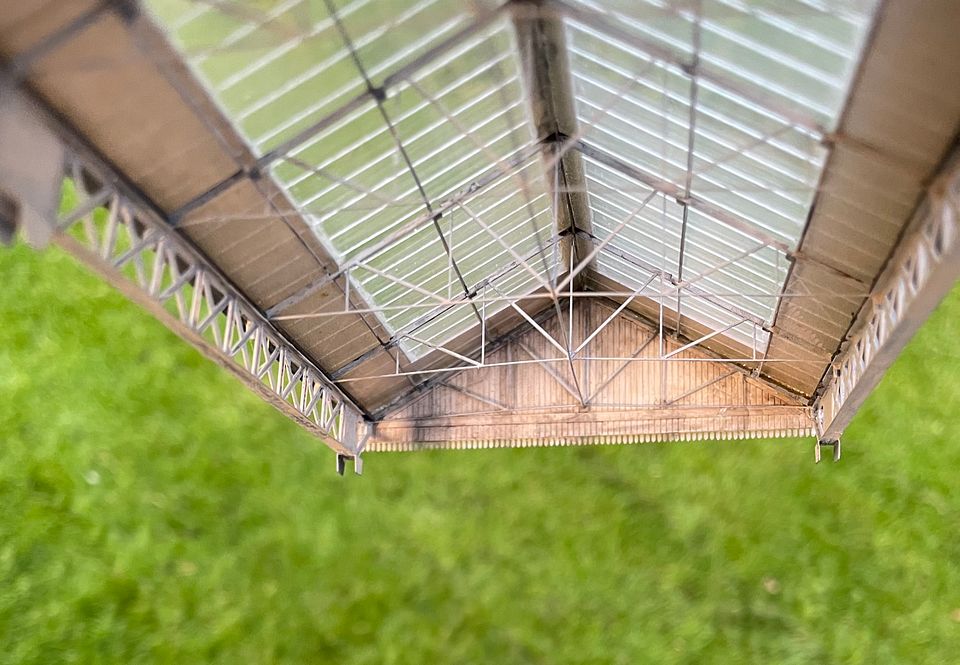
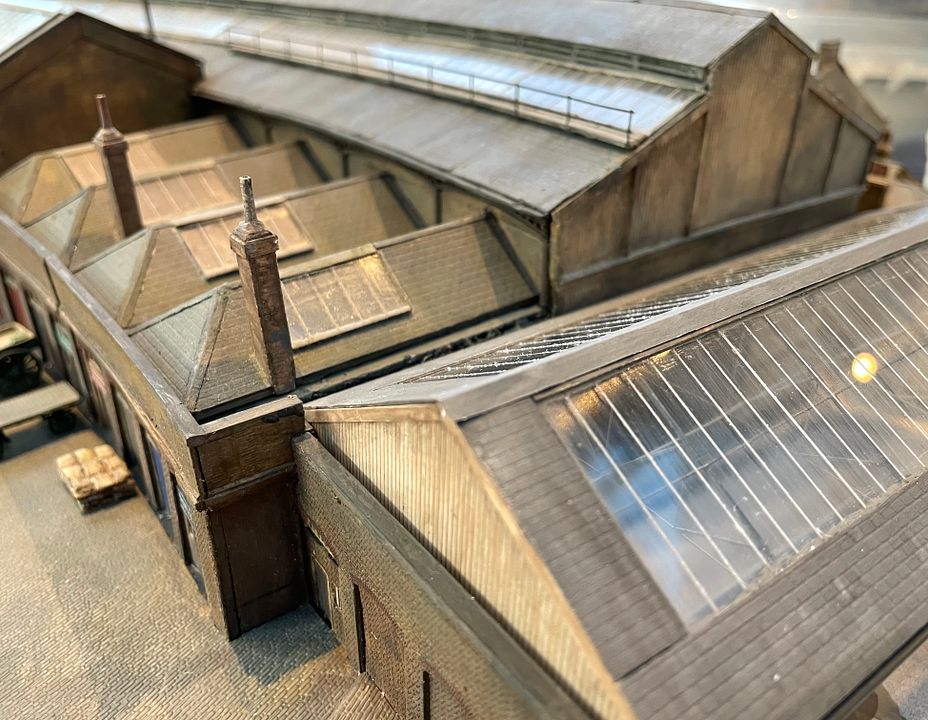
Just a rough snap showing the positioning of the canopy across the main shed end. It will need fettling in to the main structure with suitable flashing and the I beam legs making to support it. I will try this new building out on the whole board tomorrow.
To say I am pleased with it is an understatement; thank you Jim.
Tim
The ends were made from Evergreen planked styrene and black styrene pads for the roof eaves added, which also serve as gutters. Getting a bit more protected now, with the ends in place.
The glazing was guillotined to the exact tight fit between the ends and scribed for the glazing bars. The whole assembly has now become quite strong. Roof slates were also attached, using Slaters sheet; heavily sanded, of course.
This view will be difficult to get on the layout, but shows the finesse of Jim’s etches. The canopy valance was from a Scalelink etch: the last time I used this was on Luton Hoo station 40 years ago!
Just a rough snap showing the positioning of the canopy across the main shed end. It will need fettling in to the main structure with suitable flashing and the I beam legs making to support it. I will try this new building out on the whole board tomorrow.
To say I am pleased with it is an understatement; thank you Jim.
Tim
-
jwealleans
- LNER A4 4-6-2 'Streak'
- Posts: 4229
- Joined: Wed Oct 25, 2006 8:46 am
Re: Copenhagen Fields & TFW’s workshop
Words have consistently failed me over the last few pages and show no sign of stopping.
-
john coffin
- LNER V2 2-6-2 'Green Arrow'
- Posts: 1094
- Joined: Mon Sep 19, 2011 12:24 am
Re: Copenhagen Fields & TFW’s workshop
Like Jonathan, I am at a loss to describe the quality of your work.
It is still difficult to really gauge it because even in your hand, it looks quite big.
Considering the size of the roof etches it is amazing how much strength you have
managed to achieve.
Now I must finish my project, and we should talk.
Paul
It is still difficult to really gauge it because even in your hand, it looks quite big.
Considering the size of the roof etches it is amazing how much strength you have
managed to achieve.
Now I must finish my project, and we should talk.
Paul
-
manna

- LNER A4 4-6-2 'Streak'
- Posts: 3797
- Joined: Sun May 24, 2009 12:56 am
- Location: All over Australia
Re: Copenhagen Fields & TFW’s workshop
G'Day Gents
I was impressed with Luton Hoo 40 years ago, as part of the 'Chiltern Green' layout, but this, WOW !
manna
I was impressed with Luton Hoo 40 years ago, as part of the 'Chiltern Green' layout, but this, WOW !
manna
EDGWARE GN, Steam in the Suburbs.
-
Tim Watson
- GER D14 4-4-0 'Claud Hamilton'
- Posts: 320
- Joined: Mon Oct 24, 2016 11:37 am
Re: Copenhagen Fields & TFW’s workshop
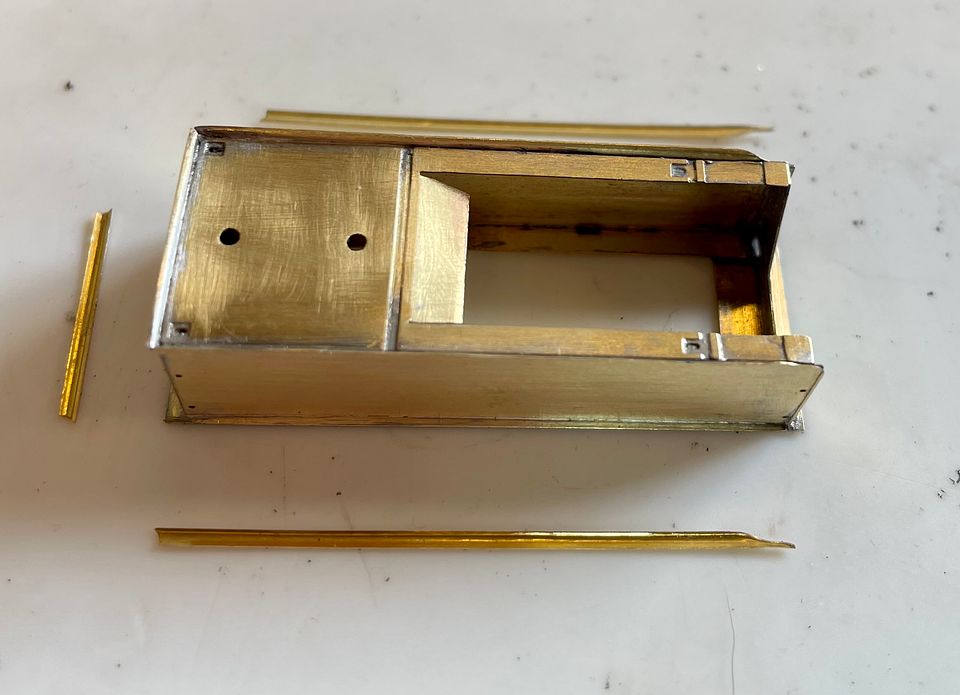
The next loco from the Darlington works in St Albans will be a Skittle Alley, AKA a Raven NER 4-6-2 No. 2400.

It will make a striking and exactly contemporaneous partner to Valour on CF. (Just needs someone to make a NER Dynamometer Car).
A holiday start was made on the tender, reduced from the original Steve Barnsfield artwork for Mick Simpson: many thanks to Mick and Chris Higgs for letting me have some etches.
The fit of the parts is excellent and so the body work made good progress. The tank and bunker are made as two layers (I did re-do the sides as the first attempt wasn’t dead flat): the inner top flare section is half etched. This was swaged around a 1mm diameter rod held on top of the vice for the inner layer. The three smaller half-etched outer flares needed another method, however.
Rob Pulham has made one of these in 7mm scale, so I copied his excellent technique for forming the flares. This involved a 1mm diameter steel rod and some hard(ish) rubber sheet.
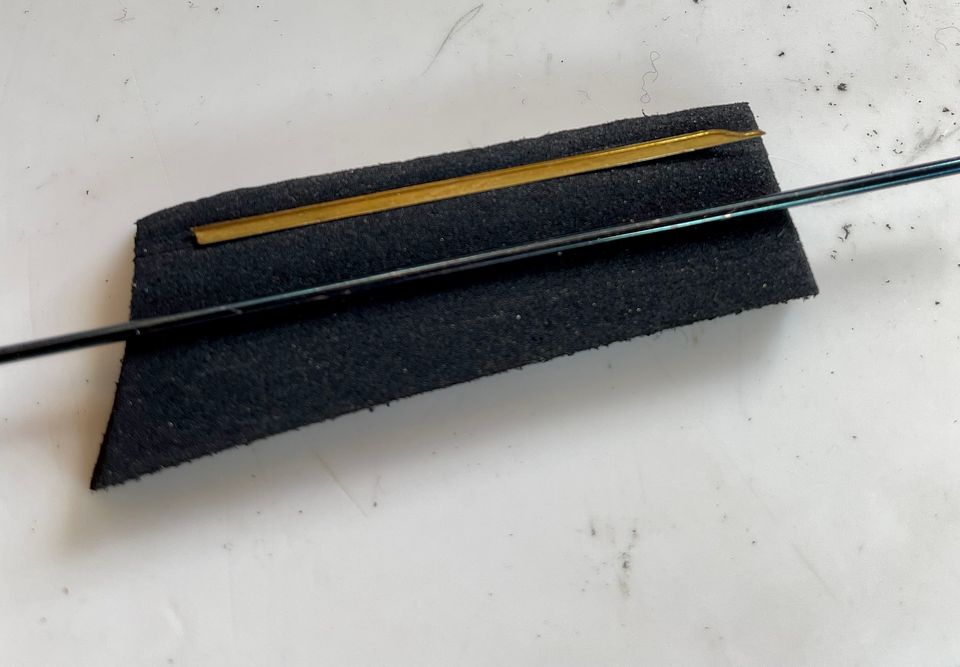
The rod and narrow flare component were carefully aligned in a vice and then squeezed hard.
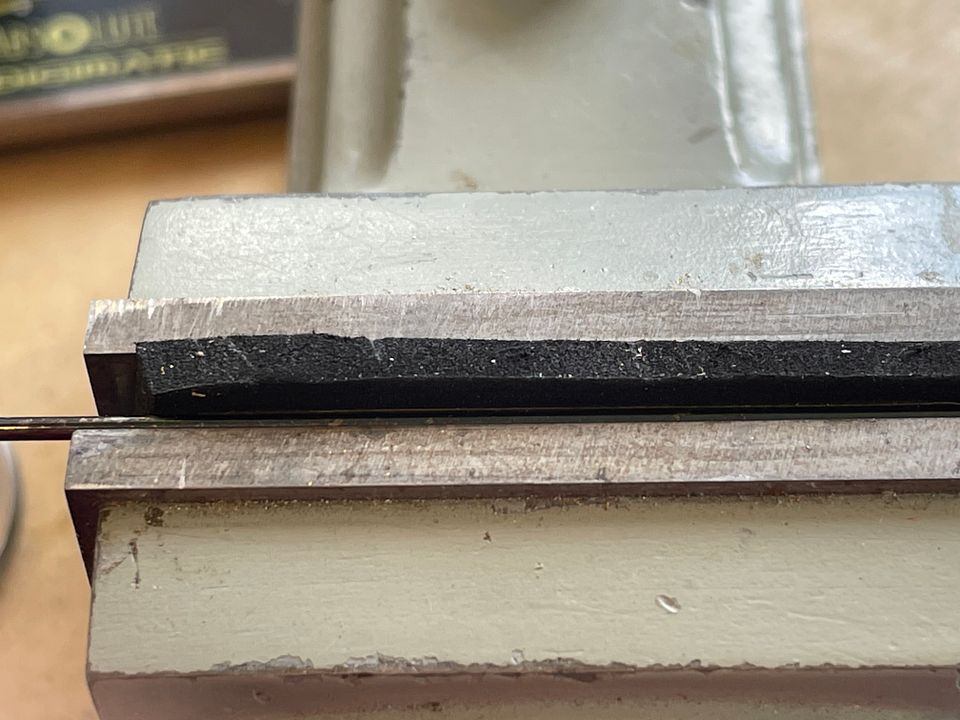
This translates the curvature of the rod into the brass strip to make the flare, as can be seen in the photo with them as separate components.
It was straightforward to solder these to the tender sides.
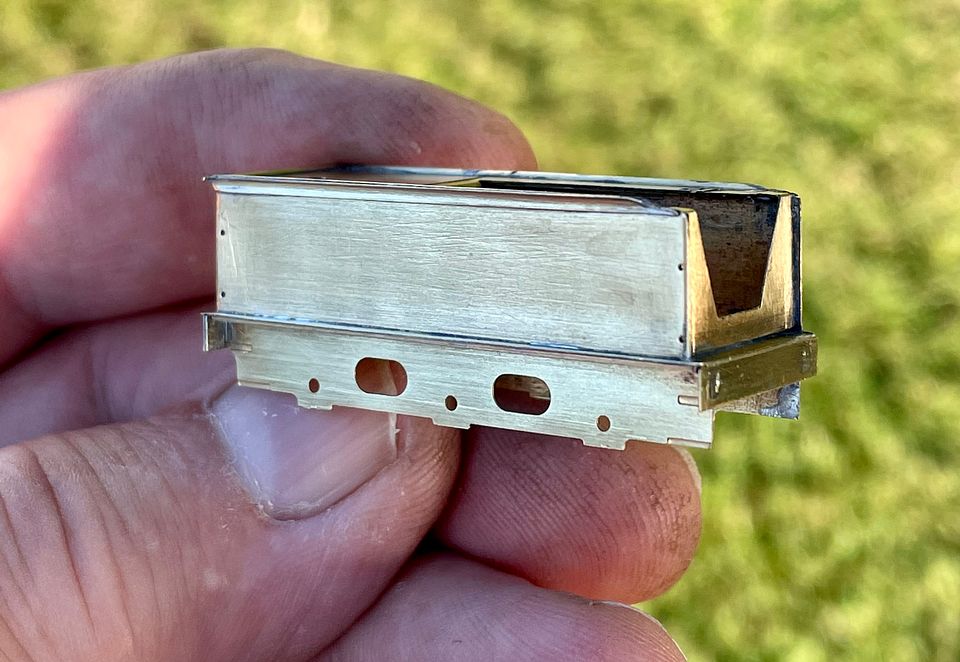
The underframe sides and ends complete the work so far. The kit produces some nicely understated flares: it’s easy to make them too large in 2mm scale. Having said that, Bob Jones is making some full height coal side plates, as the kit design is too low.
Work on the engine should continue at Missenden Abbey very shortly…
Tim
It will make a striking and exactly contemporaneous partner to Valour on CF. (Just needs someone to make a NER Dynamometer Car).
A holiday start was made on the tender, reduced from the original Steve Barnsfield artwork for Mick Simpson: many thanks to Mick and Chris Higgs for letting me have some etches.
The fit of the parts is excellent and so the body work made good progress. The tank and bunker are made as two layers (I did re-do the sides as the first attempt wasn’t dead flat): the inner top flare section is half etched. This was swaged around a 1mm diameter rod held on top of the vice for the inner layer. The three smaller half-etched outer flares needed another method, however.
Rob Pulham has made one of these in 7mm scale, so I copied his excellent technique for forming the flares. This involved a 1mm diameter steel rod and some hard(ish) rubber sheet.
The rod and narrow flare component were carefully aligned in a vice and then squeezed hard.
This translates the curvature of the rod into the brass strip to make the flare, as can be seen in the photo with them as separate components.
It was straightforward to solder these to the tender sides.
The underframe sides and ends complete the work so far. The kit produces some nicely understated flares: it’s easy to make them too large in 2mm scale. Having said that, Bob Jones is making some full height coal side plates, as the kit design is too low.
Work on the engine should continue at Missenden Abbey very shortly…
Tim
-
Tim Watson
- GER D14 4-4-0 'Claud Hamilton'
- Posts: 320
- Joined: Mon Oct 24, 2016 11:37 am
Re: Copenhagen Fields & TFW’s workshop
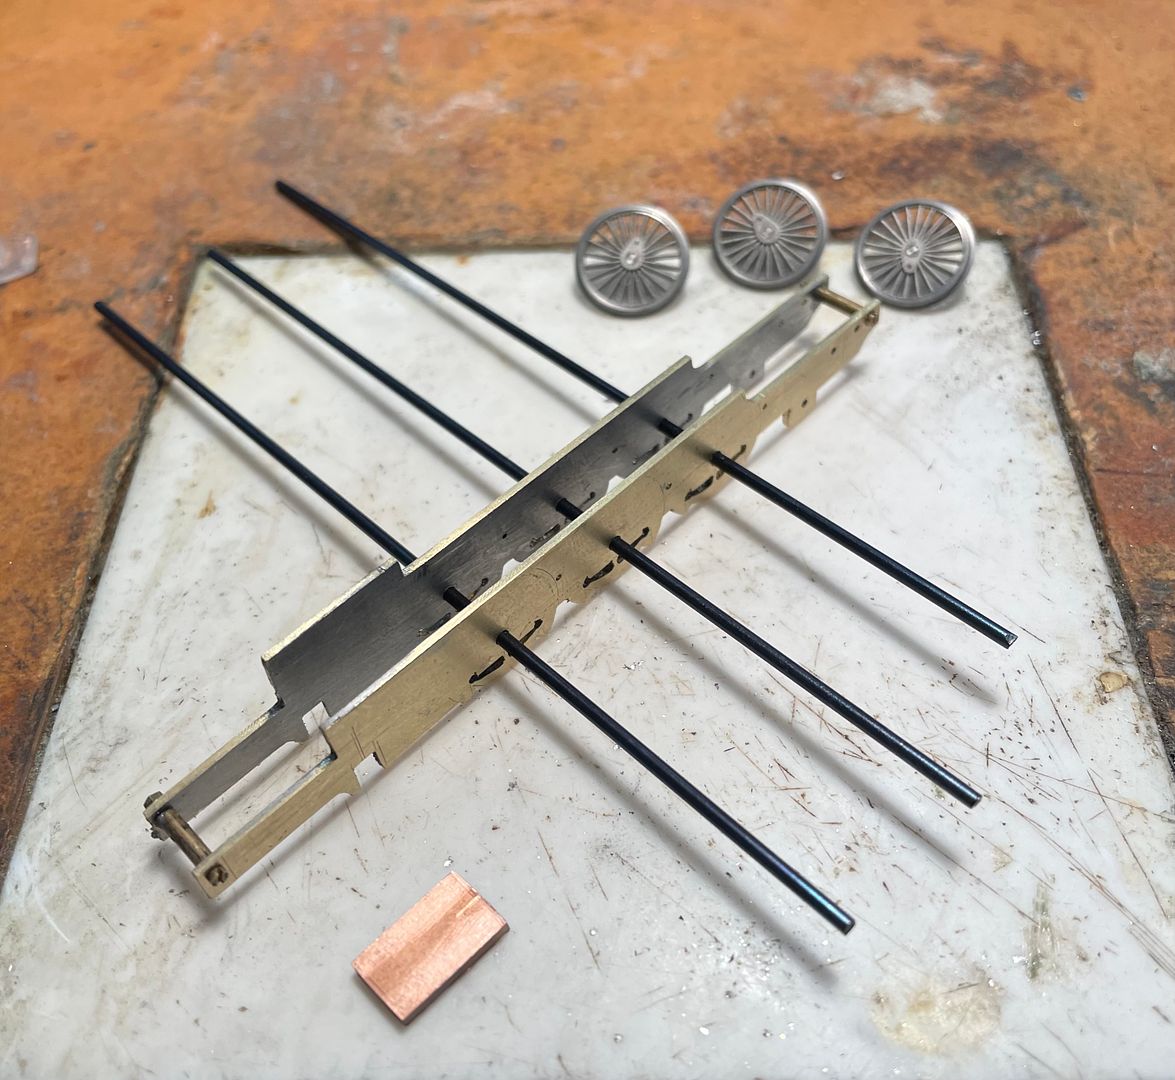
After a busy day at Missenden, the frames are now cut out.
[URL=htps://app.photobucket.com/u/strq0672/p/382aed89-d0ec-4327-b47b-582998f695d7]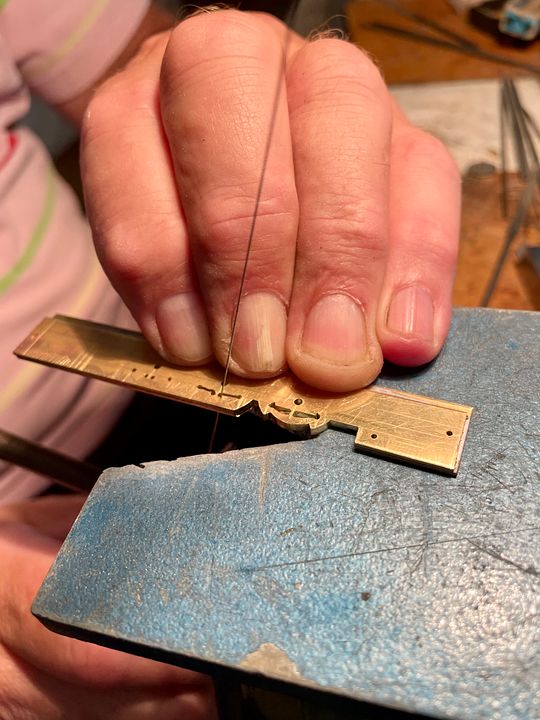 [/URL]
They will probably be erected tomorrow.
[URL=htps://app.photobucket.com/u/strq0672/p/50d009b0-d6d7-44ce-99c8-ba7a64f9dcfb]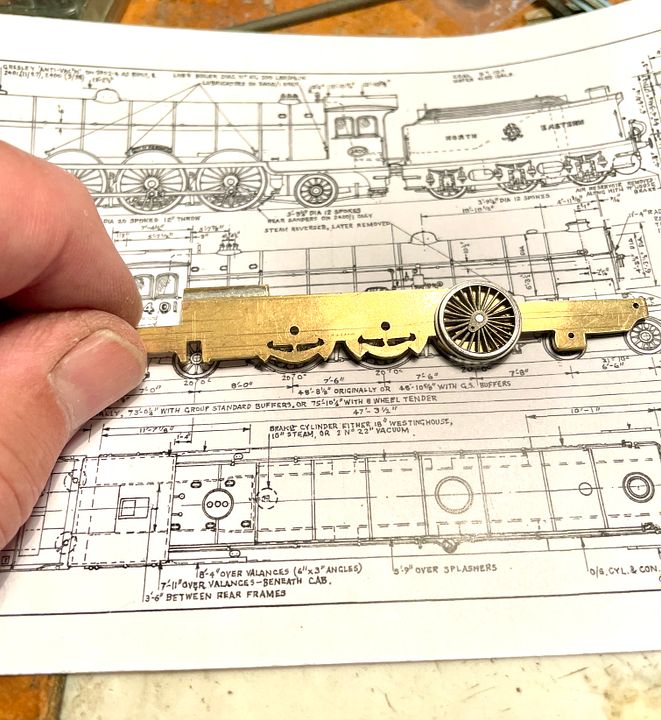 [/URL]
Hopefully get the coupling rods underway as well.
Tim
[URL=htps://app.photobucket.com/u/strq0672/p/382aed89-d0ec-4327-b47b-582998f695d7]
[/URL]They will probably be erected tomorrow.
[URL=htps://app.photobucket.com/u/strq0672/p/50d009b0-d6d7-44ce-99c8-ba7a64f9dcfb]
[/URL]Hopefully get the coupling rods underway as well.
Tim
-
Tim Watson
- GER D14 4-4-0 'Claud Hamilton'
- Posts: 320
- Joined: Mon Oct 24, 2016 11:37 am
Re: Copenhagen Fields & TFW’s workshop
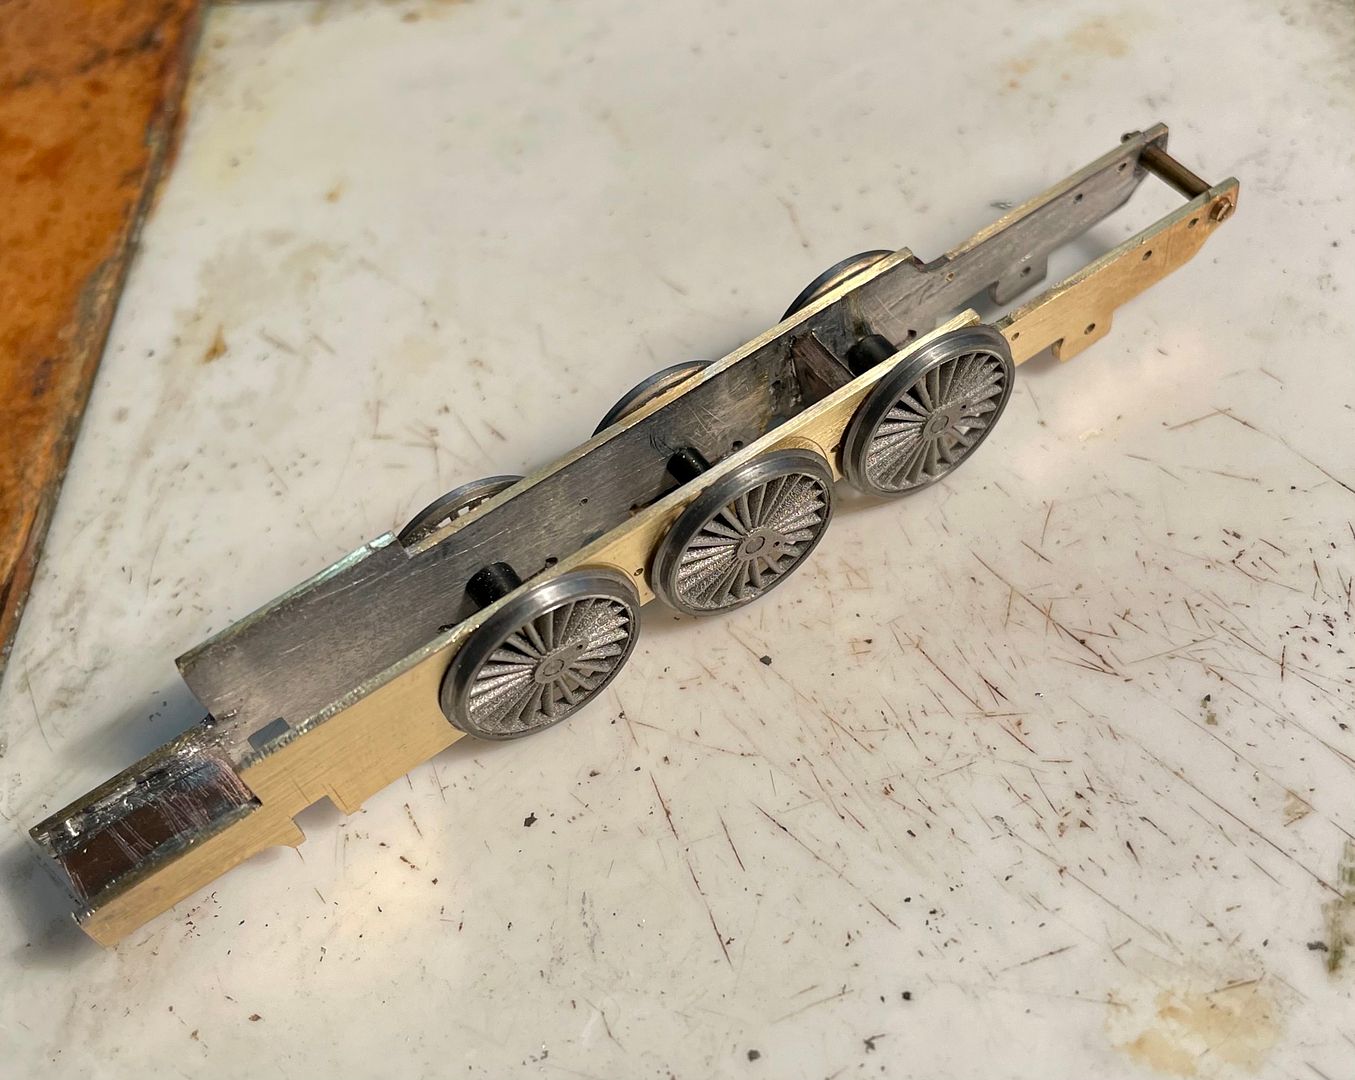
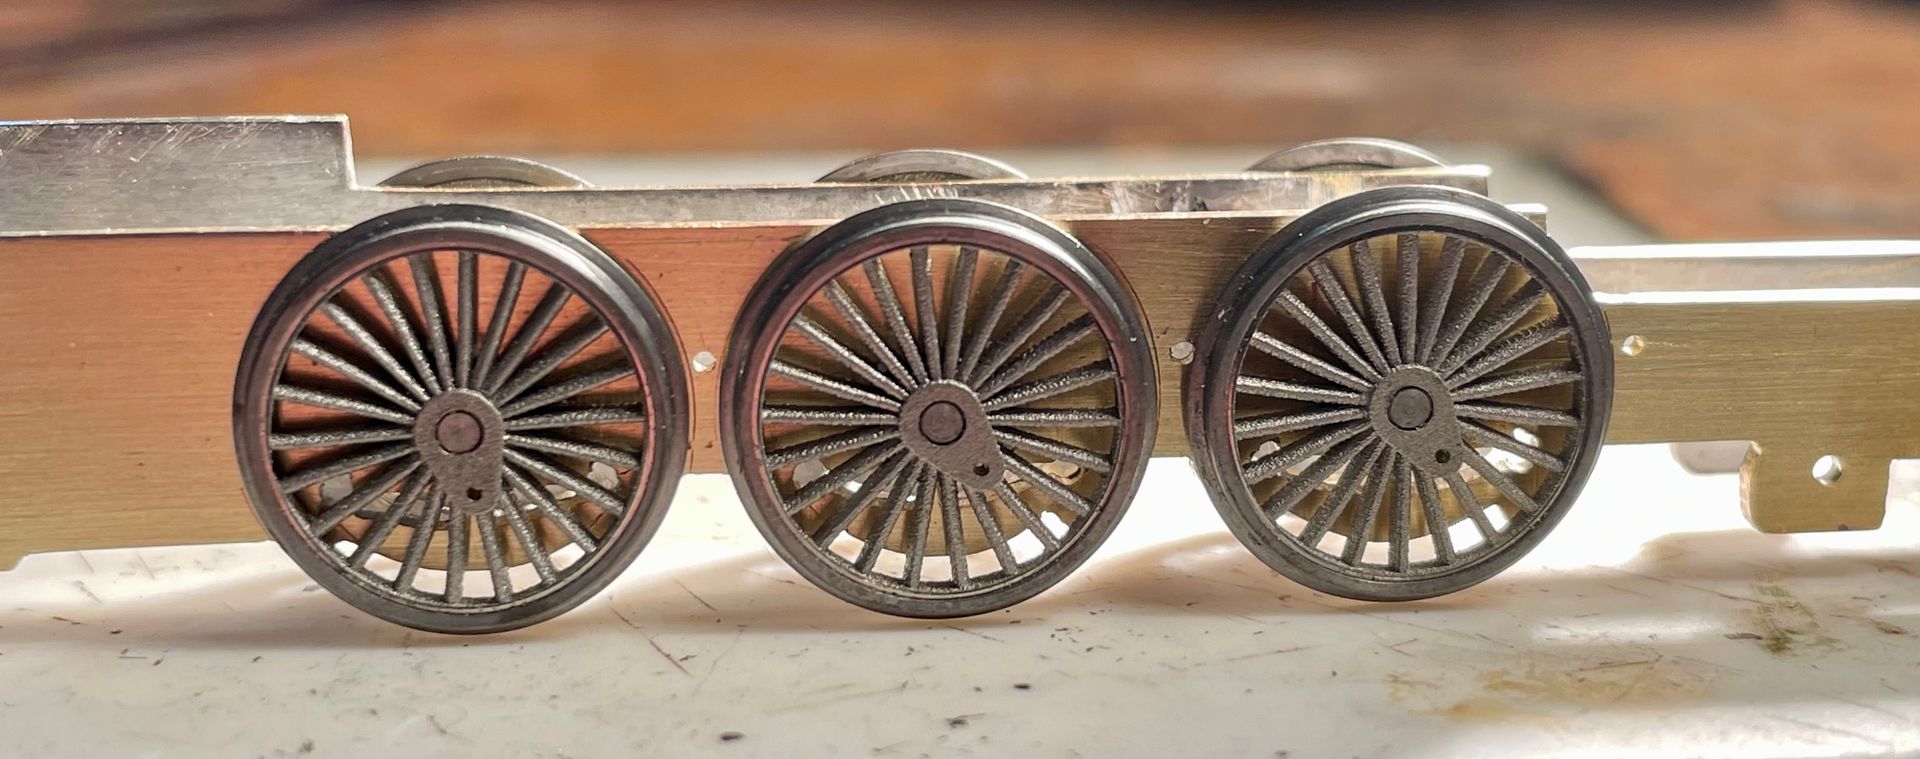
After a day fiddling at Missenden I got the frames erected.
https://hosting.photobucket.com/images/ ... C5DC7.jpeg
The two bits of brass tube with 14BA bolts through them acting as spacers are used to set up the frames: they have been used for the last 40 years on all my 2mm scale locos. The long rods are to check out the alignment through the axle holes.
https://hosting.photobucket.com/images/ ... B7161.jpeg
The definitive spacers are double sided PCB soldered into place.
https://hosting.photobucket.com/images/ ... 63B63.jpeg
The springs and hangers are just about visible behind the wheels. A start has been made setting up some thick steel for the coupling rods: I like chunky valve gear, but I now need some new TC drills.
Tim